Best Water Temps? + Do It Yourself Water Chiller Details!
- Thread starter Serpentz
- Start date
Serpentz
Well-Known Member
Alright, right now I got my temp controller set at 20c. For water temp, that feels quite cold to me. I'm not quite sure how my DIY chiller will work out, but so far, so good.Canna recommends 18/22c for mixing a+b, I'm using pots idk if that's applies to dwc/nft, I found the clip on you tube.
Attachments
-
 1.3 MB Views: 85
ZenWolf
Well-Known Member
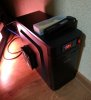
Details on the DIY chiller please. Basically just an air cooled radiator? That looks awesome using the computer case btw.Alright, right now I got my temp controller set at 20c. For water temp, that feels quite cold to me. I'm not quite sure how my DIY chiller will work out, but so far, so good.
Serpentz
Well-Known Member
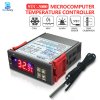
Alright. The first thing you need to buy are all the parts. They are all dirt cheap, so that's a plus. You need a temperature controller, you can find them on Ebay, just type in STC 3000. I was also able to buy this locally, so your hardware store probably has them. Also, make sure it's a DC 12 volt powered controller, not AC for home use. The controller will come with a wired thermistor to gauge temperature:

The next parts are a TEC1-12709 Thermoelectric Peltier module 12 volts, 90 watt + you need a CPU water block. You also need a 250 watt - 30 amp DC power supply. I went with 30 amps to be safe, but probably pulling 15 to 20 amps max. I will test it and tell for sure. I went online and found the smallest and cheapest computer case that will work and paid like $17 for it. You're going to need some wire, I bought some red and black speaker wire (about 15-feet) and that worked fine. I bought about 8 feet of tubing for the water block. It's supposed to be some food safe stuff for carbonated drink machines. Wanted to be safe and not put anything I don't know about in my hydro. You'll also need a big CPU heat sink + thermal paste for the HOT side of the Thermoelectric Peltier module. The bigger the heat sink, the better.
Before I get ahead of myself, and in case you're not sure... a thermoelectric peltier module produces a cold side and a hot side as electricity runs through it. They are used in things like mini-fridges etc. They are really cheap...like $5 or $10
After you have everything, the challenge is putting it all together. Having a Dremel tool is good in case you need to modify anything, like cutting the hole in the CD-ROM plastic blank for the controller. Couldn't live without mine.
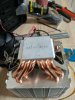
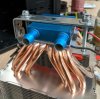
First put the thermoelectric cooler and water block on the big heat sink using thermal paste. I had to figure out a way to clamp them down, so I just used some metal L braces for shelves that I had lying around, and used some machine screws/nuts and washers to clamp it together. On peltier modules, the cold side of the module is the one with the model number printed on it. The other side is the HOT side and you want it facing DOWN towards your big heat sink.
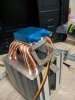
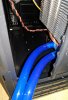
One thing you got to do is make sure that your two outlets on the water block are facing in the right direction on the water block so your hoses can come out the back of the case before you clamp it down!
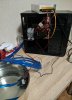
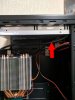
The next thing I did was mount the thermostat controller in the front of the PC case using my Dremel, and a power switch going to the power supply so I can turn it off and on. Simple. Also, I wired everything up at this point. I decided I will mount the power supply upside down in the top of the PC case in the event of any water leaks or related mishaps. So here, you can see the power supply sitting on the top. Also, I used these wire blocks so that if I need to replace anything, or modify something, I can easily just disconnect the wires from my peltier/heatsink unit and pull it out. By the way, you'll notice in these photos a different heatsink setup...ignore that as it didn't work. There was just not enough heatsink to do the job.
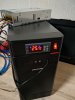
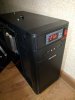
Once I had all the wiring done and I tested it, then I slapped it together, mounted the power supply in the top upside down with its fan facing OUT (important ), and there was a place on the case on the outside for a fan. The fan would not fit inside the case next to the heatsink, so I mounted it on the outside.
I'm not sure the exact cost, but I know its under $100 and aquarium chillers here are like $300-400 bucks. So I decided I will build my own. If anyone wants some guidance or needs help building one, I can give advice. I also know a way to put three peltiers together on a longer CPU block for three times the chilling power for anything bigger than 20 liters. If I missed something here, let me know.
The next parts are a TEC1-12709 Thermoelectric Peltier module 12 volts, 90 watt + you need a CPU water block. You also need a 250 watt - 30 amp DC power supply. I went with 30 amps to be safe, but probably pulling 15 to 20 amps max. I will test it and tell for sure. I went online and found the smallest and cheapest computer case that will work and paid like $17 for it. You're going to need some wire, I bought some red and black speaker wire (about 15-feet) and that worked fine. I bought about 8 feet of tubing for the water block. It's supposed to be some food safe stuff for carbonated drink machines. Wanted to be safe and not put anything I don't know about in my hydro. You'll also need a big CPU heat sink + thermal paste for the HOT side of the Thermoelectric Peltier module. The bigger the heat sink, the better.
Before I get ahead of myself, and in case you're not sure... a thermoelectric peltier module produces a cold side and a hot side as electricity runs through it. They are used in things like mini-fridges etc. They are really cheap...like $5 or $10
After you have everything, the challenge is putting it all together. Having a Dremel tool is good in case you need to modify anything, like cutting the hole in the CD-ROM plastic blank for the controller. Couldn't live without mine.
First put the thermoelectric cooler and water block on the big heat sink using thermal paste. I had to figure out a way to clamp them down, so I just used some metal L braces for shelves that I had lying around, and used some machine screws/nuts and washers to clamp it together. On peltier modules, the cold side of the module is the one with the model number printed on it. The other side is the HOT side and you want it facing DOWN towards your big heat sink.
One thing you got to do is make sure that your two outlets on the water block are facing in the right direction on the water block so your hoses can come out the back of the case before you clamp it down!
The next thing I did was mount the thermostat controller in the front of the PC case using my Dremel, and a power switch going to the power supply so I can turn it off and on. Simple. Also, I wired everything up at this point. I decided I will mount the power supply upside down in the top of the PC case in the event of any water leaks or related mishaps. So here, you can see the power supply sitting on the top. Also, I used these wire blocks so that if I need to replace anything, or modify something, I can easily just disconnect the wires from my peltier/heatsink unit and pull it out. By the way, you'll notice in these photos a different heatsink setup...ignore that as it didn't work. There was just not enough heatsink to do the job.
Once I had all the wiring done and I tested it, then I slapped it together, mounted the power supply in the top upside down with its fan facing OUT (important
I'm not sure the exact cost, but I know its under $100 and aquarium chillers here are like $300-400 bucks. So I decided I will build my own. If anyone wants some guidance or needs help building one, I can give advice. I also know a way to put three peltiers together on a longer CPU block for three times the chilling power for anything bigger than 20 liters. If I missed something here, let me know.
Serpentz
Well-Known Member
Right on, thanks for the reply!64-66 stay below 68, above 62. That’s where I settled.
ZenWolf
Well-Known Member
Thanks for the mini-tutorial Serpentz. After I saw the computer case and you said chiller, I looked over at my PC and the water cooling system in it and the cogs started turning. A lot of parts for computers and cases (including a case itself) seems perfect for a DIY water chiller system. Surprised this is not something I've ever thought about doing since I also build some computers on occasion. I'll have to research how to integrate a peltier module into the picture more than anything.
That's brilliant - thanks again.
That's brilliant - thanks again.
Serpentz
Well-Known Member
Let me know if I can help you. I went through all the trial and error stuff so nobody else has toThanks for the mini-tutorial Serpentz. After I saw the computer case and you said chiller, I looked over at my PC and the water cooling system in it and the cogs started turning. A lot of parts for computers and cases (including a case itself) seems perfect for a DIY water chiller system. Surprised this is not something I've ever thought about doing since I also build some computers on occasion. I'll have to research how to integrate a peltier module into the picture more than anything.
That's brilliant - thanks again.
Beehive
Well-Known Member
I used an Thermoelectric Aquarium Chiller. I always used an ice chest for the res. Hole saw the outer cover. Cut the foam and the liner is a hair over 1/16" thick. Mount the chiller probe in the side. All the hoses through the lid.
All kinds of spray and or drip modes of deliverance.
No internal pumps. External only. They generate too much heat.
All kinds of spray and or drip modes of deliverance.
No internal pumps. External only. They generate too much heat.
Serpentz
Well-Known Member
Yeah, I made my hoses and wires long enough to run it outside of the tent. That's a good idea to use an ice chest. Water will stay cooler longer. Now I'm interested in trying this out.I used an Thermoelectric Aquarium Chiller. I always used an ice chest for the res. Hole saw the outer cover. Cut the foam and the liner is a hair over 1/16" thick. Mount the chiller probe in the side. All the hoses through the lid.
All kinds of spray and or drip modes of deliverance.
No internal pumps. External only. They generate too much heat.
Offmymeds
Well-Known Member
Ditto but my rez in/out are on the bottom. I think I paid $120. Broke it once by dumping water colder than the probe onto it. I heard the peltier chip pop. Replaced the chip myself for a few bucks.I used an Thermoelectric Aquarium Chiller. I always used an ice chest for the res. Hole saw the outer cover. Cut the foam and the liner is a hair over 1/16" thick. Mount the chiller probe in the side. All the hoses through the lid.
All kinds of spray and or drip modes of deliverance.
No internal pumps. External only. They generate too much heat.
Serpentz
Well-Known Member
Thanks for the replyI think I have all those parts except the computer case. I ran a failed experiment. Failed bc of the pump heat. Glad to see someone smarter make it happen.
That is pretty slick looking too.
Congrats.
Right now the system comes on for maybe 5 -10 minutes and shuts down, and maybe it comes on every hour. I got the difference set to 0.5c before it will kick back on. The room/tent temperature is 23c (73f) so that helps a bit I am sure.
I am also working on a plan for a system that uses 3 peltier coolers at the same time for faster and more efficient cooling + someone here might have more than one hydro bucket or reservoir.
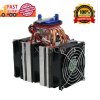
Also, if you want to skip all the peltier to heatsink/water block fabrication, check Ebay out for this one:
 Click here to see the listing on Ebay
I watched this thing make ice on the water block on a Youtube review!
Good luck!
Offmymeds
Well-Known Member
That is cool. I remember clamping the block & peltier properly was a real pain for me. I bet that is worth the money.Thanks for the replyAs for the water pump, there is one main important thing to consider when buying one. The slower the water runs through the cooling water block, the more time the water has to cool. Also, the pump I got is so quiet I can't hear it at all. It's a brushless pump, and likely creates very little heat if any at all. It's just a tiny little thing that fits in the palm of your hand. Just search: Mini Water Pump QR30E Quiet DC 12V 4.2W 240L/H Flow Rate Waterproof Brushless Submersible Pump. This was the lowest flow rate one I could find and its working terrific. It's not spraying water, more like a water hose with water trickling out. Oh, and I rigged a tiny stainless steel screen over the inlet so it doesn't suck up any roots
Right now the system comes on for maybe 5 -10 minutes and shuts down, and maybe it comes on every hour. I got the difference set to 0.5c before it will kick back on. The room/tent temperature is 23c (73f) so that helps a bit I am sure.
I am also working on a plan for a system that uses 3 peltier coolers at the same time for faster and more efficient cooling + someone here might have more than one hydro bucket or reservoir.
Also, if you want to skip all the peltier to heatsink/water block fabrication, check Ebay out for this one:
View attachment 4846492 Click here to see the listing on Ebay
I watched this thing make ice on the water block on a Youtube review!
Good luck!
MidnightSun72
Well-Known Member
Very clever man. Thanks for posting.Alright. The first thing you need to buy are all the parts. They are all dirt cheap, so that's a plus. You need a temperature controller, you can find them on Ebay, just type in STC 3000. I was also able to buy this locally, so your hardware store probably has them. Also, make sure it's a DC 12 volt powered controller, not AC for home use. The controller will come with a wired thermistor to gauge temperature:
View attachment 4845841 View attachment 4845863
The next parts are a TEC1-12709 Thermoelectric Peltier module 12 volts, 90 watt + you need a CPU water block. You also need a 250 watt - 30 amp DC power supply. I went with 30 amps to be safe, but probably pulling 15 to 20 amps max. I will test it and tell for sure. I went online and found the smallest and cheapest computer case that will work and paid like $17 for it. You're going to need some wire, I bought some red and black speaker wire (about 15-feet) and that worked fine. I bought about 8 feet of tubing for the water block. It's supposed to be some food safe stuff for carbonated drink machines. Wanted to be safe and not put anything I don't know about in my hydro. You'll also need a big CPU heat sink + thermal paste for the HOT side of the Thermoelectric Peltier module. The bigger the heat sink, the better.
Before I get ahead of myself, and in case you're not sure... a thermoelectric peltier module produces a cold side and a hot side as electricity runs through it. They are used in things like mini-fridges etc. They are really cheap...like $5 or $10
After you have everything, the challenge is putting it all together. Having a Dremel tool is good in case you need to modify anything, like cutting the hole in the CD-ROM plastic blank for the controller. Couldn't live without mine.
First put the thermoelectric cooler and water block on the big heat sink using thermal paste. I had to figure out a way to clamp them down, so I just used some metal L braces for shelves that I had lying around, and used some machine screws/nuts and washers to clamp it together. On peltier modules, the cold side of the module is the one with the model number printed on it. The other side is the HOT side and you want it facing DOWN towards your big heat sink.
View attachment 4845814 View attachment 4845815 View attachment 4845816
One thing you got to do is make sure that your two outlets on the water block are facing in the right direction on the water block so your hoses can come out the back of the case before you clamp it down!
View attachment 4845820
The next thing I did was mount the thermostat controller in the front of the PC case using my Dremel, and a power switch going to the power supply so I can turn it off and on. Simple. Also, I wired everything up at this point. I decided I will mount the power supply upside down in the top of the PC case in the event of any water leaks or related mishaps. So here, you can see the power supply sitting on the top. Also, I used these wire blocks so that if I need to replace anything, or modify something, I can easily just disconnect the wires from my peltier/heatsink unit and pull it out. By the way, you'll notice in these photos a different heatsink setup...ignore that as it didn't work. There was just not enough heatsink to do the job.
View attachment 4845840 View attachment 4845857
Once I had all the wiring done and I tested it, then I slapped it together, mounted the power supply in the top upside down with its fan facing OUT (important
View attachment 4845858 View attachment 4845866
I'm not sure the exact cost, but I know its under $100 and aquarium chillers here are like $300-400 bucks. So I decided I will build my own. If anyone wants some guidance or needs help building one, I can give advice. I also know a way to put three peltiers together on a longer CPU block for three times the chilling power for anything bigger than 20 liters. If I missed something here, let me know.
Is there any way to quantify how much cooling each heatsink/ Pelletier module achieves? Like number of btu per watt spent or anything? Like I am assuming the more powerful the Pelletier module the bigger the heat sink should be right?
Offmymeds
Well-Known Member
The heat sinks used here should easily handle the largest peltier I would think.Very clever man. Thanks for posting.
Is there any way to quantify how much cooling each heatsink/ Pelletier module achieves? Like number of btu per watt spent or anything? Like I am assuming the more powerful the Pelletier module the bigger the heat sink should be right?
Serpentz
Well-Known Member
I changed a couple of things since this post. I decided to not put the pump inside the reservoir, so it's now inline on one of the hoses outside. The only thing in the reservoir are hoses, and nothing for nutrients + water to corrode. I replaced the thermoelectric peltier with a higher TEC1-12710 - 10 amp model to see if I can get better cooling. There is a 15 amp peltier that I might try.
Failmore
Well-Known Member
How many watts is that thing pulling. Linus did a vid where they tried to cool a pc with one if those and it was pulling 400watts or something. If it is only on a lil every hour that ain't bad for power consumption then.
I attempted a few dui cooling designs in the past but didn't know about these things till years later.
I attempted a few dui cooling designs in the past but didn't know about these things till years later.
DolfBegins
Member
I'm attempting to put together a version of this design, would you mind posting a layout drawing of flow/parts ? I've seen some people put the pump in the res, using it to push the water out, but are you placing a second pump after the cooler to pump it back or has that seemed to be strong enough? I'm expecting to need to expand this cooling ability but haven't run a first test yet. Waiting on tubing.
Thanks!
Thanks!