Harvest a Pound Every Three Weeks!

DragonPhoenix

Well-Known Member
Hey stink I have a question for you about your nutes.... Have you always used cal-mag from botanicare?? and what happened when you didn't use it or did?? do you feel that you need it??? My previous grows have been without it. The guy at he hydro shop said I don't need it. I want to do my next grow with tap water and have no nutrient deficiencies. I want the prettiest buds possible. Please let me know asap because if it is a good idea to have I need to go get some today. thanks in advance and you are a master!!! :)

Look through the posts...Stink uses Cal-Mag+ in veg growth and flowering. It's especially important to use if you use RO water.

Look on Botanicare's website and you will see the feeding schedule. You can download a PDF of the schedule which is what I did.
 

StinkBud

Well-Known Member
Hey stink I have a question for you about your nutes.... Have you always used cal-mag from botanicare?? and what happened when you didn't use it or did?? do you feel that you need it??? My previous grows have been without it. The guy at he hydro shop said I don't need it. I want to do my next grow with tap water and have no nutrient deficiencies. I want the prettiest buds possible. Please let me know asap because if it is a good idea to have I need to go get some today. thanks in advance and you are a master!!! :)
Same thing with Liquid Karma and Sweet. It will really help your grow.

Check out these photos of two weeks growth. I had to tie the two Skunks down already because they were in the lights!

Do you think my formula works?

P.S. Aero/NFT plans and instructions will be posted tomorrow morning. The Plans came out nice!
 

Attachments

smartsoverambition

Well-Known Member
quick question:
How much room does ur entire setup (flower room veg and clone room electrical room)
take up? i wanna see if i can SAFELY put 2 40 plant aero setups 4 flower and 1 veg and clone room in at most 150 sq. ft
 

torrey420

Well-Known Member
Hey stinkbud, I thought I would ask the expert himself, I'm not lucky enough to get clones to start with so what would you suggest as the best method to start from seed, i have rapid rooter plugs, just curious at which point i should put them in my aero cloner? I figure since you started with soil you would be the man to ask!
 

offgridgrower

Well-Known Member
Hey stinkbud, I thought I would ask the expert himself, I'm not lucky enough to get clones to start with so what would you suggest as the best method to start from seed, i have rapid rooter plugs, just curious at which point i should put them in my aero cloner? I figure since you started with soil you would be the man to ask!

DOOD build his ez cloner, it does all the work!! I can tell you that i built it, put it in a closet put a dual t5 over it and boom, roots out the yang!! 23 out of 30 in less than 2 weeks to the day fool! I got bad ph issue and high temp problem and still roots, do you wont be dissapointed!!!
 

offgridgrower

Well-Known Member
I did check the PH in my Aero cloner. It was low (5.0)! I had to add PH up.

PH rising is usually a signal that something is growing in your water. Also, sometimes Hydroton will cause problems if it isn't PH'd first. We don't use any medium (right?) so it must be the funk or something else.

.
I belive I know whats up, I noticed that when i lift the lid to test the water, i can see light coming thru the lid , and my rez temps seem to hover around75- 78 but like i said i dont have the ability to have a min max on the rez temps, so when i check it, it is in the afternoon and im sure im getting the highest temp read, but i do know that the t5 is coming thur the lid, im going to paint it silver this weekend to help block the light,(btw the paint will be the vinyl dye kind of spray paint because that absorbs into the plastic and thats what i have around) built my frame for the veg room today, will have it finished this weekend, yea ya!!!! are these pics evidence that the ph is messing with me? and the last one is a pic of that weirdness i talked about with a couple of clones swelling up on me!! 2 did that and once i moved them above the collar the roots took off! all 7 of my original cuttings are rooted now! thanks stink!!!
 

Attachments

torrey420

Well-Known Member
I have the aero cloner all built, just wondering when I should put seedlings in it, did you start your seed in the aerocloner?

DOOD build his ez cloner, it does all the work!! I can tell you that i built it, put it in a closet put a dual t5 over it and boom, roots out the yang!! 23 out of 30 in less than 2 weeks to the day fool! I got bad ph issue and high temp problem and still roots, do you wont be dissapointed!!!
 

StinkBud

Well-Known Member
I belive I know whats up, I noticed that when i lift the lid to test the water, i can see light coming thru the lid , and my rez temps seem to hover around75- 78 but like i said i dont have the ability to have a min max on the rez temps, so when i check it, it is in the afternoon and im sure im getting the highest temp read, but i do know that the t5 is coming thur the lid, im going to paint it silver this weekend to help block the light,(btw the paint will be the vinyl dye kind of spray paint because that absorbs into the plastic and thats what i have around) built my frame for the veg room today, will have it finished this weekend, yea ya!!!! are these pics evidence that the ph is messing with me? and the last one is a pic of that weirdness i talked about with a couple of clones swelling up on me!! 2 did that and once i moved them above the collar the roots took off! all 7 of my original cuttings are rooted now! thanks stink!!!
I should of noticed the grey lids. That's what I started with. I also had algae problems. That's why I went to the black lid. I still need to paint the bottom container though. Or find one of the dark blue Roughnecks.

Also your water temps might cause problems. Can you cool the room more?

I'm stoked you got roots! Your plants look fine. They get a little sick looking after a few weeks of no nutes. I'm sure we would too!

They will pick right up in veg though. When ever I put my clones in veg I always think, there is no way they will be big enough for flower in three weeks. But every time they prove me wrong.

The photos of the swelling roots is called Damping Off (Pythium Wilt). It's a fungal condition. If you see something like this chuck the clone right away so the fungus dosen't spread.

Again too warm of water temps can cause all sorts of fungus to grow. Hygrozyme should help take care of your problems. As soon as you kill all the funk, your PH will stop rising. It's that simple.

If your water temp is getting to 78 you are going to have problems. That must mean your room is very hot! I wish I could help you there but you are the only one that can figure out how to cool your room more.

Ventilation and A/C are really your only options. The advantage of A/C is it also helps to keep humidity down in a sealed room.

You're doing great bro! You guys make me feel like a proud father! Your success is my success....
 

StinkBud

Well-Known Member
I have the aero cloner all built, just wondering when I should put seedlings in it, did you start your seed in the aerocloner?
Start your seed in a wet paper towel as usual. When they pop put them in a Rapid Rooter plug under fluorescent lighting.

Soon you will see a long tap root coming out the bottom. As soon as it is about 2" long break open the Rapid Rooter plug and remove the seedling. (be gentle!)

Take the seedling and very carefully put it in the neoprene collar and net pot. Place it in the cloner and your done.

Another option is to leave the plant in the plug and just put it in the net pot. You will need to buy a $10 pump filter bag for your pump. Little pieces of the Rapid Rooter plug will break off and plug your sprayers if you don't have a filter bag.

Seedlings can go into the veg unit sooner than cuttings because they already have roots. So within a few days go ahead and transfer the seedling to the veg unit.

Remember, seedlings have to stay in veg until you see preflowers. You can take them into flower sooner but it won't do you any good. Plants have to reach a certain maturity to flower, just like us. Clones are already mature...
 

StinkBud

Well-Known Member
quick question:
How much room does ur entire setup (flower room veg and clone room electrical room)
take up? i wanna see if i can SAFELY put 2 40 plant aero setups 4 flower and 1 veg and clone room in at most 150 sq. ft
My flower room is 7x8x8 and my cloner and veg are in a little 2x3 closet.
 

offgridgrower

Well-Known Member
I knew I was pushing it when I had to put the cloner in that closet while the veg room was being built, I cant do anything for enviroment conditions where they are now, i will have the veg room done today, i will post a pic l8r 2nite. well off to work on the room yeah!!
 

iBLaZe4tozErO

Well-Known Member
Same thing with Liquid Karma and Sweet. It will really help your grow.

Check out these photos of two weeks growth. I had to tie the two Skunks down already because they were in the lights!

Do you think my formula works?

P.S. Aero/NFT plans and instructions will be posted tomorrow morning. The Plans came out nice!
I hope u do I plan on actually making it today. Have the PVC, just need to find the fence post.
 

StinkBud

Well-Known Member
So here is the final installment many of you have been waiting for. My next step it to put everything together into one convenient post. So have fun!

Aeroponic/NFT Assembly Instructions vers 1.1
By Stinkbud


Step 1 – Cutting the ¾” PVC Pipe for the Frame
1) 4 - 41” lengths (label plant support)
2) 4 - 20” lengths (label “H”)
3) 6 - 4 1/8” lengths (label fence post holder)
4) 3 - 14 3/4” lengths (label 1- “H” and 2 -“end”)
5) 4 - 18” lengths (label plant support leg)
6) 4 - 12” lengths (label plant support leg)
7) 4 - 2” lengths (label end)
8- 2 - 12 1/2“ (label front)
9) 2 - 13 1/2” (label back)

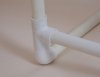
Step 2 – Preassemble Your Frame
1) Start with the ends. Use 4 - Tees and 3 – 4 1/8” lengths to make the fence post holder.
2) Add the legs and bottom Tees. Don’t forget the front and back label!
3) Add the 2” pieces to the bottom of the Tees
4) Add the Elbows to the 2” pieces. Make sure the elbows are facing toward each other.
5) Connect the Elbows with the 14 ¾” pieces. The ends should be complete now.
6) Now make the bottom “H” using 2 - Tees, 4 – 20” pieces and 1 – 14 ¾” piece.
7) Connect the two ends together using the “H”.
8- Create your plant supports using the 4 – 41” lengths and 4 – Elbows.
9) Add the 12” and 18” plant support legs and place the plant supports into the frame.
10) If everything fits then take the unit apart and glue all the pieces together. Be careful, the glue
dries fast!

Step 3 – Assemble the Fence Posts
1) Measure and mark the 2" net pot holes (according to the plans).
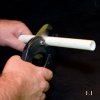
2) Clean up the holes with the Exacto knife.
3) Put a large bead of Silicone inside 2 of the end caps and place them on the back end of the fence
posts.
4) Run a bead of Silicone around the edges of the end cap and let the posts dry
5) Cut the bottom ¼” off of the 2 end caps. Use a small drill drum sander to sand an opening for the
sprayer pipe assembly. A Dremel tool works well too.
6) Place the fence posts on the frame and use large cable ties to hold it in place.

Step 6 – Cutting the Sprayer Assembly Pipe
1) 2 - 3” lengths
2) 2 - 2” lengths
3) 2 - 47” lengths
4) 1 - 11 1/2” length

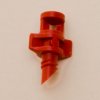
Step 7 – Assembling the Sprayer Unit
1) Drill ten 11/64” holes in the 47” length pipes according to the plans
2) Use pliers to insert the EZ-Cloner sprayers into the holes
3) Attach end caps and elbows to the sprayer pipes
4) Put the 2” pipes into the elbows
5) Combine the two sprayers together with a Tee
6) Add another 2” piece to the Tee and a downward facing Tee to that
7) Attach the last 2” piece to the Tee.
8- Attach the ball valve and garden hose adapter to the last piece
9) Try it out in the fence posts and if everything looks good, glue it all together.

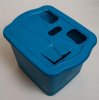
Step 8 – The Container Lid
1) Put the container and lid under the fence post and draw a drain hole under the fence posts.
2) Cut out the holes with a utility knife and clean up the edge with the small drum sander.
3) Drill a 2” hole for the pump pipe.
4) Cut a large access hole with the utility knife. Leave one edge attached to make a flap that can be
closed.

Step 9 – Final Assembly
1) Place the pump into the container and run the 11 ½” pipe through the lid.
2) Put the sprayer assembly into the fence posts.
3) Put the container under the frame and attach the pump pipe to the sprayer assembly.
4) Apply a few small drops of silicon the drain end caps and place them on the fence posts. Don’t
use much silicon because you want to be able to remove the caps when needed.
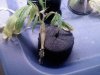
5) Fill the containers and place empty net pots with collars into the fence posts.
6) Check for leaks. If everything is OK then you are done! Congratulations!!!

Step 10 – Mixing the Nutrient Formula

Botanicare Nutrients:
1) 126ml Cal-Mag Plus
2) 150ml Sweet
3) 180ml Liquid Karma
4) 540ml Pure Bend Pro Bloom
Mix all the nutrients together in a gallon jug and top off with water. Shake well!

Step 11 – Setup and Conclusion
1) Add 15 Gal. of water. (approx.) to the reservoir
2) Add nutrient mix until the meter reaches 2000 PPM
3) Adjust the PH to 5.8
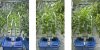
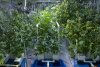
4) Fill the flower unit with your favorite strains from the veg unit.
5) Set your cycle timer to one minute on and five minutes off.
6) Enjoy your new Aeroponic system!!! You should see some amazing buds in no time!
7) Don’t forget to pass the love on…
 

Attachments

DIRTHAWKER

Well-Known Member
these plans are exceptional!!!! I am in the process of printing out a manual from all of this and sharing with some friends.

Update on my progress.. My plants are more then ready for the flower room.. but i am not. still putting the room together.
Gonna take clones tomorow and fill my cloner.

Stinkbud.. do you think this light setup up will work with this system?
[/quote]
 

trevor50020

Active Member
I admire the fact you keep your word, :) Awesome attention to details as usual. Keep up good works stinkbud, I'm sure everything can say this.. Thanks for all the love man.

:peace::joint::-?:mrgreen:
 

smartsoverambition

Well-Known Member
great man i'm assembling this into one pagedo incase RIUblows up i have these exceptional plants, alb.fuct passed the SOG crown onto stinkbud!
 

StinkBud

Well-Known Member
these plans are exceptional!!!! I am in the process of printing out a manual from all of this and sharing with some friends.

Update on my progress.. My plants are more then ready for the flower room.. but i am not. still putting the room together.
Gonna take clones tomorow and fill my cloner.

Stinkbud.. do you think this light setup up will work with this system?
[/quote]

Is there a reason why they are on separate light movers? Why not just buy a single light mover and a two light kit? That way you could plumb the air together with just one 440 CFM fan.

Funny, I was just looking into the same thing. I'm going to buy one mover and a dual light kit for my lights. Still have my electrical to go first though.
 

DIRTHAWKER

Well-Known Member
Maybe im missing something, wouldnt one rail (with 2 light adapter) mean that the lights move together on the same track
leaving one side of the garden without light for a spell?
 

StinkBud

Well-Known Member
Maybe im missing something, wouldnt one rail (with 2 light adapter) mean that the lights move together on the same track
leaving one side of the garden without light for a spell?
Yes, but not long enough to matter. Especially if you get the 10 RPM motor.

You might see a small gain with two light movers. I'm just not sure how you would run the light's exhaust. You would have to have separate fans and plumbing for the air.

I'm assuming your room is as small as mine...
 

DIRTHAWKER

Well-Known Member
Maybe im trying to get too fancy.. 4 lights means 4 ballasts 4 bulbs 4 reflectors..etc.. $$$$ maybe i will go with 3 600 watter hps's, one over each unit stationary with one in line duct fan cooling the lights in a line. aww..theres so many ways.
 
Top