Bagseed & Rubbermaid Grow Box

Spittn4cash

Well-Known Member
Im a man of very few words but plenty of pictures so I will be posting pics of my progress every other day. First set of pics are of my grow box. I will include construction details also.

4012d1172264242-bagseed-rubbermaid-grow-box-uvs070223-009.jpg

^I aligned the inside of the Box with reflective Mylar^
file000153lq4.jpg

^Built my own Cfl Hood out of a cardboard box and more Mylar^
file000244.jpg

file000245.jpg

^Suspended the Light from the lid of the box^
4014d1172264693-bagseed-rubbermaid-grow-box-uvs070223-001.jpg

^Cut out hole on side for fan/exhaust^
4013d1172264251-bagseed-rubbermaid-grow-box-uvs070223-010.jpg

^Every Grow Box needs a fan for air circulation^

and thats it for the grow box!
 

Attachments

  • UVS070223-007.JPG
    UVS070223-007.JPG
    16.2 KB · Views: 1,137
  • UVS070223-008.JPG
    UVS070223-008.JPG
    21.8 KB · Views: 1,016
  • UVS070223-009.JPG
    UVS070223-009.JPG
    19.2 KB · Views: 5,221
  • UVS070223-010.JPG
    UVS070223-010.JPG
    12.6 KB · Views: 5,178
  • UVS070223-001.JPG
    UVS070223-001.JPG
    10.8 KB · Views: 5,503
4020d1172265126-bagseed-rubbermaid-grow-box-uvs070223-011.jpg

^I start my seedlings off in Jiffy Cube #7 Peat Pellets^
4018d1172265126-bagseed-rubbermaid-grow-box-uvs070223-002.jpg

^When they get older Im planting in Miracle Gro Moisture Control Potting Mix^
4021d1172265352-bagseed-rubbermaid-grow-box-uvs070223-003.jpg

^Since my soil mix is already ferted I will only be feeding this Miracle grow 15-30-15 Blooming Fertilizer^

Time to get started!
 

Attachments

  • UVS070223-002.JPG
    UVS070223-002.JPG
    21.5 KB · Views: 5,154
  • UVS070223-011.JPG
    UVS070223-011.JPG
    18.6 KB · Views: 5,114
  • UVS070223-003.JPG
    UVS070223-003.JPG
    59.2 KB · Views: 5,338
I germinated by first lightly sanding the seeds with a nail file for approximately 30 seconds - 1 minute. I do this by taking about 5 seeds, make a cup with my hand place the seeds in the "cup" and lightly rub the file over them.

Some seeds needs to have the surface of their shells scratched or nicked inorder to wake the seed up from its sleeping period called dormancy. once water gets into the scratch it triggers hormones that causes the seed to awake and begin germination.

Next I soak the seeds in a cup of water. I simply get a coffee mug, fill it half way with melted snow, or rain water and sit it on top of my surround sound amp, which keeps it warm. I only leave them in there until most of them have sunk to the bottom. When I have a good feeling that most of them will sprout then I use the paper towel method to germinate seedlings.

I use a coffee mug bcuz it stores heat better than other types of cups, and I use melted snow bcuz, well hey its wintertime in Ohio and we got plenty of free snow, so why not?

My germination method is not different than what you would read -
2 paper towels, 2 plates...
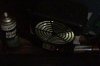
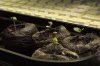
I fold one paper towel in half and sit it on the plate. I take the coffee mug thats halfway full of rain water and seeds and dump half the water on the paper towel, pick out the seeds with a spoon and set them in a circle on the paper towel...
I then take the other paper towel, fold it in half and simply place it overtop of the seeds, I lightly sprinkle the remaining water over it just until i start to see the form of the seeds thru the paper towel..if I added too much I'll just add another folded paper towel to the top layer, but the important point is to make sure the paper towels are fairly damp..and then I put the other plate on top.

I stick that next to the vent in my room bcuz seeds only need to be at room temp to germinate..10*deg too low and its too cold...10*deg too high and they'll probably cook!

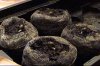
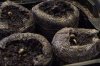
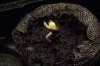
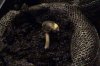
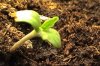
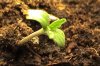
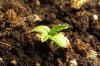
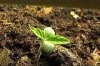
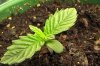
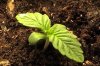
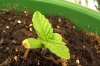
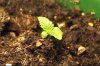
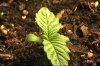
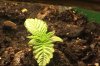
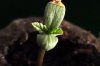
and after the taproot sticks out about 1/4 of an inch I plant into my jiffy cubes, and place the cubes into the "jiffy dome" with the lid on it for humidity. I stick that next to my heat vent so its constantly just above room temp, and wait...
 

Attachments

  • uvs070221-002.JPG
    uvs070221-002.JPG
    25.7 KB · Views: 164
  • uvs070221-001.JPG
    uvs070221-001.JPG
    27.1 KB · Views: 225
  • uvs070221-003.JPG
    uvs070221-003.JPG
    22.3 KB · Views: 215
  • uvs070221-005.JPG
    uvs070221-005.JPG
    21.5 KB · Views: 210
4036d1172267203-bagseed-rubbermaid-grow-box-uvs070222-001.jpg

^this is what I got 24 hrs later^

Plant A
4037d1172267203-bagseed-rubbermaid-grow-box-uvs070223-001.jpg

^all 4 of my sprouts had cotyl's and a very tiny pair of true leaves^

Plant B
4038d1172267203-bagseed-rubbermaid-grow-box-uvs070223-002.jpg

^but they're survivors!!^
 

Attachments

  • uvs070222-001.JPG
    uvs070222-001.JPG
    21 KB · Views: 4,996
  • UVS070223-001.JPG
    UVS070223-001.JPG
    20.8 KB · Views: 4,990
  • UVS070223-002.JPG
    UVS070223-002.JPG
    20 KB · Views: 4,974
looks good man, ima newb also but i heard that miracle grow ph is 5.0 so you might wanna make sure ur ph is gonna be alright

actually the ph is closer to 6.5...
Miracle Gro is composed of 60% Peat moss, 25% Perlite, 14.58% forest products compost (coir fiber and wetting agents), .21% Nitrogen, .07% calcium phosphate, and .14% potassium sulfate..and of course everyone knows that peat moss is pretty much neutral on the PH scale..if this were years ago when they used "soil" in miracle gro I probably wouldnt have used it...but I trust that my girls will be fine in that. But thx 4 the concern
4039d1172267773-bagseed-rubbermaid-grow-box-uvs070223-004.jpg
 

Attachments

  • UVS070223-004.JPG
    UVS070223-004.JPG
    56.2 KB · Views: 4,942
less than 12 hours later and look how much my babies have grown!..I also notice that the white root was sticking out of the bottom of the jiffy pellet, so I decided to go ahead and plant them in 6" pots full of MG moisture control potting mix.

Plant B
4040d1172268352-bagseed-rubbermaid-grow-box-uvs070222-004.jpg


Plant A
4041d1172268352-bagseed-rubbermaid-grow-box-uvs070222-002.jpg

4042d1172268352-bagseed-rubbermaid-grow-box-uvs070222-003.jpg
 

Attachments

  • uvs070222-003.JPG
    uvs070222-003.JPG
    28 KB · Views: 4,886
  • uvs070222-002.JPG
    uvs070222-002.JPG
    21.9 KB · Views: 4,892
  • uvs070222-004.JPG
    uvs070222-004.JPG
    23.7 KB · Views: 4,911
Lookin good. keep it going. Remember the hard part for the next three weeks or so will be keeping your hands off the plants. Concentrate on providing a balance of the 7 things plants need to thrive. Keep it positive. VV
 
I love watching them grow...check out the true leaves

Plant C

4043d1172268635-bagseed-rubbermaid-grow-box-uvs070222-003.jpg


Plant A
4044d1172268635-bagseed-rubbermaid-grow-box-uvs070223-005.jpg


Plant B
4045d1172268635-bagseed-rubbermaid-grow-box-uvs070223-004.jpg
 

Attachments

  • UVS070223-005.JPG
    UVS070223-005.JPG
    27.4 KB · Views: 4,841
  • UVS070223-004.JPG
    UVS070223-004.JPG
    20.1 KB · Views: 4,819
Lookin good. keep it going. Remember the hard part for the next three weeks or so will be keeping your hands off the plants. Concentrate on providing a balance of the 7 things plants need to thrive. Keep it positive. VV

VV I couldnt have made it this far without your guidance, so I give a great thanks to you. I'll be sure to do my best to help them thrive!
 
Quick pic update after their first watering today...even the smallest one is showing some good growth.

Plant A
4161d1172433166-bagseed-rubbermaid-grow-box-uvs070225-002.jpg


Plant B
4159d1172433166-bagseed-rubbermaid-grow-box-uvs070225-001.jpg

4160d1172433166-bagseed-rubbermaid-grow-box-uvs070225-005.jpg


Plant C

4163d1172433181-bagseed-rubbermaid-grow-box-uvs070225-004.jpg


Plant D

4162d1172433181-bagseed-rubbermaid-grow-box-uvs070225-003.jpg
 

Attachments

  • UVS070225-001.JPG
    UVS070225-001.JPG
    26.5 KB · Views: 1,621
  • UVS070225-005.JPG
    UVS070225-005.JPG
    24.9 KB · Views: 1,618
  • UVS070225-002.JPG
    UVS070225-002.JPG
    25.1 KB · Views: 1,623
  • UVS070225-004.JPG
    UVS070225-004.JPG
    20.3 KB · Views: 1,626
  • UVS070225-003.JPG
    UVS070225-003.JPG
    20.9 KB · Views: 1,618
My Plants are on a 24/0 Light cycle.
I am feeding them co2 by mixing Vinnegar and Baking Soda.
Temp stays at 77*F
Humidity was 48% for first couple days, but I sat a glass of water in there to raise it now its at 59% RH
Soil PH 6.7
(Rain)Water PH 6.9
 
New Growth since my last pics this morning:

Plant A
4195d1172443473-bagseed-rubbermaid-grow-box-uvs070225-0011.jpg

4196d1172443473-bagseed-rubbermaid-grow-box-uvs070225-0012.jpg


Plant B

4197d1172443473-bagseed-rubbermaid-grow-box-uvs070225-0013.jpg

4198d1172443539-bagseed-rubbermaid-grow-box-uvs070225-0014.jpg


Plants C & D
Both are "late sprouters"..they did everything later than A&B. C&D were both smaller seeds, they dropped their shells later, and their cotyl's opened up later also. and if U notice, they both have one little cotyl and one big cotyl, and that wouldve been an issue if I didnt keep my lights so close, but I had them just close enough so that the plants didnt have to stretch and if U look you can clearly see the growth in C & D
 

Attachments

  • UVS070225-0011.JPG
    UVS070225-0011.JPG
    23.1 KB · Views: 1,606
  • UVS070225-0012.JPG
    UVS070225-0012.JPG
    24.3 KB · Views: 1,605
  • UVS070225-0013.JPG
    UVS070225-0013.JPG
    21.5 KB · Views: 1,601
  • UVS070225-0014.JPG
    UVS070225-0014.JPG
    20.8 KB · Views: 1,602
all i have to say is wow, your plants are rollin!!!!
A and B are growing super fast, but C looks like its dieing
Nice work

Plant C 3 Days Ago
4204d1172444750-bagseed-rubbermaid-grow-box-uvs070223-007.jpg


Plant C 2 Days Ago
4043d1172268635-bagseed-rubbermaid-grow-box-uvs070222-003.jpg


Plant C 1 Day Ago
4163d1172433181-bagseed-rubbermaid-grow-box-uvs070225-004.jpg


Plant C
Now
4202d1172444577-bagseed-rubbermaid-grow-box-uvs070225-001.jpg

4203d1172444577-bagseed-rubbermaid-grow-box-uvs070225-002.jpg

^^See the little light green "nubby" thing in the middle, thats new growth, its growing its second set of leaves.
 

Attachments

  • UVS070225-001.JPG
    UVS070225-001.JPG
    18.9 KB · Views: 1,596
  • UVS070225-002.JPG
    UVS070225-002.JPG
    15 KB · Views: 1,583
  • UVS070223-007.JPG
    UVS070223-007.JPG
    10.8 KB · Views: 1,584
No pix this update, I gotta get ready for this interview Im going on.
But I raised the humidity to 65% and these babies really took off going! I dunno if its common, but my soil seems to dry out quickly thanks to the fans and lights..does watering every 3-4 days sound normal? I get so excited and wanna add some nutes to the water just to see if they will grow faster, but im trying to remember..patience pays off in the end..
I'll post new pix after my interview
 
for some reason the tips of my plants are curling up, crunchy and browning..i did a little research and found a couple causes for this

1. Nute burn
2. Lights too close
3. Poor air circulation
4. pH too high or low

i immediately thought "something's wrong with the MG, but if there are too much nute in here then i should just be able to do a flush right? well the MG might be too acidic pH-wise also...well my tap water is 8.0.."

so i decided to flush with tap water, took the book from under my plants which dropped them another inch away from the light and set the fan speed up to the next level.

all these changes are gonna cause them to stretch majorly in all directions, which is kinda what im going for..

i'll update u guys 2morrow with pics n all, my gf stopped over today after my interview (which went ok....nothing promising) so we decided to roll a nice fatty and chill for the night, and nothing comes b4 the misses.
thats it 4 the night peace..
and if theres something else that could be wrong feel free to give any advice, or if there are any other solutions, comments or questions ask away...
thx 4 stoppin by..
S4$
 
Back
Top