Padrone
Well-Known Member
Hey yall !
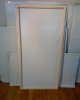
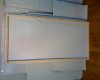
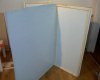
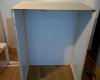
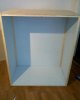
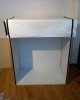
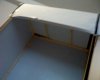
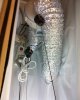
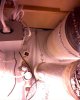
This is my new grow which I was kinda forced into building from scratch because my other one in a rented garage was discovered. I built cabinet 1 and I realized that it's too small for cloning/veg/bloom so I decided to build another cabinet for clone/veg and use the older cabinet just for bloom. I should get 20% higher yield from this change. I am not sure what strain I have because it was given to me by a friend who knew this guy who had been growing this for over 15 years due to his illness. Now this blessed fighter has passed away and his son didn't want anything to do with these plants so they found their way to me. Any ideas about what strain this is? (any help appreciated)
Like everything else, I build all I can myself just because it gives me much pleasure to create.
"Whatever you are, be a good one."
- Abraham Lincoln
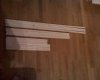
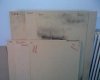
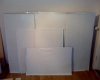
List of material
*Before you buy this, double check all measurements and sizes.
** Not a complete list, you could need more things. You can add them in comments
------------------------------------------
CABINET 1 ( Bloom )
------------------------------------------
Wood beams :
22 x 24 x 2000 - 4 pcs
22 x 24 x 852 - 4 pcs
22 x 24 x 656 - 8 pcs
Wood boards :
912 x 2012 x 6 - 2 pcs
712 x 2012 x 6 - 2 pcs
700 x 900 x 6 - 2 pcs
700 x 900 x 6 - 1 pcs (saw out 24x24 of each corner)
------------------------------------------
CABINET 2 ( Vegitative ) - to be built this week or next
------------------------------------------
Wood beams :
22 x 24 x 1300 - 4 pcs
22 x 24 x 952 - 4 pcs
22 x 24 x 556 - 7 pcs
Wood boards :
1300 x 600 x 6 - 2 pcs
1300 x 1012 x 6 - 1 pcs
612 x 1012 x 6 - 2 pcs
1000 x 600 x 6 - 1 pcs (saw out 24x24 of each corner)
------------------------------------------
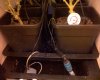
Grow equipment
------------------------------------------
125w 6400k cfl + reflector
GHE 27 plant cutting board
ATAMI Wilma 4 - with 4x 11 liter buckets
600w HPS in a Cooltube
240/360 cfm exhaust fan through Cooltube and carbon filter
Grodan Rockwool 2x2 cubes
------------------------------------------
Miscellaneous stuff
------------------------------------------
Air temperature gauges
Water temperature gauges
Easy rollers
Chains
Hooks
Panda plastic
screws
Air ducts 10"
Door hinges
Silicone glue
Digital EC meter
Branch trimmers
Leaf trimmers
razorblades
------------------------------------------
Nutrition and liquids
------------------------------------------
GHE products:
Grow ( green )
Multimineral ( brown )
Bloom ( pink )
Diamond Nectra
Ripen
pH up
pH down
ATAMI Root stimulator
---------------------------------------------
This is the basic formula I try to follow but as you know the amount of nutrients dissolved in the water always build up. I do change water every 2-3 weeks so I can control how much is dissolved in the water. Max EC I've seen is around 3.6 but it is usually around 2.0 - 2.6 and I have just pH drop tester so my tests are not accurate but I usually have to add 2-3 ml of pH down every 2-3 days into my 40 liter reservoir. My plants drink up maybe 70-80% of that water every 2-3 weeks.
ml/10 liters
Grow ( green )
Clones - 2
Vegetative - 15
Bloom - 5
Multimineral ( brown )
Clones - 2
Vegetative - 10
Bloom - 10
Bloom ( pink )Clones - 2
Vegetative - 5
Bloom - 15
Root stimulator
Clones - 15
Vegetative - 0
Bloom - 0


Comments and questions are appreciated
This is my new grow which I was kinda forced into building from scratch because my other one in a rented garage was discovered. I built cabinet 1 and I realized that it's too small for cloning/veg/bloom so I decided to build another cabinet for clone/veg and use the older cabinet just for bloom. I should get 20% higher yield from this change. I am not sure what strain I have because it was given to me by a friend who knew this guy who had been growing this for over 15 years due to his illness. Now this blessed fighter has passed away and his son didn't want anything to do with these plants so they found their way to me. Any ideas about what strain this is? (any help appreciated)
Like everything else, I build all I can myself just because it gives me much pleasure to create.
"Whatever you are, be a good one."
- Abraham Lincoln
List of material
*Before you buy this, double check all measurements and sizes.
** Not a complete list, you could need more things. You can add them in comments
------------------------------------------
CABINET 1 ( Bloom )
------------------------------------------
Wood beams :
22 x 24 x 2000 - 4 pcs
22 x 24 x 852 - 4 pcs
22 x 24 x 656 - 8 pcs
Wood boards :
912 x 2012 x 6 - 2 pcs
712 x 2012 x 6 - 2 pcs
700 x 900 x 6 - 2 pcs
700 x 900 x 6 - 1 pcs (saw out 24x24 of each corner)
------------------------------------------
CABINET 2 ( Vegitative ) - to be built this week or next
------------------------------------------
Wood beams :
22 x 24 x 1300 - 4 pcs
22 x 24 x 952 - 4 pcs
22 x 24 x 556 - 7 pcs
Wood boards :
1300 x 600 x 6 - 2 pcs
1300 x 1012 x 6 - 1 pcs
612 x 1012 x 6 - 2 pcs
1000 x 600 x 6 - 1 pcs (saw out 24x24 of each corner)
------------------------------------------
Grow equipment
------------------------------------------
125w 6400k cfl + reflector
GHE 27 plant cutting board
ATAMI Wilma 4 - with 4x 11 liter buckets
600w HPS in a Cooltube
240/360 cfm exhaust fan through Cooltube and carbon filter
Grodan Rockwool 2x2 cubes
------------------------------------------
Miscellaneous stuff
------------------------------------------
Air temperature gauges
Water temperature gauges
Easy rollers
Chains
Hooks
Panda plastic
screws
Air ducts 10"
Door hinges
Silicone glue
Digital EC meter
Branch trimmers
Leaf trimmers
razorblades
------------------------------------------
Nutrition and liquids
------------------------------------------
GHE products:
Grow ( green )
Multimineral ( brown )
Bloom ( pink )
Diamond Nectra
Ripen
pH up
pH down
ATAMI Root stimulator
---------------------------------------------
This is the basic formula I try to follow but as you know the amount of nutrients dissolved in the water always build up. I do change water every 2-3 weeks so I can control how much is dissolved in the water. Max EC I've seen is around 3.6 but it is usually around 2.0 - 2.6 and I have just pH drop tester so my tests are not accurate but I usually have to add 2-3 ml of pH down every 2-3 days into my 40 liter reservoir. My plants drink up maybe 70-80% of that water every 2-3 weeks.
ml/10 liters
Grow ( green )
Clones - 2
Vegetative - 15
Bloom - 5
Multimineral ( brown )
Clones - 2
Vegetative - 10
Bloom - 10
Bloom ( pink )Clones - 2
Vegetative - 5
Bloom - 15
Root stimulator
Clones - 15
Vegetative - 0
Bloom - 0
Comments and questions are appreciated