Home Made Grow Box

q3aserver

Member
Welcome Pockets,
First thing, if you feel like your going to make another video. Do everyone a favor and write yourself a rough guideline script. You go over the things you want to share with RIU and figure out how to effectively convey your message. I enjoyed your little video. I just pulled and all nighter, high on my first harvest.

What method did you use to germinate your seeds? In your video you mention that they might not all sprout because of the light fixture. Light is not used in the sprouting process so you should be fine. I think once they do start growing that you will outgrow your space very fast. I would suggest just growing 2 plants.

Your venting looks fine. They make USB power ports that plug into the wall. It is a relatively low priced product.

Seems like your on a tight budget, don't buy weed for a few days get mylar and a better power source for your fans and you will be on your way to a fun first grow.

As far as growing advice, I learned all I needed to know to grow my first dank batch from the internet. I have never asked one question. Just weedle your way through the false information. When you see that there is a split decision on a certain topic it is usually easy to determine the bullshitter, just pay attention to the information you take in.

I want to mention that I am a new MJ grower myself, but things have been working as expected for me.
Good luck sir, I will watch your thread for updates.
 

MrPockets

Well-Known Member
Will do and thanks for the feedback bro! The video was pretty much when it was like 2-3 am, so i had no type of script so kinda winged it but i will be more efficient in the next one. I germinated them in little Tupperware container and it has 4 layers of paper towel 2 on the bottom and 2 going over top of them and sprayed it with a spray bottle about 2 or 3 times not soaked but moist and i put them on my heater. Also i was wondering if i could coat my walls with pure white paper or even paint the walls (the paper is not see through).
 

Jeffdt1966

Active Member
be nice bout the ghetto grow ^^ I dont like wasting the bucks and learned a very important lesson through my short time here on RIU . I have seen cheaply grown buds that look as dank as those in the thousand dollar setups , and my guess is that they taste and work as well also : ) keep this in mind when the bigboys start telling you all the technical aspects and gadgets u gotta buy ... just get in tune with your plants and pay close attention to them - they will tell you when to water , and when watering doest perk em back up ... thats them telling you to feed them - just dont over do it ( easier to add more than to take some away ) . btw ... about an extra light .. at walmart you can get a desk light for about 10 bucks thats on a flexible post with a clip on holder - these will clip on almost anything and hold a 26w ( lums of a 100w ) cfl that you can direct anywhere you need it. just a thought .. its up to you . you could even forego the mylar ... just rip that foil outta there and paint the inside flat white. If the charts I have seen are true - flat white is just 5% less reflective than mylar anyway ( enphasis on the " if its true " I have not verified this yet ).. anyway good vid .. looks like a very good job so fa r- keep us posted mate
 

MrPockets

Well-Known Member
be nice bout the ghetto grow ^^ I dont like wasting the bucks and learned a very important lesson through my short time here on RIU . I have seen cheaply grown buds that look as dank as those in the thousand dollar setups , and my guess is that they taste and work as well also : ) keep this in mind when the bigboys start telling you all the technical aspects and gadgets u gotta buy ... just get in tune with your plants and pay close attention to them - they will tell you when to water , and when watering doest perk em back up ... thats them telling you to feed them - just dont over do it ( easier to add more than to take some away ) . btw ... about an extra light .. at walmart you can get a desk light for about 10 bucks thats on a flexible post with a clip on holder - these will clip on almost anything and hold a 26w ( lums of a 100w ) cfl that you can direct anywhere you need it. just a thought .. its up to you . you could even forego the mylar ... just rip that foil outta there and paint the inside flat white. If the charts I have seen are true - flat white is just 5% less reflective than mylar anyway ( enphasis on the " if its true " I have not verified this yet ).. anyway good vid .. looks like a very good job so fa r- keep us posted mate
Im probably gonna paint the walls white i put up double layered white paper it seems a bit brighter ill probably make an update video showing you guys what it looks like now and tell me if its better or keep with the foil until mylar
 

q3aserver

Member
Don't put the foil back on. At Walmart the in house camping brand is Ozark Trail. They make a survival blanket that costs $3.50+/- 45 cents.
Get that when you can, its cheap though man you can find that kinda money in your couch.

This is the USB wall plug I was talking about.
http://www.google.com/products/catalog?q=usb+wall+plug&hl=en&prmd=ivs&resnum=1&biw=1360&bih=575&um=1&ie=UTF-8&cid=2469014376220383182&ei=ZZ3qTIGYFcSclgfIyOXhCw&sa=X&oi=product_catalog_result&ct=result&resnum=7&ved=0CIoBEPMCMAY#

Your laptop computer is sitting on top of your box. The hottest air in your box is going to be at the top. Laptops them self's produce lots of heat, even at idle since you are pushing the USB. Not saying your box is running hot, but I would try to relocate that at least asap.
 

q3aserver

Member
Sweet man, looks like your on the way to BUDS!
Once they take off its a great feeling.

The times go by fairly quick when growing as well. For me it does at least.
 

MrPockets

Well-Known Member
Thanks bro! the leaves just sprouted when i opened the box 10 minutes ago :) the stem and leaves are looking very healthy and the stem is thick looking to be an awesome first grow so far. Keep ya guys updated!

Keep token:leaf:
 

thegersman

Active Member
I love it !!!! I think the white paper is good instead of smelly paint. If you get a few bucks go for the emergency blanket, or not.

I'm a fellow ghetto grower....I created a cage monster myself as a 1st time grower... GOOD LUCK---READ UP ON RIU


1029001828.jpg1101002352[1].jpgscanplants 010.jpg
 

MrPockets

Well-Known Member
Thats awesome!! i would love to have a setup like that because i find myself looking opening and closing the box about 3 times a day just to check on the plant and that cage build would be amazing for me haha. Are you still in veg or are you starting your flowering if so how long has it been in for? Also ill look into the emergency blanket i just have to figure out a way to fit and adjust it in the box correctly.
 

thegersman

Active Member
Hi!
I'm in my fourth week of flowering, my plants are 3 and 4ft. I had to tie one down cause it was too close to the lamp !!!!!!

Keep it up, I'll follow your videos and grow.

Happy Thanksgiving!


1122001409b[1].jpg1123001442[1].jpg
 

MrPockets

Well-Known Member
Haha, thanks bro happy thanksgiving aswell!:) your grow is lookin awesome bro i cant wait till mine are about 2-3 foot so i can start flowering :)) so exciting keep ya updated =]

keep token:leaf:
 

MrPockets

Well-Known Member
hey guys heres alittle picture update on how the plants are doing (sorry for the absolute shitty quailty of theses pics) my cameras usb charger is broke atm and im pretty much broke sorry :( but i when i have the money i will def start making videos again of the grow, but for now i will picture update. I have a question aswell i just bought foxfarm grow big yesterday and im not sure when to start using it these plants are now 9 days old from seed and 7 days from sprout there getting pretty big quick it already has its 3rd set of leaves which are the 3 leafd fan leaves if that makes any sense haha, but im worried if i use nutrients it will burn it up so yeah advice would help greatly thanks! (a quick little note im probably not going to be switching out the other plant because i dont want to cause any root damage and if one gets more nutes than the other and dies so be it)
Photo0053.jpgPhoto0055.jpg
Keep token:leaf:
 

solarguy

Active Member
Your video link didnt work for me heres my thread that shows this, https://www.rollitup.org/grow-room-design-setup/388420-building-easy-cabinet-will-last.html#post4970473

This was my first grow and a few months ago i remember searching all over and still asking questions when i knew nothing so this is me returning the favor to the boards...Growing weed is easy, its a weed good luck.

Here is the little veg cab easy to make and this works with cfls as well...


1. 2 x 45 gallon rubbermaid tubs 15.00 each = 30.00
2. black and white spray paint for plastic = 10.00
3. extension cord 3 prong, everyday use 16 gauge wire = 6.00
4. 5/16" hook screws, bolts, washers...
-4 hooks @ 1.00 each = 4.00
-8 bolts @ .25 each = 2.00
-8 washers @ .25 each = 2.00
5. 6" inline duct fan = 22.00
6. 2 x 2" pvc 90 degree elbows AND 2 x 2" pvc short pipes, 4" long. = 4.00 total
7. *Mylar = had some left over, if not a new roll is 20 bucks but will last a long time with a grow like this! UPDATE I SAID FUCK THE MYLAR, that shits garbage white walls are fine. spray paint them white.
8. wire connectors, duct tape, electrical tape = had them laying around! (i do electrical work) if not, 5 bucks max for these items!

80.00 total for cab without light and plant material.

Step 1: spray paint bottoms of rubbermaids. first black and than white. This is so light doesn't get out the top and reflects off of the bottom. Why not spray the sides? because the Mylar will block light out/in. If you are not using Mylar i recommend spray painting the entire rubbermaid or else you will be glowing. remember first black and than white. You will not need the tops of the containers, see photo to understand.

Step 2: Inside the rubbermaids cover the sides with Mylar. If you dont have Mylar than spray paint it black and than white. The entire inside except the bottoms and than tape it with foil tape. Keep as little foil tape out of the inside of the rubbermaids, this will prevent hot spots. Turn on your lights in a dark room and put them in the tub, make sure no light leaks...LIKE I SAID, not a fan of MYLAR so here i just use my white walls....MYLAR is a waste and it is high maintenance especially in a small box like this. BE SURE TO CHECK THE CAB WITH LIGHTS ON TO SEE IF ANY LIGHT LEAKS, YOU WANT TO GET ALL OF THE PAINTING DONE AT ONCE!

Step 3: use a drill or screw driver to put the hooks inside. You will have a bolt and washer on both sides on the rubbermaid, outside and inside...These hooks will be used to hold your lights....you can use any lights with this grow design!

Step 4: This is for your fan/exhaust...with an exacto knife or sharp knife, cut a 6" hole in the bottom (actually your top) trace your fan for an even cut!

Step 5:
At opposite bottom corners cut two inch holes on the rubbermaid that doesn't have the fan hole in it! This is for your passive intake!

Step 6: grab your extension cord, cut the female end off. This is the end where you would plug devices into, NOT the side you plug into the wall, that's the male. strip the coating around the wires. There will be three wires. Green, black, white....most extension cords have green wires and the other two are usually black, that's fine.

Step 7: take fan wires, green black and white, and connect them to the extension cord wires. You will need to strip the wires of the extension cord. Its a good idea to have the same amount of wire showing on both the fan and extension cord. You will see the middle cord is usually the ground, or green. Typically the two other wires besides the ground will not be marked. If your extension cord is not marked its ok to connect the wires from your extension cord to any of them. So to conclude: your green fan wire should be connected to the green extension cord wire, this is your ground. the others can connect to either.

Step 8: Use wire connectors/caps/ to connect wires together. Make sure no wires are exposed and they are all inside the wire caps. Its a good idea to secure your wires with electrical tape after...this stops the wires from pulling apart.

Step 9: 
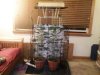
place your fan in the hole! the air should be blowing straight up! I wrapped a shirt around the outside of my fan and taped it with duck tape so it sits on top of the grow box and i can remove it and look inside, adjust lights....etc! To prevent light from getting in you can add duct work so the light doesn't get inside! I will be doing this once i am off 24/7 veg cycle.

Step 10: put PVC pipes together and secure them with duck tape or glue...
There is another on the other side! 2 x 2" intakes!

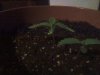
Step 11: figure out your lights and get some plants in this bitch!

You can do many different variations and what i have learned is that there is NO right way!

FYI:

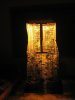
I use a 6 inch exhaust fan and 2 x 2inch holes for passive intakes. 4 inches total of intake. There is negative pressure created since my exhaust is bigger than the intake. The fan pushes more air out than it is pulling in so there is constant air flow being brought in and out quickly. If my intake holes were greater than the 6 inches of exhaust, i would have a hard time keeping the air moving out! This also prevents air/odor from leaking out the bottom. You can see in the pic below the lighter flame is being sucked in!


Once the smell kicks in and i go to flower i will use Duct Work and make a DIY carbon filter. This will be connected to the fan, the fan will stay in the same position. I will be sucking air out of the cab and pushing it through the filter into my bedroom!

DIY carbon filter - http://boards.cannabis.com/grow-faqs...on-filter.html
 

solarguy

Active Member
what kind of soil are you using? grow big can wait until week 3 or 4...when using FFOF soil you wait 30 days before any nutes bc the soil is already rich with nutes...
 
Top