Thermal Paste as TIM & Cree CXA30x0

salmonetin

Well-Known Member
...gauge for stencil way... from 0.050 mm to 0.500 mm...

...from sds post...

...TIM thicknesses for LED arrays typically range from 0.050 mm to 0.500 mm, depending on the type of TIM selected and material properties of the TIM...
.................

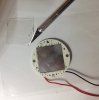
Arctic Silver 5 : Oldest TIM from the three ....
But .....Piece of cake to apply into an ultra-thin layer ...
My own favourite ...

.........

...My advice :
Use a thermal paste that can be applied easily .
Forget about their "thermal conductivity " figure...
It really means nothing at all ,if you can't have an ultra thin layer of the TIM used ....


........

....my decoding....then ultra thin layer.... 0.050 mm to 0,150 mm... not?...


saludos
 
Last edited:

robincnn

Well-Known Member
I haven't tried using a stencil yet, though I think it's a great idea. I just place a line on one side and drag it with the razor, a couple passes to distribute the paste well and then a single pass or two to create the thin flat surface.
In the Bridgelux video they use stencil to apply TIM on Heatsink. Once TIM is there on heatsink it is a little challenge to make sure Vero is center aligned on the TIM on heatsink because you cannot see though plastic. This will not be a challenge with Cree as corners of ceramic are visible.
I will try stencil on Heatsink soon. That should give an even and thin layer.
I tried to use stencil to apply TIM on Vero 29 directly just to see if I can do a cleaner job. It did not help ensure a thin layer.

$0.50 for Office depot transparent plastic laser printer sheet at their print center. No clue about sheet thickness. A4 paper is 0.05 mm thick and that laser printer sheet could be the same. A fine blade. And my testing Vero29. Had to use a little more TIM than what you see in photo.
I simply put the plastic sheet on vero's back and ran the blade in the gap between where metal ends and plastic begins.
 

Attachments

salmonetin

Well-Known Member
...for my pov the stencil go on the cob side... for the thermal paste... but its only my opinion...

....maybe need a base for protect the die zone from direct presions and evitate moving...

...but on the heatsink side too ... helped with screws for centering... its more easy and doable too...

saludos
 
Last edited:

robincnn

Well-Known Member
Imo, Stencil goes on Heatsink to ensure thin layer. Stencil on COB will not ensure thin layer, it only helps with cleaner application with Vero's cob. Stencil on Cree cob does not make much sense.
 

Rahz

Well-Known Member
You might try outlining the Cob on the heatsink surface before applying the paste. Done this way you would only need to insure the contact was square with the TIM layer and aim for the circle.
 

robincnn

Well-Known Member
You might try outlining the Cob on the heatsink surface before applying the paste. Done this way you would only need to insure the contact was square with the TIM layer and aim for the circle.
Thank you Rahz. I will outline the Cob and also screw points then contact will square on its own. Will try soon.
 

SupraSPL

Well-Known Member
I have always though of this graph as evidence that TIM thickness is NOT as important if you have good thermal conductivity and conductivity is not as important if you have a thin layer. One of the very best performers was the 250um thick pad, but it has 10W/mk (probably expensive though). But at lower Tc, the poor conductivity/thin layer TIM performed equally well as the high conductivity/thin layer TIM.

Also note that the graph assumes a Tc of 55C even with COB running soft (17W) and good TIM. In many cases we cool our setups much better than that when running soft and you can see that the difference in performance shrinks at lower Tc.

thermal grease a.png
===============================

I think this explains why I found no benefit to sanding the heatsinks using PK3 which is 11.2W/mk. The same was true with the stock Arctic MX4 paste and Rosewills stock paste, both performed great on unsanded heatsinks.

On top of all that our white COBs handle heat very well. We are looking at a difference of ~5C from a poor thermal interface versus a proper one so that translates to maybe 1% improvement in output. But there is no performance gain going from a proper interface to a fancy interface (sanded/polished heatsink, expensive pads, printed TIM etc).

I am not suggesting we should make no effort to reduce layer thickness, a bit of squeezing goes a long way. I agree with Salmonetin it makes sense to use a paste that is easy to apply into a thin layer and arctic silver 5 is runnier than PK3, yet still claims a very high conductivity. PK3 is easier to apply when it is warmed up a bit though and after some time develops an adhesive effect (try removing a PK2/PK3 mounted COB they are stuck fast)
 
Last edited:

littlejacob

Well-Known Member
Bonjour
Cause you need bigger one. ..35x35mm
Or better. ..do like me...change your mind for TIM...artic silver 5 is easy to use. ..really. ..like butter on toast...really
CU
 

Quintrix

Active Member
Bonjour
Cause you need bigger one. ..35x35mm
Or better. ..do like me...change your mind for TIM...artic silver 5 is easy to use. ..really. ..like butter on toast...really
CU
what about to remove artic?
dificult? clean? i will move the cob on the bars in a couple of mounths
 

littlejacob

Well-Known Member
Bonjour
Since I do not have isopropyl alcohol I cleaned with alcool you find in pharmacy to clean injury...and it work...it work too with cleaning alcohol!
I took a razor blade...put some tim all along a side and sprayed it all along with the blade and the same on the hs.
Apply tim with cob on the older if you don't you are going to have to clean and do it again!
Have a great day ★
 
Top