Finally some luck + questions :-)

DrDukePHD

Well-Known Member
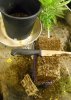
Ok so beginners luck... for my first "learning" step I germinated some seeds i was given at grow shop (no idea what they are) & 100% germinated in 48hrs. I used the paper towel, ziplock & Asus Router method ;-) Incase you're wondering an Asus Router runs 77-81F, sweet.

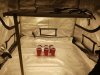
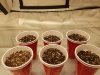
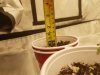
Now I've put the seeds in solo cups + soil. Holes in bottom. Tiny bit of Deer Park bottled water dripped on. Then I put the cups in my tent, with the FC4800 on & dimmed all the way down + sitting as high as i could get it. I opened one vent of the tent (bottom right).

I set the AC inline controller to only kick on at 80F.

Am I doing anything wrong so far???
 

OldMedUser

Well-Known Member
Am I doing anything wrong so far???
Yes, you are.

Don't dribble a little water around the seed. Water the whole thing good then don't water again until it dries out some. By the time they get their first set of true leaves coming out they will have tap roots half way down the cups and if there's dry soil below they're screwed.

How much light does a sprout get if it comes up outside like they have for millenia? Starve them for light and they'll stretch like crazy. If that was the FC-E4800 I'd probably go with 40% at 24" and the light bars moved close together to concentrate the footprint for them to see as soon as they poke up through the soil.

I use the light meter on one of those crappy 3-in-one plant probes to see how much light is hitting my plants. The scale runs 0 - 2000 and I want at least 500 on that scale for seedlings. 1000+ once they have a set of leaves and right up to 2000 for short periods under my 600W when it's moving on the light rail a foot from the tops. Stick that thing under sunlight and it pins it to the end right off the scale so if the sprouts could survive that outside then I know they'll be fine at way less than that.

:peace:
 

DrDukePHD

Well-Known Member
Yes, you are.

Don't dribble a little water around the seed. Water the whole thing good then don't water again until it dries out some. By the time they get their first set of true leaves coming out they will have tap roots half way down the cups and if there's dry soil below they're screwed.

How much light does a sprout get if it comes up outside like they have for millenia? Starve them for light and they'll stretch like crazy. If that was the FC-E4800 I'd probably go with 40% at 24" and the light bars moved close together to concentrate the footprint for them to see as soon as they poke up through the soil.

I use the light meter on one of those crappy 3-in-one plant probes to see how much light is hitting my plants. The scale runs 0 - 2000 and I want at least 500 on that scale for seedlings. 1000+ once they have a set of leaves and right up to 2000 for short periods under my 600W when it's moving on the light rail a foot from the tops. Stick that thing under sunlight and it pins it to the end right off the scale so if the sprouts could survive that outside then I know they'll be fine at way less than that.

:peace:
Ok thanks, I watered them all with maybe 2.5oz each & they are all heavy now. Then i moved it to 26" & 35% power. Don't have a light meter yet. Not sure i can move the light bars on this FC4800? Also I included a picture for the guy above your post :) :D

Also, only 4 of those cups contain a seed. 2 are just soil, i forgot which lol
 

Attachments

Weedoguido

Well-Known Member
I guess this is a question for anybody who can answer. I've noticed in a lot of seedling pics people are using two solo cups that appear to be the same, why? I use two solo cups myself but the one that the plant is in is clear and I put that one inside of a red solo cup to block the light.
 

DrDukePHD

Well-Known Member
I guess this is a question for anybody who can answer. I've noticed in a lot of seedling pics people are using two solo cups that appear to be the same, why? I use two solo cups myself but the one that the plant is in is clear and I put that one inside of a red solo cup to block the light.
I cut the inside one with scissors from top to bottom, then put it in an uncut one, so when its transplant time, i remove the inner cup & just peel it open. No having to shake it loose from cup.

Guy at grow shop suggested this method.
 

Weedoguido

Well-Known Member
I cut the inside one with scissors from top to bottom, then put it in an uncut one, so when its transplant time, i remove the inner cup & just peel it open. No having to shake it loose from cup.

Guy at grow shop suggested this method.
I now have a new method to try, thank you!
 

OldMedUser

Well-Known Member
Ok thanks, I watered them all with maybe 2.5oz each & they are all heavy now. Then i moved it to 26" & 35% power. Don't have a light meter yet. Not sure i can move the light bars on this FC4800? Also I included a picture for the guy above your post :) :D

Also, only 4 of those cups contain a seed. 2 are just soil, i forgot which lol
The FC models have fixed bars but the same models marked FC-E have thumbscrews at the end of each bar so you can push them closer together to tighten up the footprint when the plants are small and you don't need to cover so much area. The say if you run that at the 35% you have it now you could run at the same height at maybe 20% and still get the same reading on a light meter.

I was looking at the FC-E6500 to cover a 5x5' grow space like I'm at now in the grow room for flowering. Now they come out with the 8000 series so it's a f'n arms race now. lol You can see the black thumbscrews in the pic at the link.

Power is expensive here at over 30¢/kwh so I'm always looking at how to reduce my usage but still grow healthy plants. I'd start those babies of yours under my DIY LED bulb light with maybe only 5 or 6 bulbs screwed in at 9W each and let them get a couple nodes at least before firing up the 200W, (real power draw), COB LED I got with my little 2x4 grow tent. Then once a foot or so tall and getting bushy stick them under a 400W MH and move up from there as needed. Have 1- 400W MH, 3 - 400W HPS mags, 3 - 600W digitals and a 1000W MH/HPS magnetic I rarely need to use. Hortilux Super HPS bulbs for all and the MH version for most.

I'm always very careful to label pots etc as I go along so I know which is which. I know damn well I'll forget and be kicking my ass later. I always get clones from anything new in case it turns out to be the 'one' and I've missed a few of those in the past.

I cut the inside one with scissors from top to bottom, then put it in an uncut one, so when its transplant time, i remove the inner cup & just peel it open. No having to shake it loose from cup.

Guy at grow shop suggested this method.
I like a clear one inside the red one then you can easily see how rooted they are for repotting purposes. I just let plants get big enough to be able to lift the plant out of the pot by it's stem but do my repotting when the soil is dry to the point of needing water right away so the rootball doesn't fall apart when moving the plants to new homes. I also lay it on it's side and saw the bottom of the rootball off with a bread knife to get rid of stringy roots and force the roots to branch out with tons more feeder roots. Shave off any wound around the sides too then spray it all with water and drop in the new pot and soak it good with 1/2 strength nuts.

RootPrune01.jpg

RootPrune02.jpg

:peace:
 

DrDukePHD

Well-Known Member
Yes, you are.

Don't dribble a little water around the seed. Water the whole thing good then don't water again until it dries out some. By the time they get their first set of true leaves coming out they will have tap roots half way down the cups and if there's dry soil below they're screwed.

How much light does a sprout get if it comes up outside like they have for millenia? Starve them for light and they'll stretch like crazy. If that was the FC-E4800 I'd probably go with 40% at 24" and the light bars moved close together to concentrate the footprint for them to see as soon as they poke up through the

:peace:
Hey OMU, so I turned the light up to 35% & dropped it to 26inches, very close to your FCE instruction. Opened side bottom + back bottom vents for fresh air... 50% humidity. One thing i noticed, all the water drops on floor are gone & cups are already slightly lighter just an hour later. That light evaporates h2o quick, holy smokes! How often do you think ill be watering this germinated seed/soil cup?
 

OldMedUser

Well-Known Member
Hey OMU, so I turned the light up to 35% & dropped it to 26inches, very close to your FCE instruction. Opened side bottom + back bottom vents for fresh air... 50% humidity. One thing i noticed, all the water drops on floor are gone & cups are already slightly lighter just an hour later. That light evaporates h2o quick, holy smokes! How often do you think ill be watering this germinated seed/soil cup?
If you water until it's saturated then it should take at least a few days before needing water again. I use those little 3" flimsy square pots to start mine in and they can go a week at the start before needing more water. The top inch or two dries quickly from evaporation but lower down it's stay wet until the plants use it up. A 2" sprout will have a 6" root so it's not going to dry out easy. With new seeds in a pot you may need to wet the surface until it's up and growing a bit so you don't dry out the short tap root but not later so much. That water down lower will become stagnant and promote root rot if not allowed to dry down a bit and draw in some air to replenish the O2 that the roots and soil bacteria need.

I wouldn't worry about fresh air intake much at this stage nor do they need a strong fan blasting them as they come up. I aim the fan against a wall of the tent so the air circulates but don't direct it at the sprouts. Once the stems are flexible I flick the tops around so they look a little beat up after as that works the stems and makes them stronger. Most sprouts stretch up a bit and it looks worse than it is. After a couple weeks that 3" of stem will help keep the leaves up out of the soil and allow for better airflow around the base and won't look odd at all. If they want to fall over a little bamboo skewer and a twist tie loosely around the stem under the leaves will keep them upright and once they have a couple nodes the stem will be thicker and support them no problem.

Until the seeds are actually up I keep mine in a humidity dome to slow drying but once up they go out in the air to prevent excess moisture causing damping off/stem rot. I got a couple of those 6" tall domes that fit on the standard seed trays you can buy almost anywhere. Found a 4" one last time I was in the city and heavier trays too so want more of the trays when we go back next week if they still have them.

:peace:
 

Boatguy

Well-Known Member
I use two solo cups myself but the one that the plant is in is clear and I put that one inside of a red solo cup to block the light.
Why? Dont like the looks of algae on the sides?
Dirt isnt hydro...
The amount of time a plant takes to fill a solo with roots is very short, unless you are in the solo cup challenge or something.
 

Weedoguido

Well-Known Member
Why? Dont like the looks of algae on the sides?
Dirt isnt hydro...
The amount of time a plant takes to fill a solo with roots is very short, unless you are in the solo cup challenge or something.
I use the clear cups so I can monitor root growth. I don't normally see algae.
 

OldMedUser

Well-Known Member
So maybe i can just put a ziplock over top of cups until they sprout?
That works too but should take them off for a bit every day and remove as soon as the cotyledons break the surface. A dome just makes it easier and a little bending of a couple of coat hangers and a clear garbage bag would make a fine dome you could pop over them all at once right there on the floor. I like those cake pans you get from the store with the clear domes for small pots or cups. Get to eat cake too! :D

:peace:
 

DrDukePHD

Well-Known Member
That works too but should take them off for a bit every day and remove as soon as the cotyledons break the surface. A dome just makes it easier and a little bending of a couple of coat hangers and a clear garbage bag would make a fine dome you could pop over them all at once right there on the floor. I like those cake pans you get from the store with the clear domes for small pots or cups. Get to eat cake too! :D

:peace:
Any tips so far? Took the plastic wrap domes off.
24" up, 25% power...
 

Attachments

OldMedUser

Well-Known Member
Any tips so far? Took the plastic wrap domes off.
24" up, 25% power...
Not really. Now you know which were the blank cups. :)

I don't know enough about the LED lights to say whether you have yours set right but it seems a little low power at that distance to me. If they start stretching a bunch I'd power it up or move it closer right away. 3 - 4" tall by the time their first set of leaves out is what I look for.

:peace:
 

DrDukePHD

Well-Known Member
Not really. Now you know which were the blank cups. :)

I don't know enough about the LED lights to say whether you have yours set right but it seems a little low power at that distance to me. If they start stretching a bunch I'd power it up or move it closer right away. 3 - 4" tall by the time their first set of leaves out is what I look for.

:peace:
Day #3 up.. what do yall think? Just moved light down to 19" at 25% a few hours ago
 

Attachments

OldMedUser

Well-Known Member
Day #3 up.. what do yall think? Just moved light down to 19" at 25% a few hours ago
That looks pretty normal. About this stage is when I'm flicking them around a bunch to toughen up the stems more. When I have a bunch of them I just rake back and forth thru them so they look a little beat up after but if it doesn't kill them it just makes them stronger.

:peace:
 
Top