Harvest a Pound Every Three Weeks!

andyman

Well-Known Member
Oh, the andyman can ;)

Not too difficult! I bought my contactor at an "electrical wholesale supply" store for $26. I got the 120vAC 20A two pole. I should have got the 30A...

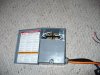
It's a cool and simple concept now that I understand it :) The contactor has an electromagnetic coil that is powered by the "trigger". The magnet pulls the contactor down to complete the circuit of the extension cord, which is powered by it's own outlet, not the timer.

I changed the trigger cord since taking these pics to a three wire cord... and I also plan on getting some sort of metal or plastic case to enclose it in.
awsome and well done. dont really need the 3prong trigger cord but wont hurt anything. better safe than sorry. Also I dont think I needed that fuse but it doesnt hurt to have.
im putting mine in an enclose box & adding indicator light too (to know when the trigger is powered by the timer).:weed:
peace
 

latinrascal

Well-Known Member
For those wanting to build the "Andy" Timer control here is what i did and it cost less the $30 but i already had a timer so the $30 was just for the other supplies i needed. Work perfectly by the way Thanks Andy for your how too.

Went to lowes and bought
1. a pack of 2 power strips since they were on sale $5.96
2. Buy basic 6 ft household extension cord $1
3. Go down electrical isle that has the breaker boxes and pick up a 60a not fusible air conditioning disconnect box $6.50. What you are looking for is just a box to house the other parts and this was the cheapest one they had that would do what i needed. part number for this at lowes is ufp222r and bar code is 85901 30117 2.
4. grab at least 3 nm cable connectors 3/8-1/2 in size. Should be same isle neat the conduit. Its just the piece that goes in the knockout holes of the box to secure the wire. Part number is 49650 bar code 3 1857 49650 0
Price is like 50 cents
5 Call around to your local heating and cooling shops and look for the electrical contactor that andy posted up. I was able to get the same one for $11 and change. be for warned that this is the price that contractors pay. for the general public is was about $22. I deal with this particular shop alot so he cut me a deal. Make sure they are 120v to coil. Most shops only carry the 24v to coil which you can get to work but that is a whole nother ball game.

When you get home open the disconnect box and gut it. you can leave the grounding rod as i did to ground my wires. now at this point you have to secure the contactor to the inside of the box securely. I drilled a hole in the mounting plate and just reused one of the original screws and holes from the gutting on one end and the other i slipped into the tab holes like the original setup.

Knock out the smallest holes on the 2 bottom and 1 side knockout holes. attach your cable connectors and secure

Now you cut the female end off the cheap extension cord and slip through the connector and connect one end to each side of the coil. That would be the different looking tabs on the long sides of the contactor.
Now cut the power strip wire allowing yourself just enough wire on the strip side so the wires can reach the terminals on the contactor. slip the wire through the connector and secure the wires Strip back the outer layer of insulation and connect the black wire to one of the contactor terminals. do the same for the male ended cord that you cut and secure in the last knockout hole. I tied the whites together and grounded the greens in the grounding block. make sure that the black wires that are attached to the contactor line up on the same terminal of the contactor. one should be on right and one on the left either the 1st or top terminal or the 2nd bottom terminal. It really is a piece of cake.
 

repvip

Well-Known Member
the 24v contactors could be used with some of those cheaper CO2 monitors on fleabay! That way you could piggyback a 120v generator.... geez man this is great :mrgreen:
 

offgridgrower

Well-Known Member
This probably is not a coincidence but I've got three pumps plugged into a CAP NFT timer. It's the fixed 1 minute on / 4 minute off timer. I've had issues with the timer and it stays on for several minutes at a time. I can't say how long it stays on for because every time I catch it I time it for like 4 minutes that it's on before I unplug it. I bought a new one yesterday actually and replaced the original and I'll return it. If this happens with the new one then I might have to try this device that andy shared with us.

Hey andy - is there any way you could clean up the schematic drawing and provide a parts list?

Thanks,
DP
dragon the same thing happened to me with my fixed cap nft1 i am on my 3rd one now,luckly the shop owner has let me return them and replace it for free but now it only powers the water pump so it seems fine and hasnt stayed on, before I had the pump and a couple air pumps for the dwc buckets all plugged into it and it doesnt like it, I still dont get what this thing (the andy device) does tho? i get having multiple pumps on one device is not good but why?
 

latinrascal

Well-Known Member
the 24v contactors could be used with some of those cheaper CO2 monitors on fleabay! That way you could piggyback a 120v generator.... geez man this is great :mrgreen:

unless i'm wrong your would need a 24v transformer to make that work. Its can be done but the transformer cost about $30 or so.
 

latinrascal

Well-Known Member
dragon the same thing happened to me with my fixed cap nft1 i am on my 3rd one now,luckly the shop owner has let me return them and replace it for free but now it only powers the water pump so it seems fine and hasnt stayed on, before I had the pump and a couple air pumps for the dwc buckets all plugged into it and it doesnt like it, I still dont get what this thing (the andy device) does tho? i get having multiple pumps on one device is not good but why?
Its not good because the start up amperage is higher then the running amperage. So if your timer is rated at 15amps and just for this example lets say each pump runs at 4 amps and you have 3. So you think you are good since 4x3=12amps right? Wrong! For a very brief second at startup lets say it takes an additional 2amps to turn the pump on so that would be 6amps x 3 pumps=18amps needed. This extra draw is whats burning out your timer. Now the Andy device uses what is in essence a relay which allows you to run higher power to your devices without that power running through your switch or in this case a timer rated for only 15 amps.
If you look at repvips pictures you will see two cords both with male ends on them. the smaller one plugs into your timer the other into your wall outlet. What this does is once the timer turns on there is very little amps in play coming from your timer, just enough to basically power a magnet that then closes a contact. When that contact closes you power strip will then get full power to it right from your wall outlet. The magnetic contact acts like a light switch. When that contact is interupted (When the timer turns off) The contact opens killing the power to the strip. Basicly using this setup your timer is not really working very hard at all which should lenghten the service life.
 

andyman

Well-Known Member
Its not good because the start up amperage is higher then the running amperage. So if your timer is rated at 15amps and just for this example lets say each pump runs at 4 amps and you have 3. So you think you are good since 4x3=12amps right? Wrong! For a very brief second at startup lets say it takes an additional 2amps to turn the pump on so that would be 6amps x 3 pumps=18amps needed. This extra draw is whats burning out your timer. Now the Andy device uses what is in essence a relay which allows you to run higher power to your devices without that power running through your switch or in this case a timer rated for only 15 amps.
If you look at repvips pictures you will see two cords both with male ends on them. the smaller one plugs into your timer the other into your wall outlet. What this does is once the timer turns on there is very little amps in play coming from your timer, just enough to basically power a magnet that then closes a contact. When that contact closes you power strip will then get full power to it right from your wall outlet. The magnetic contact acts like a light switch. When that contact is interupted (When the timer turns off) The contact opens killing the power to the strip. Basicly using this setup your timer is not really working very hard at all which should lenghten the service life.
As soon as I remember to grab my clamp on ammeter out of the truck, I will see what kind of amperage my lil 295gph one for my cloner pulls. the 295gph's seem to work fine for the amount of spray nozzels in the cloner and are real cheap at harbor freight, there made in china and will fail sometime but for a few $$ extra you can get a year warrenty. I think they were under $20 with that included out the door:o
 

repvip

Well-Known Member
this is correct dont use the 24v with my system unless you have a spare 24v power supply setting around.
Obviously you want the 120volt for this system. I only referred to the CO2 monitors on ebay--the cheaper ones only have 24v out.... they aren't designed for hydroponics... the CO2 monitors for hydroponics usually have 120v out and are much more expensive. Most generators and regulators are 120v... everyone caught on now? This same concept could give me a cheaper CO2 monitor...

Anyway. Done and done. Final pics.
 

Attachments

DIRTHAWKER

Well-Known Member
For those wanting to build the "Andy" Timer control here is what i did and it cost less the $30 but i already had a timer so the $30 was just for the other supplies i needed. Work perfectly by the way Thanks Andy for your how too.

Went to lowes and bought
1. a pack of 2 power strips since they were on sale $5.96
2. Buy basic 6 ft household extension cord $1
3. Go down electrical isle that has the breaker boxes and pick up a 60a not fusible air conditioning disconnect box $6.50. What you are looking for is just a box to house the other parts and this was the cheapest one they had that would do what i needed. part number for this at lowes is ufp222r and bar code is 85901 30117 2.
4. grab at least 3 nm cable connectors 3/8-1/2 in size. Should be same isle neat the conduit. Its just the piece that goes in the knockout holes of the box to secure the wire. Part number is 49650 bar code 3 1857 49650 0
Price is like 50 cents
5 Call around to your local heating and cooling shops and look for the electrical contactor that andy posted up. I was able to get the same one for $11 and change. be for warned that this is the price that contractors pay. for the general public is was about $22. I deal with this particular shop alot so he cut me a deal. Make sure they are 120v to coil. Most shops only carry the 24v to coil which you can get to work but that is a whole nother ball game.

When you get home open the disconnect box and gut it. you can leave the grounding rod as i did to ground my wires. now at this point you have to secure the contactor to the inside of the box securely. I drilled a hole in the mounting plate and just reused one of the original screws and holes from the gutting on one end and the other i slipped into the tab holes like the original setup.

Knock out the smallest holes on the 2 bottom and 1 side knockout holes. attach your cable connectors and secure

Now you cut the female end off the cheap extension cord and slip through the connector and connect one end to each side of the coil. That would be the different looking tabs on the long sides of the contactor.
Now cut the power strip wire allowing yourself just enough wire on the strip side so the wires can reach the terminals on the contactor. slip the wire through the connector and secure the wires Strip back the outer layer of insulation and connect the black wire to one of the contactor terminals. do the same for the male ended cord that you cut and secure in the last knockout hole. I tied the whites together and grounded the greens in the grounding block. make sure that the black wires that are attached to the contactor line up on the same terminal of the contactor. one should be on right and one on the left either the 1st or top terminal or the 2nd bottom terminal. It really is a piece of cake.

SO IT COST ABOUT $50 and you have to walk around lowes and try to get the right parts etc,,,
? Then you have to build it and make a safe housing? Crap!~! me i would rather just pick up another timer for $80 bucks and be done with it.
 

repvip

Well-Known Member
SO IT COST ABOUT $50 and you have to walk around lowes and try to get the right parts etc,,,
? Then you have to build it and make a safe housing? Crap!~! me i would rather just pick up another timer for $80 bucks and be done with it.
It's probably not for everyone... I might end up using potentially 9 pumps and didn't want to buy another timer. Not to mention.. I am using the 633gph pumps...

If it's not broke... don't fix it!
 

DIRTHAWKER

Well-Known Member
Yea no pun intended guys... its probably alot easier for you all who have some wiring/electrical background... im just gonna pick up another timer,,,put two pumps on one and 3 on the other and pray.
 

torrey420

Well-Known Member
Alright, I messed around enough with trying to figure out a way around it, but I have finally given in, what is the proper circuit breaker I should run to power 4 600 watt lamps? I remodel for a living but I have always subbed out the electrical so I have no problem running the conduit from the breaker box, just don't know what gauge wire and breaker to use! Any of you electrical guru's feel free to chime in, I'm going to run the conduit this weekend.
 

G33kDro

Well-Known Member
12-3 is what I will be using, and as long as you have it in conduit all the way to your receptacle you should be in code no matter where you are... I'm not licensed, I just have wired a ton of shit.
I need to get my conduit ran up to my room this year... haha.

also think of a 20-30amp breaker @ 240 for less amp draw.
2400watts=:
20 amp draw on 120
10 amp draw on 240

-G33k
 

LionsRoor

Well-Known Member
http://forums.cannabisculture.com/fo...478638&fpart=2

^2pages

HEY GUYS same setup? whats the differences with this 1 compared to stinks?

iv really been wondering instead of filling up stinkbuds pm box with msgs (sry) lol i thought id take a shot here see what i can come up with, its only 2 pages.
This DIY project shows you how to make the AeroFlo, the older version, as the design just recently changed to external manifold with spray lines. The AeroFlo's are made by GH - here is a link to the manuals to see what the actual versions look like...

http://www.generalhydroponics.com/genhydro_US/instructions.html

The biggest difference between this and the Stink special is that it utilizes a spray line rather than the PVC tube with EZ-Clone spray heads... additionally, it uses a drain pipe to drain the nutrient solution back into the res, vs. simply letting it roll off the edge as with the SB design... the drain tubes can be raised or lowered to change the level of the water within the grow chambers.

Here is a link to a new AeroFlo with the external spray lines...

http://www.hydroponic-shop.com/product_info.php?products_id=41
 

andyman

Well-Known Member
12-3 is what I will be using, and as long as you have it in conduit all the way to your receptacle you should be in code no matter where you are... I'm not licensed, I just have wired a ton of shit.
I need to get my conduit ran up to my room this year... haha.

also think of a 20-30amp breaker @ 240 for less amp draw.
2400watts=:
20 amp draw on 120
10 amp draw on 240

-G33k
All sounds good , nice job
 

latinrascal

Well-Known Member
Andy,

Just an FYI now that i am not medicating. in your schematic i noticed that you made an error that i just now caught. the fuse you inserted going to the timer may be to high unless you have a different type timer then most of us are using. The timer such as what SB uses has a max output of only 15amps, at least mine does, so i would suggest lowering that to under 15 amps if in fact you expect it to do anything to save your timer. However with that said and i did Read where you said you thought it was overkill which i do believe it to be since your main power is coming from another circuit.
 

torrey420

Well-Known Member
12-3 is what I will be using, and as long as you have it in conduit all the way to your receptacle you should be in code no matter where you are... I'm not licensed, I just have wired a ton of shit.
I need to get my conduit ran up to my room this year... haha.

also think of a 20-30amp breaker @ 240 for less amp draw.
2400watts=:
20 amp draw on 120
10 amp draw on 240

-G33k
Cool, sounds good, I was thinking of doing 240 just need to find lights that are compatible with 240! Thanks!! +rep:weed:
 
Top