My Self Built Stealth Cabinet Grow (how to build a cab) My Pride And Joy

dusty26

Well-Known Member
Hey fellow growers ...
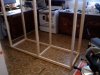
So i'm switching from my current 12' x 12' room to a stealthy cabinet grow i'm so excited.. I love building / designing a new grow (who doesn't hehe) so here's the story...

For christmas I got a radial arm saw (very nice) A portable brad nailer and compressor and tons of different little wood working tools :) .... my wife asked me if I would build a shelf/cabinet/entertainment center for our bedroom so I decided to make a stealthy cabinet grow and incorporate a housing for our tv and dvd player as well.. I guess this could be a how to for the beginers as well.. please enjoy.. (its a work in progress.. I couldn't wait to post the finish product so i'm going to post my way through the build.. please enjoy ..
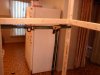
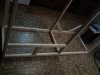
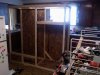
below is a pic of the initial drawing I did .. cab will house a flowering room, veg room/mother/clone, and tv/dvd player slot..

cab will be 6' 6" in length by 2'6" wide by 6' 6" tall ... with a flowering room being 3'6" wide by 2.6" deep by 6' 6" tall... a veg room of 3' wide by 2'6" deep by 56" tall...
 

Attachments

  • draw.jpg
    draw.jpg
    36.2 KB · Views: 2,395
ok so I decided to go with 2" x 3" x8" studs for the frame...
heres a pic of the bottom (floor) frame ..
stud in the middle is the divider for the flowering/veg room...
 

Attachments

  • pic1.jpg
    pic1.jpg
    57.3 KB · Views: 609
In this pic i've got the top and bottom framed in (studs seperating the veg room and flowering room
 

Attachments

  • pic2.jpg
    pic2.jpg
    47.9 KB · Views: 548
nailin in the studs for the height, connecting the top and bottom ....6'6" tall
 

Attachments

  • pic3.jpg
    pic3.jpg
    55.3 KB · Views: 497
another shot of the studs connecting the top and bottom .....
 

Attachments

  • pic4.jpg
    pic4.jpg
    57.9 KB · Views: 429
now the other side is done so i've got the top and bottom connected and my height accomplished at 6' 6" .. Now I'm going to add the studs to seperate my veg and flowering room
 

Attachments

  • pic5.jpg
    pic5.jpg
    53.8 KB · Views: 541
bam... got the studs nailed in place that will seperate my 2 grow rooms (veg / flower)
 

Attachments

  • pic6.jpg
    pic6.jpg
    57.9 KB · Views: 556
If your building a cab by yourself, sometimes it's hard to hold a stud and get it perfectly where you want it... so I went out to the garage and got a quick ratchet strap .... does the trick lol ....
 

Attachments

  • pic7.jpg
    pic7.jpg
    51.5 KB · Views: 637
ok.. now here, i've started to seperate all three rooms, i've got my large flowering room ,,, my veg room (bottom right hand side) and my housing for my dvd player and television (top right)
 

Attachments

  • pic8.jpg
    pic8.jpg
    62.2 KB · Views: 1,119
I want to build doors that hide all light , so it would be a good idea to make a fram for the doors to butt up against and also I want to put a lock in each of the doors... this pic is the bottom of the flowering room.. where the bottom of my doors will rest on...
 

Attachments

  • pic9.jpg
    pic9.jpg
    48.5 KB · Views: 566
ok heres a bigger picture, I put braces in a couple key spots for added support, floors, and in the back just to keep er sturdy she's all square and ready for the next step.....
 

Attachments

  • pic10.jpg
    pic10.jpg
    45.1 KB · Views: 764
Ok.. i'm using 7/16" osb for the walls, floors, and ceilings... (priced right) i'm sinking the floors in so it's flush with the studs (did this with some 1" pine strips under the osb nailed to the studs.. works good when you get your pots inside (gives you more floor space) I hate having to deal with a lip ...heres a pic of the veg room floor in place
 

Attachments

  • pic11.jpg
    pic11.jpg
    41 KB · Views: 431
now placing the back of the veg room in..
sorry about the number of photos lol... I know you guys like photos.. i'll skip a few steps .... i'm sure your getting the idea.. hehe..
god this is fun stuff :)
 

Attachments

  • pic12.jpg
    pic12.jpg
    46.6 KB · Views: 586
now placing the back of the veg room in..
sorry about the number of photos lol... I know you guys like photos.. i'll skip a few steps .... i'm sure your getting the idea.. hehe..
god this is fun stuff :)

Hope you can get that thing into your bedroom:-P!

Looks good keep it coming!
 
lol.. I know right... luckily 1. we have a big bedroom door, and 2 I designed it so it would fit right in the bedroom, (and it's going to be on wheels so it'll be sweet ) :) thank you for looking
 
For some reason when I try to post more on my progress the screen is gray I can type all I want and add a pic but when I go to submit it says my message is to short must be at least 10 characters...
I have more pics and have gone further but wont let me post ? hmmm
 
floors and half the backs are on...
now at my local home depot they have 4 x 8 sheets of 7/16" osb for 6.29 and the 2x3x8 are 1.98 a piece... all together I got 14 studs and 5 sheets of osb...
 

Attachments

  • pic13.jpg
    pic13.jpg
    62.5 KB · Views: 684
ok , this was earlier this morning... lol I had to get some more osb and studs and had to wait for home de"pot" to open so I decided to start painting the veg room :)
 

Attachments

  • pic14.jpg
    pic14.jpg
    48.3 KB · Views: 1,000
Back
Top