Wub's Very First Grow.

WubWubWub

Member
Considering how old I am, it is strange that I am newbie to weed in general. I am tired of the weed that I buy not being a constant quality, so I decided to start my own grow. I will list what i have here and will update with pictures as I make progress.

My grow is very much in the infancy; having things I am still learning about. I am posting here because I have lurked for about two months and have enjoyed everything I have read. I have taken a special liking to Sativus' person grow, so i urge other's to check out if you have not done so already:

https://www.rollitup.org/grow-journals/437784-losing-my-virginity-growing-first.html

With that said, I would like to start off with what I would like to purchase and what I have purchased so far and a design idea I have for my grow box. I will add to my list as I purchase the items.

What I need:
https://www.rollitup.org/indoor-growing/7074-easy-build-diy-carbon-filter.html
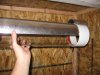
Flex Tube (for the filter and the light)
I need ALL Planting supplies- Pots, Nutes, Soil, Ph Equipment, Humidity Control, etc... (and advice is welcome here, but I need something good for a beginner... and cheap. I have already spent near 300 dollars)

What I have: (Some of which I found within Sativus' thread)
http://www.smarthome.com/3011/6-In-110VAC-250CFM-In-Line-Duct-Fan-DB200/p.aspx
http://www.amazon.com/Duracraft-DY-012-Oscillating-3-Speed-Tower/dp/B000FVX6D2
http://www.sears.com/shc/s/p_10153_12605_SPM3038892902P?prdNo=1
Power Strips and Cords
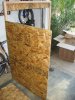
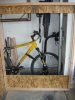
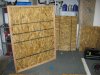
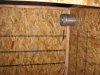
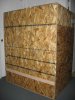
160 Sq. Ft. of Lumber for Box (and lumber for framing)
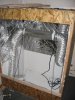
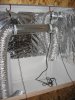
A lot of string (for curing area)

I would like to grow two plants for sure, but if I could make three work (by staggering them in the box), I will do so.

I am going to start with Nortern Lights (feminized) that I ordered from marijuana-seeds.nl (I hope they make to me in the States!!).

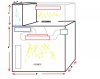
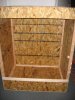
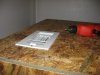
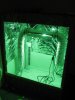
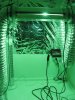
Here is my box design/idea. If it is like any other boxes on here, I am sorry it looks like yours, but I did not copy it! This was my own design from what I have read and what I think would work. Let's hope it actually works in person.
 

Attachments

Sativus

Active Member
Holy smokes man! I nearly shit when I read! Thanks bro. Really appreciate that.
About the carbon filter. I know I said that the one I am using works, and my smell is not as strong, but I have it strapped now to the exhaust fan, the circulation fan, and even the dehumidifier that is in my room. Honestly, if you want the smell gone you should buy the proper carbon filter and exhaust fan. They are both on my list for next grow. But it's about fun too right? So if you want to give it a try, go for it! It's cheap and easy, and then you can make your own conclusion ;).

Interesting idea about the curing area. Not sure how practical it will be, as the buds are not hanging in there for too long anyways... But if you find other storage uses ect. that you can use it for also, then yeah! Interesting.

My suggestion on the soil and nutes. If you haven't got anything yet, I would suggest looking into growing in coco and using coco specific nutes. Nutes are really easy if you measure properly. Make sure to start weak and slowly work your way up and watch the plants reactions and you will see how easy it is. If you don't want to do coco this run, get yourself some nice clean soil with no added nutes so you can control the feeding through the entire grow. This grow, I did mine in miracle 14-14-14 soil. It works, no doubt, but once you get into it you will wish you had used clean soil so you could manipulate the feed better on your own.
Yeah, 2 is about it if you want that curing room. Without it, you could do 3 for sure. But you can try anything you want! If you LST the shit out of them and keep good airflow under the canopy, you could probably manage 3.
Pots, square ones have much more volume which means better root system. And the bigger the better.
Humidity, the only thing that made me sure I was on the right path was a dehumidifier. Without it, all I could think of was the impending doom my plants would face from bud rot and mold resulting from high humidity. I am very happy I have it. And you can find cheap ones in the classifieds ect.
Ph/PPM meters... I don't have. Never used. I use well water high in ppm, like 700. That's all I know, except that I am sure it would be at least slightly beneficial to keep those numbers within proper ranges. Also on my buy list for next grow... And you can get them online pretty cheap too.

Congrats on taking the plunge man! My clones were stalled for like 2 months. I remember the feeling I had when I finally got them home, was so exciting!
Subbed m8! Good Luck!
 

WubWubWub

Member
GrowBox2.jpgJust a small update. I have started on my box, mostly just getting the larger pieces cut so that all I have to do is get it put together. I did change my design. I am going to run 5' tall, 4' wide and 3' deep. that will allow me to easily grow 4 plants. I am going to put a small curing station on top and then next to it (not now, but in a month or two) I am going to put an area for seedlings using a small fluorescent lamp. I am also going to use it to germinate and grow other plants to place throughout my house. I have really wanted to grow a bunch of plants lately since I have been researching this stuff. I like the look of Poinsettias, so will try and grow some of them. Anyways, I may assemble some of the box tomorrow, if not I know I will build it next weekend for sure.

I do have all of my supplies now. The only thing I am missing are the seeds, pots, soil and nutes.

Here is the quick MS Paint idea for my box. Sorry I have nothing real to post as of yet, but had roof repairs I had to do today, so it hindered my box progress.
 

WubWubWub

Member
These are the construction photos. I will have to actually assemble this in the room its going in because it will be too wide for the doors.
Construction1.jpg
This is just a quick mock of how the side will sit on it. I have another piece that will extend it to five foot tall.
Construction2.jpg
This is the inside of the box. That is the front lower lip and the smaller top lip. The door will not have hinges, it will have two handles and I will be able to lift it up and completely out of the way. Once I am done, the door will completely seal.
Construction3.jpg
This is the back. Nothing special. I have the other pieces already cut and ready to go. Just going to sand a few edges, paint it and then move indoors for assembly. I hope to get some of that work done later this week.

Thats all for now. I will post more as I get it done.
 

WubWubWub

Member
I am now at the point I have to construct this inside. I have been busy with other things, so I was not able to do much work today. I may continue working on it tonight. Not sure how much I will actually get done.

From my quick mock up, 4 plants will fit nicely and have a lot of room to grow straight up. I could also possibly fit a 5th plant, if I wanted. It would probably be a bit crowded. Anyways, here is the progress.
 

Attachments

Sativus

Active Member
It's gonna be tight. You thought about scrogging?(Which would be nice btw, and will be the basis of my next grow).
If you paint that box white, make sure you use mold resistant paint. For my next grow I will repaint my box using flat white paint on vapor barrier which will create sort of a rubber mold inside my box which will help keep it air tight.
What seeds did you get?
What growing medium did you decide on?
What size pots are you going to use?
 

WubWubWub

Member
I know I am going to LST for sure, but didnt give Scrogging much thought. I probably should. I have a lot of room inside the box. I even have a lot of room to grow upwards.

As for paint, I think I got a generic flat white indoor paint. Should I have gotten an outdoor paint?

I thought I had bought the feminized Northern Lights seeds (and got some Sensi Kush for free), but I think I got normal ones. They sent 2 bags, one with 10 seeds (NL) and one with 5 seeds (SK).

I have not bought soil yet. I honestly have no idea. I have received so many suggestions, it's hard to choose. I really do not want to mix up my own until I learn more. I kind of want auto-pilot right now or something easy to learn. As for nutes, I am going to use Miracle Grow Tomato Blend for Veg stage and the Bloom Boom for the Flowering stage. If there is anything better (and just as easy), I am open to suggestions.

I am starting off with the 4" square pots. Then moving to the 8" diameter after 2 weeks, then switching to 12" diameter [not sure when]. Should I just go from the 4" seedling pots to the 12" ones? Do i really need the 8" pots? Or should I go from the 4" seedling pots to a 5 gallon bucket?

Feel free to pick my brain. I might have missed a few things and I surely wouldnt mind this quizzes. Best way to learn.
 

Sativus

Active Member
Looking good m8! Was your exhaust fan a tight fit? A small piece of 2x4 and a hammer helped me fit mine in snug... ;)
Good on the indoor paint I think. It shouldn't be getting very wet at all anyways... Took me like 4 coats until I was happy enough (also when I ran out...lol).
I am guessing your probably going to pick up whatever soil is available at your local shop? Make sure to pick up a small bag of perlite also.
What is that tube in the last pic?
Pots I don't know m8. I would think 4 - 12 would be fine. I mean, the plants won't be getting too big anyways right? What's your intention for final height? They will at least double in size after the 12/12 switch...
I still have some smell floating around the house, and it is coming up through the floor. So next grow I will be putting plastic on the ceiling in my grow area. But I will also be building walls too. Which means I will actually have a real grow room! Point is, don't assume that a DIY carbon filter will work 100%, cause it probably wont. I saw 1 DIY though that was basically an exact replica of a store bought one but made with DIY material. Best bet is that one (I'll look for a link). If odor is of ANY concern, take it seriously...
Edit: Here it is http://www.icmag.com/ic/showthread.php?t=31679 for just over $50, that's basically what you get for 150+ if you buy one pre-made.
Anyways, keep it coming!
Edit: I just "liked" the shit out of your thread ;)
 

WubWubWub

Member
Yeah, I had to squeeze the exhaust fan in a bit, thats for sure. I didnt hammer it in though. Just put pressure on the side sticking out the most and "walked" it into place. I still need to do something to hold in place completely. I noticed last night that while I was working on other parts of the box, it was slowly coming out. Very slowly, but it still moves. Probably 2 screws on the outside to keep it from falling back in.

For the paint, I will go until I cannot see any of the wood pattern or the black ink that was on it from the factory. I am hoping I do not need to buy some primer, though that may have been easier to do in the first place, but I have a large bucket of paint. Mylar will be going up after the paint.

The tube in the last pic is my light- http://www.sears.com/shc/s/p_10153_12605_SPM3038892902P?prdNo=1. You really cant see in the pic, but it is positioned under the 2x4 that will be supporting it. It was kind of awkward holding it and taking the picture. I am going to set up another 2x4 in the back to help support the exhaust fan, the cooling hoses and the filter. Speaking of the filter, this is the one I am going to make- https://www.rollitup.org/indoor-growing/7074-easy-build-diy-carbon-filter.html. There will be a small change of how its made, but from what I have read, its very similar to how these are made- http://www.google.com/products/catalog?q=carbon+filter&hl=en&prmd=ivns&bav=on.2,or.r_gc.r_pw.&biw=1272&bih=820&um=1&ie=UTF-8&tbm=shop&cid=3157442626150603353&sa=X&ei=0zkzTs7VJ8qDsgLN2emoCw&ved=0CK8BEPMCMAY. The only difference (that I can tell) is the one I am building will need to be changed every 3-4 months while those last almost a year. I am hoping it removes a majority of the smell, if not all of it.

Thanks for the support. I cannot wait until I am cracking seeds and actually growing, but I am taking my time making sure I do everything right.
 

Sativus

Active Member
Let me say this. I have that exact carbon pre filter. There is 2 layers of it on my exhaust fan, 2 layers in my circulation fan, and 1 more layer on my dehumidifier. The smell is still there. Not nearly as bad, but nowhere near gone. I can smell it in some spots of my house, and I can totally smell it when I am downstairs. Especially in the room the box is in. I know it looks easy to build, but I am afraid that if you require the smell to be 100% gone, you will be scrambling for a replacement at an inconvenient time. If I have a go at another DIY one, it will be the one I linked to. Otherwise, I will be spending the cash on a proper one.
Take your time for sure. When you start, you will feel ready and more confident.
Edit: Nice deal on that light!
 

WubWubWub

Member
Yeah, I researched it more after you had originally suggested the DIY one in your earlier post. I think I will just buy one of the good ones that last a year, but I will pick it up right before the flowering phase. For now, I'll just use the Cut to Fit one I have to keep the smaller smells away.

Ended up buying the materials for that filter. Only difference is mine will be 6" core with 8" outside.
 

Sativus

Active Member
Yeah, I am pretty sure you can get away with the pre filter one until they really start to stink. But when they start to smell, the aroma increases rapidly.
Yeah, They didn't have a 6->8 adapter like I linked before. 3 or 4 layers on that 8 inch adapter may work ok.
 

WubWubWub

Member
I decided to build it like the link. I will be using the pantyhose with the activated carbon in between. Might wrap the outside of that filter with a cut to fit carbon prefilter just for the added protection.
 

Sativus

Active Member
;) I wish I did it that way from the start, but my local pet store don't carry the carbon ;(
I am looking forward to hearing about that m8!
 

WubWubWub

Member
More of the box. It is coming along. I will start germinating sometime this week. Also growing some regular flowers with these to put in my living room.

I still need to build the filter, buy some small bungee cords to hold up the slack in the hoses and apply the eye hooks to tie the strings/bungees off to and get everything wired and the timer working. Then I am going to run it for a couple of a days before I actually put plants in it.

I should have put the Mylar down a little bit lower, but I plan to buy more anyways. Maybe next grow. I may also get chain instead of those pulleys so I can get the light closer to the top of the box.
 

Attachments

Sativus

Active Member
Lookin good m8! Just want to point this out though, because if you can learn from my mistakes then I am twice as happy.
In the second pic, at the top. You see that crack between the press board and the 2x2, mold will grow in that crack if you don't close it. Grab a few more screws and make sure that those cracks are as minimal as physically possible.
With that light, I think you are going to do a lot better than I did... I urge you to consider carefully how many plants to put in there. I honestly think that if you did 2 with a nice veg time, you would fill your box.
Keep it up m8!
 

WubWubWub

Member
Well, I am going to germinate 5 seeds and grow whatever plants are female.

As for the cracks, I can fill them with caulking, which I should have done, but I expected to have my box done sooner and still need to get some from the store. I suppose I will get some while I am out today. Thank you.
 

WubWubWub

Member
Waiting for the Activated Carbon to come in (and still need to build the filter), but pretty much done. I will clean up the cords and get chains for the light.

Observations and suggestions? I have it running now to check temp and humidity with it going. If things check out over the next couple of days, I will germinate the seeds.
 

Attachments

Top