Missouri Green
Active Member
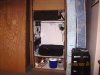
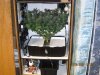
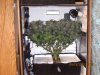
Watering every day is just too much work!!!! so i've designed a Hempy Bucket Bin .... with an adjustable height bottom drain and a visual water level indicator. I know, I know, its not a Hempy and keep it simple stupid! but.... this solves several issues for me. I typically run 1 plant at a time but could possibly run up to 6 in my custom wooden grow cabinet, main chamber 20" deep 30" wide 36" tall with 12" of space under the plants (run off capture, air intake and electronics) and something like 24" over (light,carbon filter, and 6" can fan, air exhaust) for a grand total height of roughly 6 ft give or take. my "pot" is a large black Homedepot HDX polypropylene bin cut down to 8 inches tall 15x24 footprint... Thats roughly 12 gallons and its technically too big for the size plants i grow and i probably didn't have to water every day for my last cycle ...but even every other day is too much and Im shooting for watering ONCE a WEEK!!!! however my Hempy is wide and shallow so figuring out the water height is going to be SO much easier with an adjustable drain.... If my plants are getting too much water i can lower the reservoir height and i can even lower the drain to empty the whole reservoir if i want.... leaving perhaps 1/4 inch in the bottom max... its also going to be much easier to get a complete refresh of the system and to dial things in having the ability to adjust the drain height within the "Hempy" and if i ever wanted to automate I PROBABLY won't have to deal with drain clogging issues.
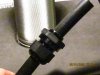
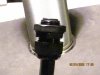
The drain not clogging was the biggest technical issue here but also having an adjustable drain without it leaking is also important
the secret sauce to make this work is
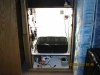
1) Drain filter in this case a 32 oz cold brew filter , siliconed down over the adjustable drain. the filter will be buried just over its top... pot is only 8" tall and this filter is 6" tall , so it will end up roughly 1" under the surface. I have two 10" x 15" x 2" tall plastic food trays with evenly space 1/16" holes drilled for even water distrubution when watering by hand that will sit either side of the plant ... if the drain does "silt up" i can always douse the outer casing from above... but i really don't expect this to clog up. may also add a fabric pot outer sleeve to the filter as an extra measure of safety.. probably ziptied on just like the pen filter.

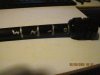
2) The Drain, in this case a 3/4 npt cable gland with 1/2" poly tubing !!! FTW . adjustment is as simple as loosening the nut and adjusting the drain tube up and down. this size seemed like a good fit for me.
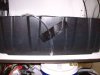
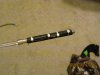
3) Water height indicator .... again not getting clogs is important, though i guess you could blow into the tube to clear clogs..too much work and too fiddly. here i've run a pen casing over a table saw several times with blade set about 1/16th high . then covered all the slots with heavy duty window screen and ziptied it in place, then attached to 1/4 inch ID clear vinyl hose which will be run through a hole at the bottom and side of the reservoir. Hole is going to be approx 5/16" to make a nice tight seal on the 6/16ths or 3/8" OD of the hose. no leaks this way but i will probably silicone inside and out just for safety's sake as this hole is at the bottom of the res.. which is a little scary in a wood cab but pretty sure I won't leak here. the remainder of the clear tube will run up the side of the bin and allow me to quickly see water levels in the res.
I've got a few holes to drill and some caulking to do before this is up and running but should work well. perlite in the bottom 4" or so and perlite coco on top half ... excited at the prospect of only watering once a week... may or may not work but I'm optimistic.
-sleepless in missouri
The drain not clogging was the biggest technical issue here but also having an adjustable drain without it leaking is also important
the secret sauce to make this work is
1) Drain filter in this case a 32 oz cold brew filter , siliconed down over the adjustable drain. the filter will be buried just over its top... pot is only 8" tall and this filter is 6" tall , so it will end up roughly 1" under the surface. I have two 10" x 15" x 2" tall plastic food trays with evenly space 1/16" holes drilled for even water distrubution when watering by hand that will sit either side of the plant ... if the drain does "silt up" i can always douse the outer casing from above... but i really don't expect this to clog up. may also add a fabric pot outer sleeve to the filter as an extra measure of safety.. probably ziptied on just like the pen filter.
2) The Drain, in this case a 3/4 npt cable gland with 1/2" poly tubing !!! FTW . adjustment is as simple as loosening the nut and adjusting the drain tube up and down. this size seemed like a good fit for me.
3) Water height indicator .... again not getting clogs is important, though i guess you could blow into the tube to clear clogs..too much work and too fiddly. here i've run a pen casing over a table saw several times with blade set about 1/16th high . then covered all the slots with heavy duty window screen and ziptied it in place, then attached to 1/4 inch ID clear vinyl hose which will be run through a hole at the bottom and side of the reservoir. Hole is going to be approx 5/16" to make a nice tight seal on the 6/16ths or 3/8" OD of the hose. no leaks this way but i will probably silicone inside and out just for safety's sake as this hole is at the bottom of the res.. which is a little scary in a wood cab but pretty sure I won't leak here. the remainder of the clear tube will run up the side of the bin and allow me to quickly see water levels in the res.
I've got a few holes to drill and some caulking to do before this is up and running but should work well. perlite in the bottom 4" or so and perlite coco on top half ... excited at the prospect of only watering once a week... may or may not work but I'm optimistic.
-sleepless in missouri