can anyone help me wire my t5 electronic ballast?

Killer Vanilla

Well-Known Member
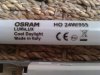
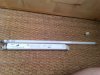
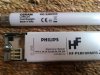
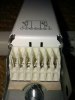
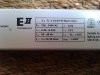
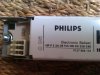
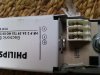
i bought this ballast and 2 of the bulbs, i was told this would power both bulbs but i have no paperwork or instructions with the ballast, the diagrams on it only make half sense to me :dunce: when i put the wires in theres no way for them to secure they just fall out and dont go very far inside, i tried pushing hte metal pins above the holes down and backwards but they dont move, am i suppose to solder the wires to the metal V's? any help would be hella appreciated, thaynx :bigjoint:
 

Attachments

DO3SHA

Well-Known Member
You. Need a punch down tool to insert those wires a thin flat head might work, you insert the wires non stripped with coating around them still and punch then down
 

kpmarine

Well-Known Member
Okay, I'm going to do my best to explain this to you. I've wired and overdriven a few ballasts at this point without tripping anything, blowing bulbs, or starting fires. lol

Keep in mind to read this all the way through, you will have to mock it up accordingly. Otherwise you won't have enough wire slack to make it fit your needs. As far as your inability to get the wires to stick, it looks like there used to be something to lock them in. Soldering would be your best bet, if you can do it.

First, connect wires to 1, 2 3 , 5, 6, 7.
Take wire 1 and 2, put them into the open holes on the first end cap.
Take wire 3 and connect it to your second end cap.
Set end cap 1 and 2 aside for now.
Take wires 6 and 7, attach them to end cap 3.
Take wire 5, attach to your fourth end cap.
Take a wire, and run it from end cap 4 to end cap 3.

On the power cord end, just make sure to attach the ground to the labeled contact. The other two can go either way.
 

kpmarine

Well-Known Member
You. Need a punch down tool to insert those wires a thin flat head might work, you insert the wires non stripped with coating around them still and punch then down
Self splicing connections have a top bar on them to keep the wires in, without that, they can just come back out. At least that's how all the one's I have seen work.
 

Killer Vanilla

Well-Known Member
Okay, I'm going to do my best to explain this to you. I've wired and overdriven a few ballasts at this point without tripping anything, blowing bulbs, or starting fires. lol

Keep in mind to read this all the way through, you will have to mock it up accordingly. Otherwise you won't have enough wire slack to make it fit your needs. As far as your inability to get the wires to stick, it looks like there used to be something to lock them in. Soldering would be your best bet, if you can do it.

First, connect wires to 1, 2 3 , 5, 6, 7.
Take wire 1 and 2, put them into the open holes on the first end cap.
Take wire 3 and connect it to your second end cap.
Set end cap 1 and 2 aside for now.
Take wires 6 and 7, attach them to end cap 3.
Take wire 5, attach to your fourth end cap.
Take a wire, and run it from end cap 4 to end cap 3.

On the power cord end, just make sure to attach the ground to the labeled contact. The other two can go either way.
hey thanks alot for detailed reply, i understand the diagram for the wiring, i just was unsure about how to connect the cables, and also the power side there are 3 small symbols but 2 are the same so not sure which the earth neutral and live goes in.

You. Need a punch down tool to insert those wires a thin flat head might work, you insert the wires non stripped with coating around them still and punch then down
when i was googling i heard this, i have a thin flat head but i didnt want to break them, they dont seem to wana al have a smoke then try a little harder,
 

kpmarine

Well-Known Member
hey thanks alot for detailed reply, i understand the diagram for the wiring, i just was unsure about how to connect the cables, and also the power side there are 3 small symbols but 2 are the same so not sure which the earth neutral and live goes in.


when i was googling i heard this, i have a thin flat head but i didnt want to break them, they dont seem to wana al have a smoke then try a little harder,
The different symbol is your ground. That's the universal symbol for it, for future reference. Sorry, thought you were having a hard time figuring out how to wire the whole thing. lol
 

DO3SHA

Well-Known Member
Self splicing connections have a top bar on them to keep the wires in, without that, they can just come back out. At least that's how all the one's I have seen work.
i just got out of school for all this crap sir
 

DO3SHA

Well-Known Member
CEET ( computer and electronics engineering technology) & CNS ( computer networking systems)
 

Killer Vanilla

Well-Known Member
yeah that sounds like a good job, thanks for info, so i push the V shape in the middle straight down onto the uncut cable,
 

Killer Vanilla

Well-Known Member
what guage wires are they?
not sure, i pulled apart a cable from some old reflectors and stripped into the 3 cables, was going to use them. think they are alittle to wide to fit in with the plastic around them :( might have to get something slimmer tomorrow what do you recommend?
 

DO3SHA

Well-Known Member
I oils go to fry's RadioShack or another electronics store and pick up new wire don't use old stuff Cus wires. Do get old and brittle. Take the ballast with you and have them help you get the right size Cus without the thing in front of me I couldn't tell you what size
 
You'll need like a 20 guage or smaller wire to wire the ballast to the pin sockets. Strip about 3/8_1/2" insulation off and push it as far into the hole as it will go. Pull back on wire once its in to lock it in. Make sure to use solid wire for everything. I've wired at least 1000+ ballasts over the last 25 years as an electrician. The wire in those old light you tried to use is rated foe 90c and takes about 50 years to get brittle, you could re use it no problem.
 
Top