senseisensi
Member
CONCEPT
Grab a sheet of paper. What's the area? 8.5 x 11, probably 93.5 in^2, right? Okay, great. Now punch it.
Smack the thing dead center, and it will crumple. The area hasn't changed. We know it's still 93.5 square inches. On the other hand, these 93.5 square inches are occupying LESS lateral space than they did before. We can take the crumple, lay it over another sheet of paper and see it from a bird's eye view. The crumple and the sheet have the same area, although the crumple takes up way less space left-to-right and up-to-down.
The screen of green approach is a technique which involves the placement of chicken wire or some 2" fencing above the plants during the vegetative or flowering stage. When the girls grow, they push up into the screen, dispersing themselves along the plane of the fence, thereby maximizing the (lateral or sideways) canopy area.
However, as the lateral surface area increases, the buds will stray further and further away from the light source, eventually rendering them immature, below size, or just plain dead. Instead of a flat plane (screen), a variable manifold (waves of lovely sensual ladyflowers) allows for a greater amount of surface area to be confined within a smaller space.
The waves are created through a series of supercropping techniques. Bending, cracking, FIMming, and pruning set the stage, followed by this thing I'm going to call the "tuck it all" (TIA) approach to the final phases complete the manifold and should allow for the almighty holy grail of the farmer...HIGHER YIELD, in more ways than one.
THE EXPERIMENT
Four groups:
1. The control: Ebb and flow hydro with 24 plants distributed evenly in 12 3 gallon buckets using a 3-part nutrient formula with a calmag supplement and some root enzymes
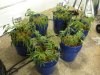
2. ST: Control plus stress training. Only maximum number of plants possible in 6 or 12 buckets, bent and cracked as cloned starts planted in hydroton, arranged in a flower pattern from overhead (photos to follow).
3. Mesh of green: (2) plus the introduction of a variable manifold mesh. Taking the screen and contorting it to the point where the waves are being forced by the mesh, as opposed to being created from scratch through stress training.
4. Screen of green: basis of comparison. (1) plus the ScrOG that we all know and love.
I'm starting with (2) because I believe this will be the highest yielder. In time I hope to go down the entire list, but this will have to do for now.
Criticize me!
Thanks in advance.
Grab a sheet of paper. What's the area? 8.5 x 11, probably 93.5 in^2, right? Okay, great. Now punch it.
Smack the thing dead center, and it will crumple. The area hasn't changed. We know it's still 93.5 square inches. On the other hand, these 93.5 square inches are occupying LESS lateral space than they did before. We can take the crumple, lay it over another sheet of paper and see it from a bird's eye view. The crumple and the sheet have the same area, although the crumple takes up way less space left-to-right and up-to-down.
The screen of green approach is a technique which involves the placement of chicken wire or some 2" fencing above the plants during the vegetative or flowering stage. When the girls grow, they push up into the screen, dispersing themselves along the plane of the fence, thereby maximizing the (lateral or sideways) canopy area.
However, as the lateral surface area increases, the buds will stray further and further away from the light source, eventually rendering them immature, below size, or just plain dead. Instead of a flat plane (screen), a variable manifold (waves of lovely sensual ladyflowers) allows for a greater amount of surface area to be confined within a smaller space.
The waves are created through a series of supercropping techniques. Bending, cracking, FIMming, and pruning set the stage, followed by this thing I'm going to call the "tuck it all" (TIA) approach to the final phases complete the manifold and should allow for the almighty holy grail of the farmer...HIGHER YIELD, in more ways than one.
THE EXPERIMENT
Four groups:
1. The control: Ebb and flow hydro with 24 plants distributed evenly in 12 3 gallon buckets using a 3-part nutrient formula with a calmag supplement and some root enzymes
2. ST: Control plus stress training. Only maximum number of plants possible in 6 or 12 buckets, bent and cracked as cloned starts planted in hydroton, arranged in a flower pattern from overhead (photos to follow).
3. Mesh of green: (2) plus the introduction of a variable manifold mesh. Taking the screen and contorting it to the point where the waves are being forced by the mesh, as opposed to being created from scratch through stress training.
4. Screen of green: basis of comparison. (1) plus the ScrOG that we all know and love.
I'm starting with (2) because I believe this will be the highest yielder. In time I hope to go down the entire list, but this will have to do for now.
Criticize me!
Thanks in advance.