crazy7605150
Well-Known Member
WEll i got stoned one day and kinda got an idea so i wrote it down( man that good shit makes u forget who you are!) i went to the store and picked up a few parts and just smoked a joint and let the creativity come out... i made 3 sections all wired together but u can make a single one which is what im explaining..
PARTS
- PVC pipe 2inch diameter, 1 ft long ----$0.50-$1
-3 light sockets (i used ones with rubber on the outside so it fit snugly) -$7-8
-3 ft of 2 different wire (i used yellow and white. 3 ft each..14 gauge) $2-3
-2 caps for PVC ends $2-3
-power supply cord $7- 10 ( or old computer cord.. thrift shop??)
-aluminum foil tape or something similar (optional) $5
cheap side about $20 or about 30 bucks for a lil nicer
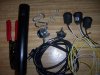
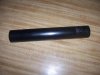
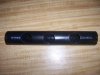
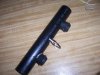
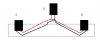
1. first start out with your pvc pipe.. cut 3 holes on top ( my sockets where 1.5 inch so my holes where 1.5 each) pics 2 & 3
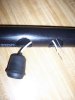
2. make a hole large enough for your power cord to go through where you want the cord to come out.. i chose on top
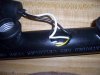
3. next put the 2 end lights in and put the wiring up through the center hole pics 3 & 4
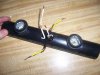
4. take your wiring and cut off 4 pieces (2 of each color) about 2 inch each and strip of the ends. solder the 2 inch sections onto the ends of the 2 socket wires. ( my soldering gun broke so for now im twisting the wires and using electical tape NOT SAFE DONT DO!! ) PIC 6
5. now for your 3rd (middle) light socket.. take the wires you soldered onto your first(left) socket and solder those to second(middle) socket. then take the wires you soldered onto the third (right) and solder those to the same wires u just soldered.. pic 7 & 9
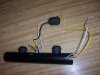
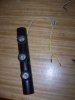
6. take your power cord and put it through the hole u made in step 2 and solder on a 2 inch section to both the positive and negative wires..( leave the ground thats not ganna be used) now take those wires and solder them onto where light socket 1 meets with socket 2. (this is where is a lil diff then the one im making.. im puting 3 of these pvc pipes together.. i have the 14 guage wire coming out instead of the power cord so i can hook it up to the next one... you should have a power cord instead tho) pic 7
7. use twist caps for your wires.. i just used tape for now (im not ganna use my light) until i get a new soldering iron.. shove all your wires into the middle hole and put ur socket in the hole now.. pics 10 & 11
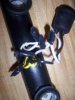
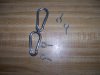
8. put the caps on the ends of your PVC and plug it in ... but if you want you can put the foil tape along the whole thing to help with reflectivity. if you want a way to hang your lights all you have to do is go get a few screw things with loops on them and some clips (pic 13) scew the loops into the pvc one on each end and screw 2 loops onto the top part of your grow room. then hook the clips on them and use chain to raise and lower your lights...
like i said when i made mine i have 3 of them linked up to each other.. very easy if u need help tho let me know..
there are a few other modifications you can do if you can think of anything better or anthing to add on plz let me know ..
PARTS
- PVC pipe 2inch diameter, 1 ft long ----$0.50-$1
-3 light sockets (i used ones with rubber on the outside so it fit snugly) -$7-8
-3 ft of 2 different wire (i used yellow and white. 3 ft each..14 gauge) $2-3
-2 caps for PVC ends $2-3
-power supply cord $7- 10 ( or old computer cord.. thrift shop??)
-aluminum foil tape or something similar (optional) $5
cheap side about $20 or about 30 bucks for a lil nicer
1. first start out with your pvc pipe.. cut 3 holes on top ( my sockets where 1.5 inch so my holes where 1.5 each) pics 2 & 3
2. make a hole large enough for your power cord to go through where you want the cord to come out.. i chose on top
3. next put the 2 end lights in and put the wiring up through the center hole pics 3 & 4
4. take your wiring and cut off 4 pieces (2 of each color) about 2 inch each and strip of the ends. solder the 2 inch sections onto the ends of the 2 socket wires. ( my soldering gun broke so for now im twisting the wires and using electical tape NOT SAFE DONT DO!! ) PIC 6
5. now for your 3rd (middle) light socket.. take the wires you soldered onto your first(left) socket and solder those to second(middle) socket. then take the wires you soldered onto the third (right) and solder those to the same wires u just soldered.. pic 7 & 9
6. take your power cord and put it through the hole u made in step 2 and solder on a 2 inch section to both the positive and negative wires..( leave the ground thats not ganna be used) now take those wires and solder them onto where light socket 1 meets with socket 2. (this is where is a lil diff then the one im making.. im puting 3 of these pvc pipes together.. i have the 14 guage wire coming out instead of the power cord so i can hook it up to the next one... you should have a power cord instead tho) pic 7
7. use twist caps for your wires.. i just used tape for now (im not ganna use my light) until i get a new soldering iron.. shove all your wires into the middle hole and put ur socket in the hole now.. pics 10 & 11
8. put the caps on the ends of your PVC and plug it in ... but if you want you can put the foil tape along the whole thing to help with reflectivity. if you want a way to hang your lights all you have to do is go get a few screw things with loops on them and some clips (pic 13) scew the loops into the pvc one on each end and screw 2 loops onto the top part of your grow room. then hook the clips on them and use chain to raise and lower your lights...
like i said when i made mine i have 3 of them linked up to each other.. very easy if u need help tho let me know..
there are a few other modifications you can do if you can think of anything better or anthing to add on plz let me know ..
Attachments
-
 82.8 KB Views: 713
 -
 77.3 KB Views: 282
 -
 82.3 KB Views: 246
 -
 70.9 KB Views: 297
 -
 85.2 KB Views: 280
 -
 59.5 KB Views: 364
 -
 77.1 KB Views: 218
 -
 45.7 KB Views: 333
 -
 13.9 KB Views: 425
 -
 76.4 KB Views: 193
 -
 68.8 KB Views: 494
 -
 69.7 KB Views: 1,024
 -
 76.2 KB Views: 253