This would be a good idea to add to the DIY closers ive seen around because the array will only need minimum half an inch of space, depending on how well you constructed it.
I got my LEDs from Ebay for CHEAP. average around $0.07 USD per LED. As for the DC converter, I got it for $3.
Alright, Lets start:
Tools:
Soldering Iron
Solder
Flux
Side Cutters
Strippers (wire, not human, but they will also be needed)
Screw Driver
Drill Bit
Drill
Materials:
Plexiglass
LEDs
Aluminum Tape
Resistors
AC to DC converter
Wire
First step is to cut your plexiglass sheet into whatever size you want. You can make it any size.
Second step is to drill your holes. My LEDs are 5mm, I used a 5mm drill bit and moved the drill bit around to get a easier fit for my LEDs. I measured my LEDs so that they are 3.5 cm away from eachother horizontally, and about 2.5 vertically. Thats about 1 1/2 inch across and 1 inch down for those imperial storm troopers out there.

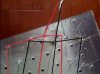
I covered my plexiglass sheet with my aluminum tape to reflect the light. Then I took a pencil or pen and poked the Aluminum where my LED holes are. It shoud look like this:


A little side note: I will be using 12vDC. I looked at my specs sheet for my LEDs and it said that my blue LEDs will drop about 3.1v ~ 3.6v (forward voltage). This means that if I wire 4 in series, they will not turn on. This is because 3.1 x 4 = 12.4v which is more then my 12v power supply can handle. So, I have to use 3 LEDs in series (9.3v ~ 10.8v). This leaves me 2.7v to 1.2v across my Resistor. REMEMBER: LEDS need resistors!!!

So, for my Blue LEDs, I will need to regulate the current. I looked at my specs sheet and it said that I need 20 mA for peak brightness. Remembering high school physics, voltage = current x resistance or V=IR. Our resistor will be the one regulating the current. So heres the math:
2.7v / 20 mA = 135 ohms
Remember that milli (the little m next to the big A) means that it is 0.00x. In our case 20 mA = 0.02 A.
1.2v / 20 mA = 60 ohms
This means that we will need a resistor that has a resistance of anywhere between 135 ohms to 60 ohms. (when buying your resistor, get the ¼ watt resistors) I went with the 130 ohms because I had some lying around. The colour bands on the resistor tell you what resistance they are. Here is a nifty resistance calculator:
http://www.ealnet.com/m-eal/resistor/resistor.htm
So I need a 135 ohm resistor, the colour bands should be Brown Orange Brown (then gold or silver, ignore this band).
So, In short, for Blue, you can only put 3 LEDs in series (positive to negative, positive to negative, positive to negative) and Red, you can only put 4 in series (positive to negative). These LEDs are grouped in series, then connected to other groups in Parallel. Dont let this scare you, your group will be positive to negative, then that group, all positive sides will be together, and all negatives will be together.

Now, place your LEDs in the holes. The more consistent you are with how you place them, the easier it will be for you in the future. I decided that to the left will be my positive end and my right will be my negative end. In my series group, I placed them positive to negative until I reached my max amount that I can put in series.
Solder them together. Then on you negative side of your group, solder your resistor. Each series group needs a resistor or you will burn your LEDs out. When you are done soldering all your groups, I suggest soldering these groups together at the end so you dont get mixed up. Now you can solder all your negative leads with the resistors together, and all you positive leads all together.
I got this Ac to Dc converter. It says that it is rated to 500 mA. This means, if each group draws about 20 mA, I can have 25 groups of LEDs. It is best not to stress the converter out too much. I but about 22 groups per converter.
I took my converter apart, soldered my positive leads and negative leads and connected them to my groups. You can get a power adaptor from a surplus store for cheap. Look on the back to make sure it is in DC. It will say the current rating and how many volts it has. The more the volts, the more LEDs you can put in your groups.
Turn it on and it works!!
If anyone needs ANY help, just ask. Take pictures, and write as much detail as possible.
I got my LEDs from Ebay for CHEAP. average around $0.07 USD per LED. As for the DC converter, I got it for $3.
Alright, Lets start:
Tools:
Soldering Iron
Solder
Flux
Side Cutters
Strippers (wire, not human, but they will also be needed)
Screw Driver
Drill Bit
Drill
Materials:
Plexiglass
LEDs
Aluminum Tape
Resistors
AC to DC converter
Wire
First step is to cut your plexiglass sheet into whatever size you want. You can make it any size.
Second step is to drill your holes. My LEDs are 5mm, I used a 5mm drill bit and moved the drill bit around to get a easier fit for my LEDs. I measured my LEDs so that they are 3.5 cm away from eachother horizontally, and about 2.5 vertically. Thats about 1 1/2 inch across and 1 inch down for those imperial storm troopers out there.
I covered my plexiglass sheet with my aluminum tape to reflect the light. Then I took a pencil or pen and poked the Aluminum where my LED holes are. It shoud look like this:
A little side note: I will be using 12vDC. I looked at my specs sheet for my LEDs and it said that my blue LEDs will drop about 3.1v ~ 3.6v (forward voltage). This means that if I wire 4 in series, they will not turn on. This is because 3.1 x 4 = 12.4v which is more then my 12v power supply can handle. So, I have to use 3 LEDs in series (9.3v ~ 10.8v). This leaves me 2.7v to 1.2v across my Resistor. REMEMBER: LEDS need resistors!!!
So, for my Blue LEDs, I will need to regulate the current. I looked at my specs sheet and it said that I need 20 mA for peak brightness. Remembering high school physics, voltage = current x resistance or V=IR. Our resistor will be the one regulating the current. So heres the math:
2.7v / 20 mA = 135 ohms
Remember that milli (the little m next to the big A) means that it is 0.00x. In our case 20 mA = 0.02 A.
1.2v / 20 mA = 60 ohms
This means that we will need a resistor that has a resistance of anywhere between 135 ohms to 60 ohms. (when buying your resistor, get the ¼ watt resistors) I went with the 130 ohms because I had some lying around. The colour bands on the resistor tell you what resistance they are. Here is a nifty resistance calculator:
http://www.ealnet.com/m-eal/resistor/resistor.htm
So I need a 135 ohm resistor, the colour bands should be Brown Orange Brown (then gold or silver, ignore this band).
So, In short, for Blue, you can only put 3 LEDs in series (positive to negative, positive to negative, positive to negative) and Red, you can only put 4 in series (positive to negative). These LEDs are grouped in series, then connected to other groups in Parallel. Dont let this scare you, your group will be positive to negative, then that group, all positive sides will be together, and all negatives will be together.
Now, place your LEDs in the holes. The more consistent you are with how you place them, the easier it will be for you in the future. I decided that to the left will be my positive end and my right will be my negative end. In my series group, I placed them positive to negative until I reached my max amount that I can put in series.
Solder them together. Then on you negative side of your group, solder your resistor. Each series group needs a resistor or you will burn your LEDs out. When you are done soldering all your groups, I suggest soldering these groups together at the end so you dont get mixed up. Now you can solder all your negative leads with the resistors together, and all you positive leads all together.
I got this Ac to Dc converter. It says that it is rated to 500 mA. This means, if each group draws about 20 mA, I can have 25 groups of LEDs. It is best not to stress the converter out too much. I but about 22 groups per converter.
I took my converter apart, soldered my positive leads and negative leads and connected them to my groups. You can get a power adaptor from a surplus store for cheap. Look on the back to make sure it is in DC. It will say the current rating and how many volts it has. The more the volts, the more LEDs you can put in your groups.
Turn it on and it works!!
If anyone needs ANY help, just ask. Take pictures, and write as much detail as possible.


 was only on 12/12 growing so as long as i had the fire going evry day it would have enough power for 16 hrs continus running.