Diy co2 genarator

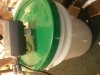
OK before I start I'd like to point out that I am very aware of the debatable fact whether or not this is substantial enough to support the effort involved . With that being said most grower that do chose to do this use 1 gallon jugs or even 2 liters this is obviously not going to do much more the a pc case or other small stealth grows .but most small ops tend to be in the 4x4x7 range and need a little more then a milk jug so what I've done is convert a 5 gallon pickle bucket into a sealed co2 generator using yeast sugar and water
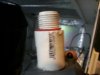
Supplies needed:
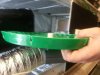
5 gallon pickle bucket (I'll explain your later)
Fish tank air pump - any will do
Pvc adapter (I believe it's a 1/2 in female to male adpter)
Hot glue, aquarium sealant, epoxy which ever u chose
Check valve should come with the pump
Air line

step 1
Gather all items needed

Step 2
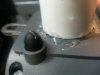
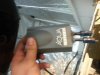
Match up your adapter with the air intake of the pump
After you've double checked that it will fit glue your adapter to the fish pump
I chose hot glue so later if I need it I can just twist and clean it off

Step 3
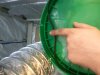
Use a fine point marker to outline the threaded side of the adapter
Cut the hole how ever u see fit i had no other way so i used a drill bit and cut about 10 holes and then used the drill to wobble out the rest in to a fairly smooth finish

Step 4
Test male side of adapter to the hole you jusy made in the lid mine screwed right in and sealed if u cut the hole a little big u may have to use sealant here as well

Step 5
Cut air lines to size of choose and add 1 way check valves

Step 6
Close lid and plug in check for leaks

Step 7
Add yeast mixture

Step 8
Enjoy more growth

OK a few things need to be said first the pickle bucket I use these because they usually have a rubber gasket around the outer ring which is good for sealing the container

Next is the yeast mixture i did not add this because ratio varys wildly from scene to scene . Generally you do not want this to be over 4 gallons full at any time do to pressure needed. But your 2 liter ratios scalled up will work that seems to be a liter of 90 degree water a tablespoon of yeast and a cup of sugar . I use 4 pounds of sugar and 3.5 gallons of water the yeast I've been playing with I'm using about half a cup of yeast

Ok let see how this thread goes

If I can answer any questionsI will
 

Attachments

FERMENTATION METHOD OF CO2 ENRICHMENT:

Sugar is converted into ethyl alcohol and CO2 when it ferments due to the action of yeast. In this method, the following ingredients and equipment are needed:


1. Suitably sized container, plastic or glass


2. Sugar, common or invert


3. Yeast, brewers or bourgelais wine yeast


4. Yeast nutrient


5. Sealant, cellophane, tape or lid


6. 1/4 plastic tubing


7. 1/4 shutoff valve


8. Balloon


9. Starter jar or bottle


A pound of sugar will ferment into approximately half a pound of ethyl alcohol (C2H5OH) and half a pound of CO2. One pound of CO2 makes 8.7 cubic feet of CO2 gas at normal atmospheric conditions. In our standard 8 X 8' X 8' grow room, you will need to generate 512 cu. ft. X .0013 (1300 PPM CO2) = 0.66 cubic feet of CO2 every four hours. It takes time for the yeast to ferment sugar, so the size of container you should use in determined by dividing the cubic feet of growing area (512 Cu. ft.) by 32 = 16 gallons.


A convenient container to use here would be a plastic kitchen garbage can. These are inexpensive and easily obtainable.


To determine how much sugar we need for six weeks of operation or until fermentation ceases, the following calculations are necessary: From the above paragraph, we need 0.66 cu. ft. of CO2 every four hours. If one pound of CO2 makes 8.7 cu. ft. of CO2, we will need 0.08 lbs. of sugar, but because every one pound of sugar only makes 1/2 lb. of CO2, we must double the amount of sugar needed, i.e. 0.08 X 2 = 0.16 lbs. of sugar every four hours. Since there are six four-hour periods in a 24 hour day, the amount of sugar we need is 0.16 x 6 or 0.96 lbs. of sugar per day.


If we round this off to one pound of sugar per day, we will need 42 lbs. of sugar in six weeks. We must consider that only 80 to 90% of the sugar will be completely converted in this length of time, therefore, we should actually use about 48 lbs. of sugar in six weeks.


The sugar solution to start with is 2 1/2 to 3 lbs. per gallon. You can use hot water to start with, as sugar dissolves faster in it than in cold water. You must let it cool to 80-90 degrees F before adding yeast to it or the yeast will be killed. Start with the fermenting container only half-full as you will be adding an extra gallon per week for 6 weeks. Begin with eight gallons per week and 24 lbs. of sugar.


To start the solution fermenting, you will want to make a "starter batch" of sugar water, yeast and yeast nutrient. To do this, use a coke or beer bottle (approx. one pint), dissolve 1/4 lb. of sugar in 10 oz. of warm water (approx. 3/4 full), add a pinch of yeast and two pinches of yeast nutrient to this sugar mixture. Place a balloon on the bottle and set in warm location, 80 to 90 degrees F, for one to two days or until the balloon expands and small bubbles are visible in the solution.


After the starter solution has begun fermenting vigorously, it is added to the main fermentation tank at the same temperature already mentioned. After a day or so, to see that the system is working properly and that CO2 is being generated, close the valve to the supply tube and, if the unit is sealed properly, the balloon should expand in a short period of time. To regulate the amount of CO2 being delivered to the plants, open the valve until the balloon is only half the size of full expansion.


The CO2 supply tube with in-line valve should have a 2" loop in it half full of water to serve as an air-lock. This loop can be held in place with tape on the side of the fermentation tank. The open end of this tube can either be positioned in front of a circulating fan or run through "T" fittings to make additional tubes, the ends of which can be positioned above your plants. Remember, CO2 is heavier than air and it will flow downwards.


Once per week, undo a corner of the Saran Wrap and add an extra gallon of sugar solution and yeast nutrient, then reseal the top with tape. Use three lbs. of sugar and one teaspoon of nutrient per gallon.


After the last gallon is added, after six weeks of operation, let fermentation continue until the balloon goes down and no more bubbles are visible in the "U" tube. When this point has been reached, taste the solution. If is it sweet, fermentation is not complete and a new starter batch should be made and added to the tank. More yeast nutrient should also be used. If the solution is dry (not sweet) like wine, fermentation has stopped and the alcohol content has killed the yeast. At this point, it's time to clean your tank and start a new batch.


The fermentation process is quite good for generating CO2 and relatively inexpensive. Regular or invert (corn) sugar is inexpensive and available. You may have to purchase invert sugar at a wine supply store. This method of generating CO2 will cost approximately 50 to 60 cents per day.


To save money on extra yeast, you can either take out approximately a gallon of fermenting liquid and save for the next batch, or start a second system identical to the first and alternate themóclean and replenish one, then three weeks later, clean and replenish the second.


Well since it's got 50 views and not post I added a little math courtesy of hydrofarm
 
I always wanted to do this but didnt know the exact measurements, thanks.
Is the pump necessary? or can I just open a lid during lights?

Any way to make some cheap wine at the same time? or are we adding way too much ingredients for that?
 
Home brew is the man to ask on any wine or beer brewing he's the man with the science to back it. But u want the unit sealed for two reasons one to concentrate the co2 and also because ants roach and other bugs are attracted to the sugar so you want everything air tight. The pump is not necessarily needed but it helps to control when and how co2 is delivered for example co2 at night serves no purpose since co2 is used for photosynthesis . So the pump allows you to stop the flow at night and supply to your needs. I get mine at Walmart for about 7 buck you don't need a two valve one a single valve is fine i had this extra lying around.

Honestly i didn't spend a single dollar besides yeast and sugar everything else was scraped from old project.
 

budleydoright

Well-Known Member
I love the math and perhaps you are the one to test this, but isn't fermentation the most expensive way to produce Co2?
 
I would think baking soda and vinegar would be the most expensive . But it depends on your cost of ingredients i got a 2 pounds of yeast for 5 bucks and i get the largest bag of sugar from Sams club. To maintain this is relatively expensive compared to tanks but start up setup cost are fractional . Example hps vs cfl both get the job done hps use less watts per lumens made but cfls are a he'll of a bargain depending on your size of a grow and still get the job done. Hps = high start up better usage cfl= low start up higher usage . To clarify hps=tanks cfl= fermentation
 
I can't take credit for the math that is supplied from hydro farms website I tried to leave a citation but it may not be so easily seen since the read is quite lengthy
 

haulinbass

Well-Known Member
Why not just get a co2 moniter and just burn propane from a torch in a safe location with a small flame(its basicly what co2 pilot light generators do)
 
That'd work to but you have increased heat like this . Also that couldn't be used in a tent or small inclosed area . My rooms to flammable as it is to trust a constant flame being introduced
 
Monitor are expensive from what I've seen if your buying a monitor might as well get the tank for the price with regulator wouldn't be to much more
 
Top