First Grow -> DWC Closet

agent9

Active Member
So here we go....

I have been thinking about doing a closet grow for a while, and have been reading a lot on these forums to get a solid plan. First of all let me say thanks to everyone for all the great information on here, i have really learned a ton in the last couple weeks (two weeks ago i did not even know about vegetative and flowering cycles)

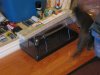
My goal for this thread is go through the entire process from building of grow space to the building of the DWC to the grow itself.

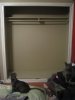
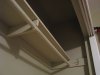
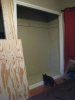
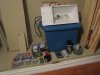
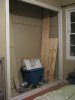
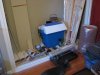
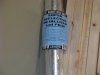
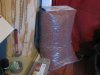
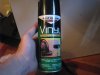
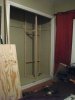
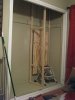
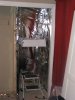
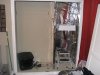
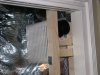
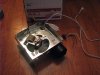
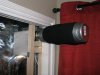
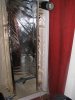
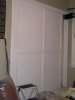
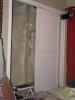
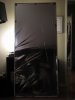
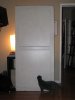
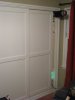
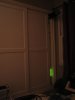
The closet that i am going to be growing in is about 8' x 8' x 18". for the first step i am going to section of an area about 3/5s of the total space and use this for my initial grow, and then building out the rest of the space when time / money allows to use as a flowering area, keeping the original space for vegetative. but for this first grow its just the small space, using a 250w switchable MH / HPS light.
 

agent9

Active Member
Ok, so my first step was to acquire a light. I found this light locally on craigslist. I made a deal with the guy and got the 250w switchable hood / ballast with 2 MH bulbs and 2 HPS retrofitted bulbs for $150. The plan is to use this for the entire first grow (maybe with some CFL's if needed...any opinions?), then keep it in the veg area after with just the MH.

I was also wondering if anyone had some suggestions on a good affordable light to use for gestation?
 

Attachments

agent9

Active Member
ok, i have my light, now onto the closet. The closet has a pair of sliding doors, I removed these first to make working in the space a bit easier. I also removed the shelf and bar to maximize usable space. I tried to preserve the pieces so when i move or remove the grow room i can re install it all, as it was before.

after removing everything I swept, vacuumed, and bleached the whole area.

pictures below also include the whole pile of stuff (mainly clothes i never wear, and a big box of airsoft equipment that hasn't been used in forever...maybe time to just get rid of all of that) that was in the closet, and my always very inquisitive cats. im not sure if they were trying to help or just figure out what just happened to their hiding space. they are in many of the photos because they seem to want to investigate anything im photographing.
 

Attachments

Techna

Well-Known Member
Nice sized grow area.. you going to split into to rooms veg and flower or do it all into 1?
 

agent9

Active Member
How many plants do you plan on growing and are you starting from seeds or clones?

for my first grow just 4 plants. starting from seeds (which i have not aquired as of yet). Ideally i would like to grow some WW strain (white russian maybe, and something a little more fruity). once i get the kinks worked out i want to start a cycle with 4 plants in veg and 4 in flower, keeping mothers and such
 

agent9

Active Member
Aight, time for a trip to home depot.....

I purchased:

6 1.5" x 1.5" x 8' lumber for framing

a small piece of plywood, to have something to mount stuff too

three different length screws

two heavy duty timers

four 8' chains

hooks, eyelets, etc for mounting the chains

staple gun and staples (which ended up being the wrong size)

extension cord and power strip

18 gallon rubbermaid tub with top

some black vinyl spray paint (more on this later) to coat the plastic tub

and a weather channel "weather forecaster" (this is sensor and remote sensor / readout) which will give me the humidity and tempature inside the room along with high and low for each, and the temp / himidity / high / low at the location of the readout. another nice feature of this is that when i add a second area to the room i can add another remote unit and have two zone that are both read from the same display.

all totaling around $180
 

Attachments

agent9

Active Member
ok, next day i made it to a local hydro shop. I was a little nervous about this. I live in SOCAL so there is not much of a stigma related to the cultivation of unmentioned plants, but i had never been to a hydro store before. I was thinking maybe just claim i was growing tomatoes or such hoping that the basic characteristics were similar.

well, there is only one shop (of about 4 within 10 miles or so) that was open on a sunday, and they were rad. it seems like the etiquite is to just assume they know, and dont offer up any extra details.

they were super helpful and nice. I took a little advice that is a bit contrary to things i have read on here (especially in reference to the DIY DWC), but i figured i would go with their advice and see where it takes me.

so, i purchase:

Two 12" stones

one dual output air pump

four feet of black tubing

all for the bubbler, and he suggested using the biggest stones that would fit in the container, and running one hose to each stone straight out of the pump instead of T-ing them together.

four 5" net cups

a plastic dome thinggy (with dual trays, one with holes and one solid)

a TON of hydroton (they were out of the small bags, so he gave me a deal on a big bag)

some rockwool cubes

100' of mylar

a small oscillating fan

I had planned on getting a more elaborate ventilation system, but realy cant justify the cost of it right now, need to get a better idea of what im going to need for this.

I also have not purchased nutes yet, wanted to get some advice on what the easiest combination would be. In the future i would really like to go organic, which this hydro store also specializes in, but i want to get a grasp on the whole process with synthetics first.

total cost was around $180 (paid cash, for obvious reasons).
 

Attachments

agent9

Active Member
ok, so the next thing i did was paint the rubbermaid tub. in retrospect it would have probably been smarter the do this later, since i dont need it painted now, since i dont have any plants to put in it, and i could have been using it as a reference to frame out the space instead of waiting for paint to dry....but i dygress....

so i used this vinyl paint (or paint for vinyl?), assuming it would be thick, flexable, and water proof. after getting it i started having some second thoughts, but the tub was only $4, and the paint was another $4 so why not just jump and see what happens. after all is said and done it seems to have worked out pretty good. next to no sunlight was able to pass through it once it had dried and a spit on the finger test of its resistance to water passed without a problem.

side note, my land lord is going to love the black rectangle in the backyard.
 

Attachments

agent9

Active Member
ok, time for some building....

now i am not builder, but i am mechanically inclined. i did not level, or square off any of this. I did over build it a bit because my walls are plaster, and they are a bitch to drill or staple into, and i dont think they would take the weight of the light. so i wanted something to supply the structure for holding up the light, and also provide me with something to easily staple the mylar into. there is a total of maybe two screws into the plaster, most of the anchoring was into either the floor, or the bit of wood that remained from where the shelf was.

basic construction technique was to pre-drill the holes, then screw into them to avoid splitting the wood. i still split it in a couple places, but nothing that would compromised the structure.
 

Attachments

agent9

Active Member
ok, time for the mylar. pretty straight forward, but it took a LONG time to get it all up there how i liked. like maybe 5 hours total. with a number of smoke breaks....which may have slowed down the whole process quite a bit.

pretty straight forward, cut it to size, instead of using cardboard to back the staples, i just used duct tape. the duct tape worked out well, and also helped hold it in place while it was being stapled. so i started with the far wall, really just so you could see it in the photos easier. after it was all tacked up i did a sloppy job of using more duct tape to seal off the top and bottom, and reinforce any areas that seemed a little weak.

the cats became totally obsessed with the mylar. go figure. its loud and new and kinda expensive...exactly their criteria for play things.
 

Attachments

agent9

Active Member
final thing i did over the weekend was to hang the chains. I had before hanging the mylar i pre drilled and screwed in some eyelets to hang the chains from, then used S-hooks to actually hang the chain (used the same to attach the chain to the hood).

I then mounted the light and put the rubbermaid tub in there. none of this is really necessary right now, but i wanted to see how it all looked.

seems to be plenty of light in there for now at least. the mylar DEF helps a ton. any thoughts on any of this so far?
 

Attachments

agent9

Active Member
I forgot to mention that i ordered this all in one multi tester thing Paid a little under $150 for it. seems like it would be a pretty easy way make sure everything is staying balanced. now i will have persistent monitoring of the air and water temperature, the humidity, ppm, and ph. am i missing anything?

so the next steps will be to mount the tri-meter when it gets here, along with the power strip, timers, air pump, weather forecaster, fan, etc in there.

then get some beans, and nutes, and have a go at it.

so at this point i have some questions:

1) what nutes are recommended and at which stages?
2) do you think the 250watt MH / HPS light will be enough to get me through the whole thing?
3) what light is recommended for germination, cfls?
4) what should the target humidity and temperature be for the room, and what temp should the water be?
5) do you think a small fan will provide enough airflow ? i can open the door from time to time, and there is a window right next to it that can provide fresh air, if not what would a good budget solution be for ventilation. I realize that im probably going to need something more elaborate for budding and drying including an air scrubber, so i really need some guidance. i wish i could just drop another $350 on a proper system, but i just dont have the coinage at this point, already spent quite a bit of money on the project.

thanks in advance for all the help!
 

Attachments

agent9

Active Member
lucked out and got some seeds, and presumably half way decent ones. i have no idea what strain, but they are from a local large scale hydro grower. only got 6, but i think that should be ok.

I have attached a pic, best i could get on my cam.

also went to home depot again and think i solved m ventilation issue, will take pictures as i try it all out.

thanks again everyone.
 

Attachments

agent9

Active Member
Went to Home Depot, again, last night to get some supplies for setting up some ventilation. cost another $140..

Picked up the following:

more 1.5" x 1.5" lumber
NuTone 695 Exhaust fan to push the air (70CFM)
generic vent cover

for a scrubber i picked up:
3" -> 4" conveter
3" cap
alluminum screen
I could not find any appropriate humidifier filters so I purchased a "Range Hood Charcoal Filter" dunno if this will work the same? anyone know?

also picked up:
some cheapo extension cords
4 100 watt CFLs for gestation / cloning
Light sockets / splitters for the CFLs


So i wanted to set up the ventilation so i could close the closet with just the removal of the scrubber, and that it would only be a little open with the scrubber in place.

First thing i did was remove the wiring thing, and ran an extension cord in the same place, so that i could just plug it straight into a timer.

Then I framed out a support for it, mounted it, and realized two important facts

1) the big opening pulls air, the 3" pipe is the exhaust....so i had it rigged up backwards
2) with it mounted the way i first mounted it i could not get the DWC tub in and out....kind of an important detail.

so i removed the blower, cut the support down to size, added a few more cross members, and mounted it sideways. I also taped down the extension cord, and when i fired it up, i realized that it was losing a lot of air through various holes in the body of the blower (such as the area where the extension cord exits in the back). to remedy this I covered all those areas with duct tape.

then i put the fan guts back in it, added more tape to secure it in place, and put the plastic vent cover that came with it over the fan (just to make sure i dont stick anything in there by accident.

i then plugged it in to test, and it seems to be pushing around a lot of air. but its LOUD. sounds like the fan on an old microwave. i dont think its loud enough that any neighbors would be suspicious, but def a noticeable sound when in the same room.

I may put in a speed control later to reduce some of the sounds once i get the whole system up and running, and can monitor the tempature / humidity.

on a good note the tub now comes in and out, its a little tight, but not annoyingly so.
 

Attachments

agent9

Active Member
next up was the scrubber, like i said before i dont know if the filter im using is going to work or not, but i think it will at very least have an impact, guess i will have to wait a month or two to know for sure...

so there are plenty of tutorials out there on how to do this, so im just going to be quick about my build.

I removed the metal framing for the filter (two filters actually).

cut a piece of screen in the same width as the filters, wrapped the screen around the sheet metal venting, taped it all down tight, then wrapped the screen with the filters, and taped them all down tight. then mounted it on the blower.
 

Attachments

agent9

Active Member
next was to mount the intake vent, i had to break the one i had purchased into smaller pieces since my mounting wall thinggy was now much narrower then i had originally anticipated.

i then just taped it in place on the inside of the pseudo wall, and filled in any extra areas with mylar.
 

Attachments

agent9

Active Member
so at this point its late at night, im making a lot of noise with drilling and screwing and stapling and turning this blower on and off, and banging stuff around as i move it, and sawing....its probably 10pm and i hear my upstairs neighbor walking around. now hes cool, and would probably not think twice about the idea of a little grow room right under him, but i dont want to risk anything.

he has a set of stairs that go into the back yard, and i have some high windows inside my other closet that faces these stairs...long story short, if he was walking down the stairs to see what the hell all the racket was, there is a pretty clear view straight into my now mylar covered closet. So i decided it may be a good time to put the doors back on, just in case...

so i covered the back side of the door that covers the built out part of the closet with mylar, but both doors back on, then fired everything up to get a sense of what it would look like, and its fairly well hidden, i get a little light out of the bottom vent, which i could probably remedy bu creating some kind of a hood to block the light, may be a good idea regardless just to prevent outside light from getting in.
 

Attachments

Top