patchwayraver
Active Member
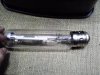
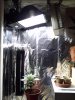
400w (metal halide)ballast reflector unit + fan with 400w (high pressure sodium) spare bulb, for flowering.
i also have a 150w UV unit (you can see it mounted on the wall in the last picture)
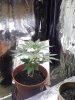
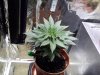
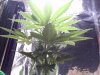
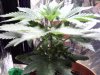
5 weeks-4 days and it is looking healthy.
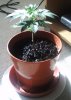
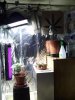
plus another 4 seedlings in Rockwool nutrient pots starting thier lives.
i got mountain water
and spray bottle to spray on leaves to keep moist and healthy
MiracleGrow compost
MiracleGrow bags (seedlings)
MiracleGrow nutrients (vegitive)
BudBoom nutrients (flowering)
Battery fan (light cooler)
Growlux Humidifier (Humidity)
ventilation tubes + extractor fan (fresh air)
i also need help on when to start flowering my plant its about 13inches tall and has 7 nodes.
please leave comments and tell me what you think of my stealthgrow
thanks and respect to all you growers out there =)
also for all those who fancie starting it up here is a bit of basic info to get you started remember this is how i done it.
Anyone Can Do It
Even if you haven't had any prior experience with growing plants in you home, you can have a successful crop of marijuana by following the simple directions in this pamphlet. If you have had problems in the past with marijuana cultivation, you may find the solutions in the following chapters. Growing a marijuana plant involves four basic steps:
1. Get the seeds. If you don't already have some, you can ask your friends to save you seeds out of any good grass they may come across. You'll find that lots of people already have a seed collection of some sort and are willing to part with a few prime seeds in exchange for some of the finished product.
2. Germinate the seeds. You can simply drop a seed into moist soil, but by germinating the seeds first you can be sure that the seed will indeed produce a plant. To germinate seeds, place a group of them between about six moist paper towels, or in the pores of a moist sponge. Leave the towels or sponge moist but not soaking wet. Some seeds will germinate in 24 hours while others may take several days or even a week.
3. Plant the sprouts. As soon as a seed cracks open and begins to sprout, place it on some moist soil and sprinkle a little soil over the top of it.
4. Supply the plants with light. Flourescent lights are the best. Hang the lights with two inches of the soil and after the plants appear above the ground, continue to keep the lights with two inches of the plants. It is as easy as that. If you follow those four steps you will grow a marijuana plant. To ensure prime quality and the highest yield in the shortest time period, however, a few details are necessary.
Soil
Your prime concern, after choosing high quality seeds, is the soil. Use the best soil you can get. Scrimping on the soil doesn't pay off in the long run. If you use unsterilized soil you will almost certainly find parasites in it, probably after it
is too late to transplant your marijuana. You can find excellent soil for sale at your local plant shop or nursery, K-Mart, Wal Mart, and even some grocery stores. The soil you use should have these properties for the best possible results:
1. It should drain well. That is, it should have some sand in it and also some sponge rock or pearlite.
2. The ph should be between 6.5 and 7.5 since marijuana does not do well in acidic soil. High acidity in soil encourages the plant to be predominantly male, an undesirable trait.
3. The soil should also contain humus for retaining moisture and nutrients.
If you want to make your own soil mixture, you can use this recipe: Mix two parts moss with one part sand and one part pearlite or sponge rock to each four gallons of soil. Test your soil for ph with litmus paper or with a soil testing kit
available at most plant stores. To raise the ph of the soil, add 1/2 lb. lime to 1 cubic foot of soil to raise the ph one point.
If you absolutely insist on using dirt you dug up from your driveway, you must sterilize it by baking it in your oven for about an hour at 250 degrees. Be sure to moisten it thoroughly first and also prepare yourself for a rapid evacuation of your
kitchen because that hot soil is going to stink. Now add to the mixture about one tablespoon of fertilizer (like Rapid-Gro) per gallon gallon of soil and blend it in thoroughly. Better yet, just skip the whole process and spend a couple bucks on some soil.
Light
Without light, the plants cannot grow. In the countries in which marijuana grows best, the sun is the source of light. The
amount of light and the length of the growing season in these countries results in huge tree-like plants. The answer to the problem of lack of sun, especially in the winter months, shortness of the growing season, and other problems is to grow indoor under simulated conditions. The rule of thumb seems to be the more light, the better. In one experiment we know of, eight eight-foot VHO Gro-Lux fixtures were used over eight plants. The plants grew at an astonishing rate. The lights had to be raised every day. There are many types of artificial light and all of them do different things to your plants. The common incandescent light bulb emits some of the frequencies of light the plant can use, but it also emits a high percentage of far red and infra-red light which cause the plant to concentrate its growth on the stem. This results in the plant stretching toward the light bulb until it becomes so tall and spindly that it just weakly topples over. There are several brands of bulb type. One is the incandescent plant spot light which emits higher amounts of red and blue light than the common light bulb. It is an improvement, but has it drawbacks. it is hot, for example, and cannot be placed close to the plants. Consequently, the plant has to stretch upwards again and is in danger of becoming elongated and falling over. The red bands of light seem to encourage stem growth which is not desirable in growing marijuana. the idea is to encourage foliage growth for obvious reasons. Gro-Lux lights are probably the most common flourescent plant lights. In our experience with them, they have
proven themselves to be extremely effective. They range in size from one to eight feet in length so you can set up a growing room in a closet or a warehouse. There are two types of Gro-Lux lights: The standard and the wide spectrum. They can be used in conjunction with on another, but the wide spectrum lights are not sufficient on their own. The wide spectrum lights were designed as a supplementary light source and are cheaper than the standard lights. Wide spectrum lights emit the same bands of light as the standard but the standard emit higher concentrations of red and blue bands that the plants need to grow. The wide spectrum lights also emit infra-red, the effect of which on stem growth we have already discussed. If you are planning to grow on a large scale, you might be interested to know that the regular flourescent lamps and fixtures, the type that are used in commercial lighting, work well when used along with standard Gro- Lux lights. These commercial lights are called cool whites, and are the cheapest of the flourescent lights we have mentioned. They emit as much blue light as the Gro-Lux standards and the blue light is what the plants use in foliage growth.
Now we come to the question of intensity. Both the standard and wide spectrum lamps come in three intensities: regular output, high output, and very high output. You can grow a nice crop of plants under the regular output lamps and probably be quite satisfied with our results. The difference in using the HO or VHO lamps is the time it takes to grow a crop. Under a VHO lamp, the plants grow at a rate that is about three times the rate at which they grow under the standard lamps. People have been known to get a plant that is four feet tall in two months under one of these lights. Under the VHO lights, one may have to raise the lights every day which means a growth rate of ate least two inches a day. The only drawback is the expense of the VHO lamps and fixtures. The VHO lamps and fixtures are almost twice the price of the standard. If you are interested in our opinion, they are well worth it. Now that you have your lights up, you might be curious about the amount of light to give you plants per day. The maturation date of your plants is dependent on how much light they receive per day. The longer the dark period per day, the sooner the plant will bloom. Generally speaking, the less dark per day the better during the first six months of the plant's life. The older the plant is before it blooms and goes to seed, the better the grass will be. After the plant is allowed to bloom, its metabolic rate is slowed so that the plant's quality does not increase with the age at the same rate it did before it bloomed. The idea, then, is to let the plant get as old as possible before allowing it to mature so that the potency will be a high as possible at the time of harvest. One relatively sure way to keep your plants from blooming until you are ready for them is to leave the lights on all the time. Occasionally a plant will go ahead and bloom anyway, but it is the exception rather than the rule. If your plants receive 12 hours of light per day they will probably mature in 2 to 2.5 months. If they get 16 hours of light per day they will probably be blooming in 3.5 to 4 months. With 18 hours of light per day, they will flower in 4.5 to 5 months. Its a good idea to put your lights on a timer to ensure that the amount of light received each day remains constant. A "vacation" timer, normally used to make it look like you are home while you are away, works nicely and can be found at most hardware or discount stores.
Watering
If you live near a clear mountain stream, you can skip this bit on the quality of water. Most of us are supplied water by the city and some cities add more chemicals to the water than others. They all add chlorine, however, in varying quantities. Humans over the years have learned to either get rid of it somehow or to live with it, but your marijuana plants won't have time to acquire a taste for it so you had better see that they don't have to. Chlorine will evaporate if you let the water stand for 24 hours in an open container. Letting the water stand for a day or two will serve a dual purpose: The water will come to room temperature during that period of time and you can avoid the nasty shock your plants suffer when you drench them with cold water. Always water with room temperature to lukewarm water. If your water has an excessive amount of chlorine in it, you may want to get some anti- chlorine drops at the local fish or pet store. The most important thing about watering is to do it thoroughly. You can water a plant in a three gallon container with as much as three quarts of
water. The idea is to get the soil evenly moist all the way to the bottom of the pot. If you use a little water, even if you do
it often, it seeps just a short way down into the soil and any roots below the moist soil will start to turn upwards toward the water. The second most important thing about watering is to see to it that the pot has good drainage. There should be some holes in the bottom so that any excess water will run out. If the pot won't drain, the excess water will accumulate in a pocket and rot the roots of the plant or simply make the soil sour or mildew. The soil, as we said earlier, must allow the water to drain evenly through it and must not become hard or packed. If you have made sure that the soil contains sand and pearlite, you shouldn't have drainage problems. To discover when to water, feel the soil with your finger. if you feel moisture in the soil, you can wait a day or two to water. The soil near the top of the pot is always drier than the soil further down. You can drown your plant just as easily as you can let it get too dry and it is more likely to survive a dry spell than it is to survive a torrential flood. Water the plants well when you water and don't water them at all when they don't need it.
Temperature and Humidity
The ideal temperature for the light hours is 68 to 78 degrees fahrenheit and for the dark hours there should be about a 15 degree drop in temperature. The growing room should be relatively dry if possible. What you want is a resinous coating on the leaves and to get the plant to do this, you must convince it that it needs the resinous coating on its leaves to protect itself from drying out. In an extremely humid room, the plants develop wide leaves and do not produce as much resin. You must take care not to let the temperature in a dry room become too hot, however, since the plant cannot assimilate water fast enough through its roots and its foliage will begin to brown out.
Ventilation
Proper ventilation in your growing room is fairly important. The more plants you have in one room, the more important good ventilation becomes. Plants breathe through their leaves. The also rid themselves of poisons through their leaves. If proper ventilation is not maintained, the pores of the leaves will become clogged and the leaves will die. If there is a free movement of air, the poisons can evaporate off the leaves and the plant can breathe and remain healthy.
In a small closet where there are only a few plants you can probably create enough air circulation just by opening the door to look at them. Although it is possible to grow healthy looking plants in poorly ventilated rooms, they would be larger and healthier if they had a fresh supply of air coming in. If you spend a lot of time in your growing room, your plants will grow better because they will be using the carbon dioxide that you are exhaling around them. It is sometimes quite difficult to get a fresh supply of air in to your growing room because your room is usually hidden away in a secret corner of your house, possibly in the attic or basement. In this case, a fan will create some movement of air. It will also stimulate your plants into growing a healthier and sturdier stalk. Often times in an indoor environment, the stems of plants fail to become rigid because they don't have to cope with elements of wind and rain. To a degree, though, this is an advantage because the plant puts most of its energy into producing leaves and resin instead of stems.
i also have a 150w UV unit (you can see it mounted on the wall in the last picture)
5 weeks-4 days and it is looking healthy.
plus another 4 seedlings in Rockwool nutrient pots starting thier lives.
i got mountain water
and spray bottle to spray on leaves to keep moist and healthy
MiracleGrow compost
MiracleGrow bags (seedlings)
MiracleGrow nutrients (vegitive)
BudBoom nutrients (flowering)
Battery fan (light cooler)
Growlux Humidifier (Humidity)
ventilation tubes + extractor fan (fresh air)
i also need help on when to start flowering my plant its about 13inches tall and has 7 nodes.
please leave comments and tell me what you think of my stealthgrow
thanks and respect to all you growers out there =)
also for all those who fancie starting it up here is a bit of basic info to get you started remember this is how i done it.
Anyone Can Do It
Even if you haven't had any prior experience with growing plants in you home, you can have a successful crop of marijuana by following the simple directions in this pamphlet. If you have had problems in the past with marijuana cultivation, you may find the solutions in the following chapters. Growing a marijuana plant involves four basic steps:
1. Get the seeds. If you don't already have some, you can ask your friends to save you seeds out of any good grass they may come across. You'll find that lots of people already have a seed collection of some sort and are willing to part with a few prime seeds in exchange for some of the finished product.
2. Germinate the seeds. You can simply drop a seed into moist soil, but by germinating the seeds first you can be sure that the seed will indeed produce a plant. To germinate seeds, place a group of them between about six moist paper towels, or in the pores of a moist sponge. Leave the towels or sponge moist but not soaking wet. Some seeds will germinate in 24 hours while others may take several days or even a week.
3. Plant the sprouts. As soon as a seed cracks open and begins to sprout, place it on some moist soil and sprinkle a little soil over the top of it.
4. Supply the plants with light. Flourescent lights are the best. Hang the lights with two inches of the soil and after the plants appear above the ground, continue to keep the lights with two inches of the plants. It is as easy as that. If you follow those four steps you will grow a marijuana plant. To ensure prime quality and the highest yield in the shortest time period, however, a few details are necessary.
Soil
Your prime concern, after choosing high quality seeds, is the soil. Use the best soil you can get. Scrimping on the soil doesn't pay off in the long run. If you use unsterilized soil you will almost certainly find parasites in it, probably after it
is too late to transplant your marijuana. You can find excellent soil for sale at your local plant shop or nursery, K-Mart, Wal Mart, and even some grocery stores. The soil you use should have these properties for the best possible results:
1. It should drain well. That is, it should have some sand in it and also some sponge rock or pearlite.
2. The ph should be between 6.5 and 7.5 since marijuana does not do well in acidic soil. High acidity in soil encourages the plant to be predominantly male, an undesirable trait.
3. The soil should also contain humus for retaining moisture and nutrients.
If you want to make your own soil mixture, you can use this recipe: Mix two parts moss with one part sand and one part pearlite or sponge rock to each four gallons of soil. Test your soil for ph with litmus paper or with a soil testing kit
available at most plant stores. To raise the ph of the soil, add 1/2 lb. lime to 1 cubic foot of soil to raise the ph one point.
If you absolutely insist on using dirt you dug up from your driveway, you must sterilize it by baking it in your oven for about an hour at 250 degrees. Be sure to moisten it thoroughly first and also prepare yourself for a rapid evacuation of your
kitchen because that hot soil is going to stink. Now add to the mixture about one tablespoon of fertilizer (like Rapid-Gro) per gallon gallon of soil and blend it in thoroughly. Better yet, just skip the whole process and spend a couple bucks on some soil.
Light
Without light, the plants cannot grow. In the countries in which marijuana grows best, the sun is the source of light. The
amount of light and the length of the growing season in these countries results in huge tree-like plants. The answer to the problem of lack of sun, especially in the winter months, shortness of the growing season, and other problems is to grow indoor under simulated conditions. The rule of thumb seems to be the more light, the better. In one experiment we know of, eight eight-foot VHO Gro-Lux fixtures were used over eight plants. The plants grew at an astonishing rate. The lights had to be raised every day. There are many types of artificial light and all of them do different things to your plants. The common incandescent light bulb emits some of the frequencies of light the plant can use, but it also emits a high percentage of far red and infra-red light which cause the plant to concentrate its growth on the stem. This results in the plant stretching toward the light bulb until it becomes so tall and spindly that it just weakly topples over. There are several brands of bulb type. One is the incandescent plant spot light which emits higher amounts of red and blue light than the common light bulb. It is an improvement, but has it drawbacks. it is hot, for example, and cannot be placed close to the plants. Consequently, the plant has to stretch upwards again and is in danger of becoming elongated and falling over. The red bands of light seem to encourage stem growth which is not desirable in growing marijuana. the idea is to encourage foliage growth for obvious reasons. Gro-Lux lights are probably the most common flourescent plant lights. In our experience with them, they have
proven themselves to be extremely effective. They range in size from one to eight feet in length so you can set up a growing room in a closet or a warehouse. There are two types of Gro-Lux lights: The standard and the wide spectrum. They can be used in conjunction with on another, but the wide spectrum lights are not sufficient on their own. The wide spectrum lights were designed as a supplementary light source and are cheaper than the standard lights. Wide spectrum lights emit the same bands of light as the standard but the standard emit higher concentrations of red and blue bands that the plants need to grow. The wide spectrum lights also emit infra-red, the effect of which on stem growth we have already discussed. If you are planning to grow on a large scale, you might be interested to know that the regular flourescent lamps and fixtures, the type that are used in commercial lighting, work well when used along with standard Gro- Lux lights. These commercial lights are called cool whites, and are the cheapest of the flourescent lights we have mentioned. They emit as much blue light as the Gro-Lux standards and the blue light is what the plants use in foliage growth.
Now we come to the question of intensity. Both the standard and wide spectrum lamps come in three intensities: regular output, high output, and very high output. You can grow a nice crop of plants under the regular output lamps and probably be quite satisfied with our results. The difference in using the HO or VHO lamps is the time it takes to grow a crop. Under a VHO lamp, the plants grow at a rate that is about three times the rate at which they grow under the standard lamps. People have been known to get a plant that is four feet tall in two months under one of these lights. Under the VHO lights, one may have to raise the lights every day which means a growth rate of ate least two inches a day. The only drawback is the expense of the VHO lamps and fixtures. The VHO lamps and fixtures are almost twice the price of the standard. If you are interested in our opinion, they are well worth it. Now that you have your lights up, you might be curious about the amount of light to give you plants per day. The maturation date of your plants is dependent on how much light they receive per day. The longer the dark period per day, the sooner the plant will bloom. Generally speaking, the less dark per day the better during the first six months of the plant's life. The older the plant is before it blooms and goes to seed, the better the grass will be. After the plant is allowed to bloom, its metabolic rate is slowed so that the plant's quality does not increase with the age at the same rate it did before it bloomed. The idea, then, is to let the plant get as old as possible before allowing it to mature so that the potency will be a high as possible at the time of harvest. One relatively sure way to keep your plants from blooming until you are ready for them is to leave the lights on all the time. Occasionally a plant will go ahead and bloom anyway, but it is the exception rather than the rule. If your plants receive 12 hours of light per day they will probably mature in 2 to 2.5 months. If they get 16 hours of light per day they will probably be blooming in 3.5 to 4 months. With 18 hours of light per day, they will flower in 4.5 to 5 months. Its a good idea to put your lights on a timer to ensure that the amount of light received each day remains constant. A "vacation" timer, normally used to make it look like you are home while you are away, works nicely and can be found at most hardware or discount stores.
Watering
If you live near a clear mountain stream, you can skip this bit on the quality of water. Most of us are supplied water by the city and some cities add more chemicals to the water than others. They all add chlorine, however, in varying quantities. Humans over the years have learned to either get rid of it somehow or to live with it, but your marijuana plants won't have time to acquire a taste for it so you had better see that they don't have to. Chlorine will evaporate if you let the water stand for 24 hours in an open container. Letting the water stand for a day or two will serve a dual purpose: The water will come to room temperature during that period of time and you can avoid the nasty shock your plants suffer when you drench them with cold water. Always water with room temperature to lukewarm water. If your water has an excessive amount of chlorine in it, you may want to get some anti- chlorine drops at the local fish or pet store. The most important thing about watering is to do it thoroughly. You can water a plant in a three gallon container with as much as three quarts of
water. The idea is to get the soil evenly moist all the way to the bottom of the pot. If you use a little water, even if you do
it often, it seeps just a short way down into the soil and any roots below the moist soil will start to turn upwards toward the water. The second most important thing about watering is to see to it that the pot has good drainage. There should be some holes in the bottom so that any excess water will run out. If the pot won't drain, the excess water will accumulate in a pocket and rot the roots of the plant or simply make the soil sour or mildew. The soil, as we said earlier, must allow the water to drain evenly through it and must not become hard or packed. If you have made sure that the soil contains sand and pearlite, you shouldn't have drainage problems. To discover when to water, feel the soil with your finger. if you feel moisture in the soil, you can wait a day or two to water. The soil near the top of the pot is always drier than the soil further down. You can drown your plant just as easily as you can let it get too dry and it is more likely to survive a dry spell than it is to survive a torrential flood. Water the plants well when you water and don't water them at all when they don't need it.
Temperature and Humidity
The ideal temperature for the light hours is 68 to 78 degrees fahrenheit and for the dark hours there should be about a 15 degree drop in temperature. The growing room should be relatively dry if possible. What you want is a resinous coating on the leaves and to get the plant to do this, you must convince it that it needs the resinous coating on its leaves to protect itself from drying out. In an extremely humid room, the plants develop wide leaves and do not produce as much resin. You must take care not to let the temperature in a dry room become too hot, however, since the plant cannot assimilate water fast enough through its roots and its foliage will begin to brown out.
Ventilation
Proper ventilation in your growing room is fairly important. The more plants you have in one room, the more important good ventilation becomes. Plants breathe through their leaves. The also rid themselves of poisons through their leaves. If proper ventilation is not maintained, the pores of the leaves will become clogged and the leaves will die. If there is a free movement of air, the poisons can evaporate off the leaves and the plant can breathe and remain healthy.
In a small closet where there are only a few plants you can probably create enough air circulation just by opening the door to look at them. Although it is possible to grow healthy looking plants in poorly ventilated rooms, they would be larger and healthier if they had a fresh supply of air coming in. If you spend a lot of time in your growing room, your plants will grow better because they will be using the carbon dioxide that you are exhaling around them. It is sometimes quite difficult to get a fresh supply of air in to your growing room because your room is usually hidden away in a secret corner of your house, possibly in the attic or basement. In this case, a fan will create some movement of air. It will also stimulate your plants into growing a healthier and sturdier stalk. Often times in an indoor environment, the stems of plants fail to become rigid because they don't have to cope with elements of wind and rain. To a degree, though, this is an advantage because the plant puts most of its energy into producing leaves and resin instead of stems.
Attachments
-
 7 weeks.jpg75 KB · Views: 269
 -
 vvvv.jpg88.7 KB · Views: 211
 -
 6 week 4 days.jpg56.7 KB · Views: 190
 -
 7 week 2 days.jpg77.9 KB · Views: 168
 -
 400w hps bulb.jpg72.4 KB · Views: 167
 -
 most recent pic.jpg72.1 KB · Views: 188
 -
 the set up.jpg78.5 KB · Views: 232
 -
 close up.jpg66.3 KB · Views: 163
 -
 close up 2.jpg61.5 KB · Views: 209
 -
 newest pic of setup.jpg67.1 KB · Views: 298

 THC
THC so you have a switchable ballast then? ya cant put a 400 hps in a 400 halide ballast.