First Time Cloner

DaMidnightToker

Well-Known Member
Hello everyone. I plan on attempting to clone for the first time, but not sure when. The plant in question is 10inchs with 8-9 nodes. I need the low- down on things that I can do to help my clippings along. Like can I clone straight to soil? Are T12 floros enough light to hold them until I see roots? Is rooting gel/powder a must? Things like that. Or even point me in the direction of a thread that explains the above. Thanks in advance.
 
Hey I've only cloned my plants once but it turned out with a 70% success rate. I took my cuttings two weeks before I flowered my vegging plants from the bottom stems and branches that I was going to trim off the plant anyway. I put the cuttings straight into red beer pong cups full of fox farm light warrior soil. i hear that rockwool is much better to use but I was going cheap so I used the soil I already had. I cut the stem from the plant at a 45 degree angle and then cut the base of the stem again under water right after so the stem doesn't fill with air. I used Olivia's root gel. It's cheap and the guys at my local grow store said its great. I put some of the gel on a plate then just dipped my finger in the gel and rubbed it on the bottom and sides of the stem of the new cuttings after I cut them under water and put them directly into the cups and soil. I put the gel on the side instead of dipping the new cuttings into the bottle of gel so that the bottle doesn't get anything mixed into it. When you take a cutting make sure its small and only has 1-2 smaller fan leaves on the stem or else the leaves and stems will take too much energy from the rooting. You don't want too much light on the cuttings for the first few days so the T12 lights should work fine. I use T5 but I'm sure the T12 will work for them until you move the cuttings to the main light set up. Use a stray bottle to lightly spray the clones with distilled water four times a day for 10-14 days. After two weeks you can lightly water them how ever you usually do. I've heard of different watering schedules but this worked for me. Also you might want to cut stems that have a natural fork in them. By 'fork' i mean a split in the stem just above the soil line so the plant will grow with two major stems not just one. I played around with growing cuttings that had a split in the stem and found the plants get really bushy. Since I grow indicas in a smaller room I like my plants shorter and bushy. Well I think I covered the basics. hope it helps
 

homebrewer

Well-Known Member
I clone with 95% success every time with clonex and rapid rooter plugs from GH. They go into a humidity dome with a heating pad and standing water for about 10-14 days. As soon as I put them in, I don't touch them until they have roots. Once they have roots, they move to 8oz cups into another humidity dome to harden off. 10 days in that dome and they are ready to move to rockwool cubes or 1 gallon soil buckets. Your mother plant is probably ok but you really want to grow her bigger for the best options for cuttings.

As far as lighting goes, a few compact floros work fine.
 

ThatGuy113

Well-Known Member
i cloned one of my plants during flowering just for the sake of curiosity... only did one cutting didnt use gel or anything just stuck it straight in a pot of fresh soil kept it damp and it worked. Gave the clone to a friend (picture from him right before harvest)
 

Attachments

DaMidnightToker

Well-Known Member
Right on guys. Thanks for the helpful and speedy replies. I take it my local hyrdro store will carry all those things? When you say take off all the leaves, you mean except for the new leaves forming and the ones below correct? How many clones should I cut in one sitting? Also, when my mother plant reachs the desired height under the MH, can I put it under the T12's, to sorta stop her from growing? Just keeping her alive?

@Thatguy, you just cut a branch off and stuck it in the soil, without a humidity dome or misting her, and it worked? Right on if so. Well I will wait a few more weeks and then have. at it.
 

ThatGuy113

Well-Known Member
@Thatguy, you just cut a branch off and stuck it in the soil, without a humidity dome or misting her, and it worked? Right on if so. Well I will wait a few more weeks and then have. at it.
yup just made sure the soil was moist and misted the leaves once to twice a day within 2 weeks it had solid roots
 

mygirls

Medical Marijuana (MOD)
Hello everyone. I plan on attempting to clone for the first time, but not sure when. The plant in question is 10inchs with 8-9 nodes. I need the low- down on things that I can do to help my clippings along. Like can I clone straight to soil? Are T12 floros enough light to hold them until I see roots? Is rooting gel/powder a must? Things like that. Or even point me in the direction of a thread that explains the above. Thanks in advance.
this is how i get 95% every time.
http://www.youtube.com/watch?v=6ahWqyJ-tpM
 

smashcity

Well-Known Member
well i tried to clone 4 times... the first three were cutting them at 45degree angle dipping in root cloning gel or powder and putting in damp soil under humidity dome... the three tries were unsuccessful, so i took rollitups advice and went with the 100% way take a 45 degree angle cut and place in a cup of water and change the water every week or so. it'll take longer to get roots i'd say about 2-3 weeks but it always worked for me. i think when i get enough money i'll just but the ez clone
 
I have had 100% success with clones taken at the 3rd week of flower, dipped in clone gel, then into a mini dwc. Took 5 days to root. Its been a week since and i have healthy root systems and they are reveging.

The fancy cutting and such doesn't make a difference, i dont think the cloning solution does. Most of them root above where it was dipped.

Ringo
 

homebrewer

Well-Known Member
I have had 100% success with clones taken at the 3rd week of flower, dipped in clone gel, then into a mini dwc. Took 5 days to root. Its been a week since and i have healthy root systems and they are reveging.

The fancy cutting and such doesn't make a difference, i dont think the cloning solution does. Most of them root above where it was dipped.

Ringo
To each his own but I would not recommend cloning a plant that's been flower for 3 weeks.

A tip I did not mention is that lightly scoring the sides of your cutting's stem with the razor seems to work wonders as far as root development goes. One more tip is that your cutting should have at least one node below the surface of your rooting medium.
 

DaMidnightToker

Well-Known Member
So where I took off one of the leaves, should be under the medium? I threw a cutting in a cupof water last night just to see what would happen. Its still green so , we'll see. lol
 

homebrewer

Well-Known Member
Any rooting cube/medium will work better than a cup of water. Look into a humidity dome, rooting plugs and a rooting gel. Having the proper environment for your clones to root is 90% of the battle.
 

mygirls

Medical Marijuana (MOD)
To each his own but I would not recommend cloning a plant that's been flower for 3 weeks.

A tip I did not mention is that lightly scoring the sides of your cutting's stem with the razor seems to work wonders as far as root development goes. One more tip is that your cutting should have at least one node below the surface of your rooting medium.
ok so go ahead and tell me cuting my clones 6 weeks in flower is wrong and a waste of timeon the vert back. its not. pending on the amont of stress the plant is going threw is what matters. i have gotten clone to vert back from 6 weeks in flower in t weeks after they root. and i have had them take 30 days. pending on the stress i put them threw.:mrgreen:
 

homebrewer

Well-Known Member
ok so go ahead and tell me cuting my clones 6 weeks in flower is wrong and a waste of timeon the vert back. its not. pending on the amont of stress the plant is going threw is what matters. i have gotten clone to vert back from 6 weeks in flower in t weeks after they root. and i have had them take 30 days. pending on the stress i put them threw.:mrgreen:
Yeah, I will tell you it's a waste of time and it certainly shouldn't be posted in a 'first time cloner' thread. It should be recognized that cloning a flowering plant is not a 'best practice'.
 

mygirls

Medical Marijuana (MOD)
Yeah, I will tell you it's a waste of time and it certainly shouldn't be posted in a 'first time cloner' thread. It should be recognized that cloning a flowering plant is not a 'best practice'.
heres one that i read when first learning how to grow. this is one way during or after flowering.
i will find the other one that says use a bloome nuts when cloneing.


-- Choose a Section -- History of Marijuana Medicinal Marijuana Marijuana & Health Marijuana & UK Law Growing Marijuana Marijuana Pictures Rolling Techniques Amsterdam Guide Disclaimer
Home

History of Marijuana

Medicinal Marijuana

Marijuana & Health

Marijuana & UK Law

Growing Marijuana

UK Specifics (Part I)

Hydroponics (Part II)

Marijuana Pictures

Rolling Techniques

Amsterdam Guide

Disclaimer


Growing Marijuana - Flowering stage, harvesting & curing

A complete guide to everything you wanted to know about growing marijuana in the UK, but were just too stoned to ask.

By Sensi Sid


Growing Marijuana - an introduction
Location, heating & ventilation
Lighting Systems & Techniques
Germination & Vegetative Stage


The flowering stage
When the day length decreases to about 12 or 13 hours per day, flowering will start. For outdoor and greenhouse plants, this usually starts some time in September but can be earlier in some modern hybrid strains. For indoor plants this is whenever the grower adjusts the lamp timers. Indoor growers using fluorescent tubes may want to swap their cool white tubes for warm white at this point.

Flowering is induced when the level of a particular hormone reaches a critical point. This hormone is produced during the dark period (night) and destroyed by light during the day. It is important, therefore, to ensure that the dark period is totally uninterrupted by any light , even a few minutes could disturb this sensitive process.


Imature Female flowers
© Erowid.org
After a week or two of short days, look out for the immature flowers where the leaves join the stems. Males look like little green, upside down clubs (the playing card type) about one or two millimeters across and females look like green, slightly hairy hemp seeds with one or two thick, white hairs protruding from the top.

Pull up and throw away the males (or use them for making hash oil) before the flowers open and pollinate the females. The idea is to produce female flowering tops with no seeds and false seed pods oozing THC-containing resins; this is called sinsemillia which means "no seeds". If you are using fertiliser, change to one that is low in nitrogen and high in phosphorous.

The flowering tops will continue to grow, in the hope of receiving pollen, for another 4 to 8 weeks and produce more resins as they get older. When the plants are mature then they are harvested.

Harvesting and curing
Growers often disagree about the timing of the harvest and most have come to the conclusion that it is largely a matter of taste. When the plants are actively flowering, the resins contain a higher proportion of THC than during the vegetative stage. During the later

Imature Male flowers
© Erowid.org
stages, when flower production has slowed, THC is degrading to other related chemicals such as CBD. It is thought that THC is mainly responsible for the "high" and CBD for the more physical, "stony" sensations such as lethargy. If you want a clear high then harvest when approximately 35% of the pistils (little white hairs) have turned red or brown. If, on the other hand, you prefer the heavier hit you get from something like pakki-black resin then wait until 65% of the pistils have changed colour.

Cut off the flowering stalks with scissors and hang them upside down in a cool, dry, dark place until they are dry enough for the central stem to snap when bent; this may take one or two weeks. Pack the dried buds loosely into zip top bags or airtight jars and store in a cool dark place (the fridge is fine for this). Do not crush the buds any more than you have to as the trichomes holding the little beads of resin will fracture resulting in earlier degradation of the THC. Similarly, do not store the buds in a freezer as this also causes trichome fracture. Flowering tops stored like this can remain fresh for many months.

In an emergency, fresh buds can be dried more quickly by hanging them over a radiator or by spreading them out on a baking tray and putting them in an oven which has been pre-heated to gas mark 1 and then turned off. Naturally dried buds have a much better flavour and are less harsh to smoke than quick dried ones, so try to be patient if possible!
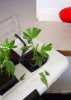
Cloning
A batch of seeds is unlikely to produce all female plants; even if it does, each individual plant is likely to differ slightly. Cloning can produce many identical plants from one mother with ideal characteristics. Ideally, the process needs to be done under artificial light, indoors.

First, decide on which female to clone. If it has just finished flowering, switch the lights to a 18 hour on/6 hour off cycle; this will usually persuade the plant to revert to a vegetative growth state.

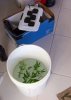
Prepare enough 3" pots filled with a moist 50/50 mixture of commercial seed and cutting compost and horticultural grit. Water them with a copper fungicide solution until the compost is damp, not sodden. Poke a pencil-diameter hole, about 4cm deep, in the middle of each compost filled pot.

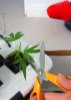
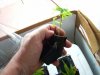
Select healthy shoots about 10cm long, remove most of the bigger leaves, and then cut off the whole shoot with a scalpel or razor blade. Immediately drop the cuttings into a bowl of cool water so that the cut ends don't dry out. When all the cuttings have been taken, remove the bottom 1cm from the first cutting, with a scalpel, while it is still under the surface of the water. Remove it from the bowl and immediately dip the end into hormone rooting powder (or solution). Now, place it in the hole in the compost and lightly press the surrounding compost such that the stem of the cutting is held snugly in place, trying to avoid rubbing off the rooting hormone. Repeat this process with the other cuttings.

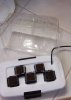
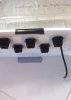
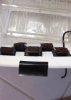
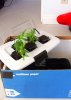
Put the pots in a propagator or a polythene covered, waterproof box. Put the propagator under artificial light set to a 18 on/6 off cycle. The idea is to maintain a fairly high humidity around the cuttings so that they do not lose too much water through their leaves while they are still growing roots. If the grow room is hot, it may be necessary to increase the ventilation in the propagator or box to avoid fungal growth. The cuttings will not need watering very often as most of the evaporating water is trapped in the propagator.

After a few weeks you should see some new growth at the tip of the cuttings. At this stage, gradually increase the ventilation in the propagator over a period of a few days so the cuttings acclimatise to the lower humidity of the grow room. When a healthy root system has developed, transplant the cuttings to their final growing positions for the vegetative stage.

Sea of Green
Sea of Green is a method developed by indoor growers to increase the frequency of harvests. The basic principle is to grow a larger number of small plants for a shorter length of time than the traditional method.

The growing area is arranged as a series of two or more shelves. Using a two shelf system as an example, the upper shelf is equipped with fluorescent tubes. This is used to grow a number of clones, vegetatively on a 18/6 daylight cycle, until they are big enough to flower. At this point they are transferred to the lower shelf which can be equipped with either HPS or fluorescent light. The lower shelf is operated on a 12/12 daylight cycle and forces the plants into flowering.


Mature Female Bud
© Erowid.org
The shelves should be shielded from light spill from the adjacent shelf, either by light proof curtains or doors. Each shelf should have it's own timer, of course.

Clones of a single variety should be grown such that the growth rate is the same for each plant. By experiment, it is possible to determine the shortest length of time the plants have to be grown vegetatively before flowering is initiated. The yield from each plant will be comparatively low but the yield per month from the available growing space should be higher that with other methods.

Variations on this theme include a three shelf system where shelf one is used for rooting cuttings, shelf two for vegetative growth and shelf three for flowering.

Bugs and diseases
Keep an eye out for bugs which may attack your plants. If you use an insecticide, be sure to use one based on natural active ingredients, such as pyrethrins; after all, you will be smoking it sooner or later - don't poison yourself.

Aphids can be washed off with a soft-soap solution - cover the plant pot with a polythene bag, tied loosely around the stem, to avoid too much soap getting in to the compost. Whitefly can be controlled by spraying with permethrin at three day intervals until eradicated.

Spider mites can be a real problem when growing indoors. They like hot, dry conditions so try and keep the humidity level up to discourage them. Unfortunately, fungi and moulds like high humidity so, like most things in life, a compromise has to be reached.

Botrytis (Grey Mould) likes humid conditions. Cut off and destroy any infected parts; reduce the humidity by increasing the ventilation and, if necessary, spray with a fungicide which is safe for use on vegetables (read the packet).

Avoid using chemicals whenever possible, especially if you are nearing harvest time. Some insecticides and fungicides are highly toxic, in contrast to THC, and may cause you serious damage. Large scale growers use parasitic insects to control pests but this is probably impractical for the cupboard grower.

Disclaimer:
Much of the information contained on this website would be illegal were it to be practiced in most countries around the world - including the UK. Our intent is to educate and inform NOT to encourage anyone to break the law
 
I also tried the razor scraping on the sides, splitting the ends all of the "best ways" to clone. They root above all of that lol. The ones that i take later in flowering (3 weeks) root quicker than just veg plants.

There is to much going on with all aspects of growing around here, people trying to complicate things. Take the same cup of water idea and add a air pump and air stone and it will root quicker. No special gels, or techniques.

Were are growing a plant that grows by its self. This isnt rocket science.

Paul :bigjoint:
 

Cali chronic

Well-Known Member
ahh Cloning Memories....I will cherish them.

10 days there about

ph water 5.5
1/4 tbsp hydro P aft about 5 days (wards off da slime)

lamps are 3 18 watt cfl 24/7 at about 80 in the dome water is cooler Roots like it

No Food at all Nitrogen is no good for rooting.

Get some rapid Rooter found on Egay for 20 bucks for 50 tray of a beautiful rooting medium. If you like how about some Cred please/
Regards
 

Attachments

williewill420

Well-Known Member
To each his own but I would not recommend cloning a plant that's been flower for 3 weeks.

A tip I did not mention is that lightly scoring the sides of your cutting's stem with the razor seems to work wonders as far as root development goes. One more tip is that your cutting should have at least one node below the surface of your rooting medium.
Yup i do mine just like yours, but I also skin the bottom inch like a potato. I try to get a cutting with 2 nodes (if possible) under the dirt. Of coarse i cut those branches off. From my experience most of the roots come from the branches that are under the rockwool and the part where i skinned it and cut small slits is where most of your roots come from...not the 45 angle cut.....but i still cut it at a 45 anyways.....and I use dip and grow liquid to dip the stems in plus i put powder down in the hole in the rockwool. I get the fastest and strongest rooting from dip and grow
 
Top