Hanging Gardens - Floating 1200W Stealth Cab Under Kingsize Bunkbed

lilindian

Well-Known Member
____________________________________


Hanging Gardens - Floating 1200W Stealth Cab Under Kingsize Bunk-bed


____________________________________


Hello community,


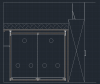
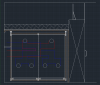
Haven't been here for a while, but I am back to log my build of a 2m x 1m cabinet. At the time of writing this, I don’t quite have enough funds to pay for the 100% completion of this project. But I have enough to get pretty far!


Background info:


Rollitup taught me most of what i know, so i thought it's only right i give something back to you guys. The rest of my knowledge has come from working in the industry. This isn't the first cabinet i've made, examples of previous builds can be seen below. This one however is my latest, and all the knowledge and experience i have gained throughout the years has gone into its design. I would like to state that I by no means consider myself an expert, just a very passionate hobbyist, who loves building and growing stuff!
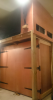

Previous Cabinet

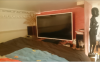
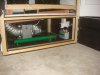
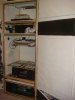
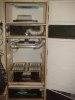
Pictures below are a few from my last build. It was approx a 1x1x2.5m Cabinet comprising of 4 sections, one for air in + heaters+ pots, one for plant growth, the next one up was ventilation and electrics (behind the black board is a 5" PK temperature controlled fan pulling air FROM lower section, through main section, through the fan, through the veg section up top, back down and through the lights, and out), and a veg/mother/clone section right at the top. It worked a treat, and was soundproofed until it was silent.

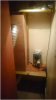
Air in was a 5" inline fan passing through a 5" particle filter.

The whole grow pulled out so i could easily access stuff at the back and inspect the plants easily.

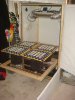
There was also a drainage system so all the run off from the pots drained directly outside.

The 2 green tubes are bar heaters, for chilly days.

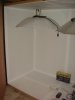
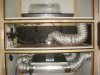
Lighting came in the form of 2 5" cool tubes and x2 4/600W lumatek digital ballasts.

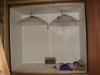
Up top was a 4 Tube 2ft T5 Lightwave


DSC04718.JPG DSC04723.JPG DSC04726.JPG DSC04733.JPG DSC04734.JPG


lilindian

Well-Known Member
New Cabinet:


Whilst there is an amazing array of technology out there for the hydroponic community such as Dimlux Digital Dimmable 400V Ballasts, infra-red sensors for light controllers (measuring leaf surface temperature) and hydroponic undercurrent systems, I am someone who a.) is not rolling in money and b.) generally likes to keep things simple and natural. Therefore I won't be pouring loads of cash into equipment and technology, but instead make do with what i already have. Having said this, the spec of the new cab can be found below.


Lighting:


Ballasts

- x1 600W Lumatek Digital Dimmable Ballast

- x1 1000W Lumatek Digital Dimmable Ballast


- In the future I will upgrade each light to a 315W Ceramic Discharge Ballast/Reflector with according bulbs for Veg/Flow


(Timer and 4 Gang Contactor Used)


Reflectors


- x1 Parabolic (silver)

- x1 Parabolic (white - which i believe to be better than silver)


Ventilation:


- Intake 6" Air Force II Acoustic Fan (now known as ISOMAX)

- Outtake 8" TD Silent Acoustic Fan


Fan speed controller:


- Variac transformer fan speed controller

(The advantage of using a Variac transformer to manage your fan speeds is in a variac transformer, the output wattage going to the fan is adjusted. In normal fan speed controllers, they adjust the fan speed using the voltage going to the fan. The result of using voltage over wattage is an on-off-on-off hum the fan gives off as you reduce the speed. This is due to the “voltage regulator” essentially turning your fan on and off slower and slower the more you turn the speed down. It is a constantly interrupted signal, where-as a variac transformer sends a constant power feed to the fan, just at reduced power.)

Hope that made sense… that’s my spin on it anyway.


Ducting:


- 200mm x 90mm Flat Channel Ducting (connecting onto fans with flat channel connector - 6" Spigot adapter)


- 6” Adjustable air outlet valve’s (intake and outtake) to balance ventilation.


Reflective Sheeting:


- Orca Grow Film

- This will be stuck using spray glue, before the edges are sandwiched in construction as the sides are put together.


Right, here for the details.....

The Hanging part:


So I plan to have the whole cabinet hung on 2 rails, allowing me to move the cabinet back and forward approx. 0.5m. This is for 2 reasons, firstly to allow access to the radiator behind the cabinet, if… it ever gets fixed. But secondly to allow access to the fans and electricals, which I plan to place in the alcove of my room, and then box up with plywood and insulation. Plus, it’d be kinda cool to have it hanging!


The way I’m going to do this, is to use door hangers, usually used to hang warehouse doors, and stuff like that. Each of the Hangers has the capacity to hold 250kg’s, and I’ll have 4, and I doubt the cabinet fully loaded and watered will be anywhere close to 1ton.

So I should be good!


The Doors:


The doors will be made of 18mm ply, with 4mm mirror glued to that. Each door will be supported by 600mm garden gate hinges. Each door will be a full length mirror, edge to edge.


Door closing mechanism:


In my previous cabinet builds I’ve used everything from wooden blocks to make a latch, to cabinet slide catches. I had always wanted to use magnets similar to those sometimes found in bathroom or kitchen cabinets, but found they were always too weak for my intended use. Recently an idea came to me. Why don’t I use neodymium magnets? They come in various shapes and sizes, and have a degree of different pulls. I looked them up and to my surprise found exactly what I needed. I plan to use magnets with around 10kg of pull, hopefully enough to seal the doors tightly against the frame/seal.


The seal around the door:


In previous builds I have used draught seal strips to seal the door shut when closed, however whilst doing the job well, I have felt that there is a better solution to this.


This time round, I am giving Neoprene a try. I’ve handled a lot of the stuff, need to do a bit more research into the different varieties available, but pretty sure this is the route I’m going down.


The Cabinet:


The Cabinet must be strong, but light. Therefore I have opted to use 9mm Ply for the walls, and 50x50 timber for the frame. I would have gone for thicker ply for better acoustic insulation, however considering it will be hanging, and it is quite a large cabinet, I thought the 9mm will be strong enough. If it is too loud for my liking, the design of the cabinet allows me to add insulation around it and box it in. I am hoping I won’t need to do that, but if I did, it would be dead silent.

Sitting on the bottom face of the cabinet will be 2 platforms if you like, each just under 1m x 1m. Each platform will be on a set of heavy duty runners. The idea behind this, is that when i want to attend the plants in the cabinet, instead of leaning into the cabinet and sticking my head under the light to see the ones at the back, i can just pull each platform out and have full access to 2 sides of the grow (would be 3 but the cabinet is in the corner!). I employed a similar technique in my last build that worked a treat. The runners however are very expensive, for the time being i will build the cabinet without this feature. It can always be added.


Another design I was looking at was a closed loop system, with air cooled lights, co2 unit, humidifier/dehumidifier, but I think I’ll save that for next time, when I have a bit more space to play with, and a bit more cash!


lilindian

Well-Known Member
The Design:
(drawings are proportional)


Front View With Cupboard and TV.png

  • Wardrobe on the right, T.V ontop
  • Ledge sticking out on the left is the mantlepiece
  • Height between mattress and ceiling is 1m.
  • Cabinet internal dimensions are 2m wide, 1.7m high, 1m deep.

Front View Ventilation Runs.png

Above you can see the ventilation runs.

  • Note how i have designed the runs in such a way, that the run to each of the intakes is the same length, and each of the outtakes is the same length. This is to ensure even airflow, and to make my job of balancing each outlet easier. All ducting will run behind the back face of the cabinet, leaving only the outlets visible such as in the first drawing.
  • I do not run Carbon scrubbers so do not need to make room for a filter. If i were however, i'd use an inline ozone scrubber, so still wouldn't have to make space for a filter.

BirdsEye Cabinet.png

  • This is essentially the footprint of my cabinet, or a birds eye view if you like. Very simple in construction.
  • Each face will be constructed separately, and then put together.

BirdsEye Frame + Cabinet.png

  • The above picture shows the timber frame i will need to build to support the cabinet. How the cabinet hangs underneath can be seen.
  • Where the rails will be hung, i have added extra support. These supports will also stop the ply from flexing under any weight.
  • The brown ledge bottom left is the mantle piece. As you can see its a very tight fit!
  • Red hatched out square bottom right is the vertical upright.
  • The horizontal brown hatching up top is to illustrate the timber going into the wall and screwing into the studs. I have had to cut out a slice of the wall for the timber to slot into and sit against the studs at the back.

BirdsEye Frame PLY With Cupboard.png

  • The drawing above shows the sheets of 12mm ply that a thin bedframe will rest on, and the mattress on that.
  • Big square on the right is the top of the wardrobe, that will be made into a little media station.


As the cabinet will be hanging from the underside of the bed, that platform has got to be strong. I am no structural engineer, but I am pretty sure what I got going on should be good enough. The timber supporting the platform will be screwed into about 8 vertical joists going along one wall, with the other wall's timber being screwed into brick. The Ply platform will then screw into this. The rest of the timber on the frame should support the ply sheets and stop it from bending/deflecting in any way. I did not want to add unnecessary weight to the design if it could be avoided, therefore did not go for thicker ply for the frame. The 12mm ply making the platform will essentially be supported from 2 sides/walls, with the opposite corner having a suitable chunky upright.

I have included beading in the middle of the cabinet, in-between which i can slot a sheet of plywood, in the event that i want to run 2 different light cycles, or just one light in 1mx1m, maybe rebalance the ventilation and use the other side for drying.

I will made a ladder to get up to the bed in the near future out of wood to keep with the general theme of the build. To the right of the frame/cabinet will go a wardrobe, ontop of which i will make a little entertainment station for TV, Xbox, Hifi, that will face the end of my bed.

I am no CAD expert, I learnt Autocad to design this, get all the measurements and timber sizes, so don’t quite know how best to illustrate the drawings to others but will give it a go.


So far, everything aside from the Mirrors, and Ventilation and runners have been purchased, as these are things I can sort out once I got some cash, and they don’t interrupt the rest of the build.
 

lilindian

Well-Known Member
So, 2 weeks later and its pretty much built.

Everything aside from the ventilation, mirrors, and magnets (need stronger ones) is done. The fans have been boxed up and stuffed with insulation and all is super quiet.

The plywood that was delivered was slightly warped. As a result the doors aren't straight. I'm currently straightening them using clamps, and a bit of moisture therapy. It's amazing how quickly plywood warps... you can almost watch it. For more info, see:

http://www.finehomebuilding.com/how-to/tips/flattening-warped-plywood.aspx


The good news is, the frame takes the weight! The cabinet is fully constructed and floats, AND, i can stand and essentially jump inside it. No cracks, no creaks. I added plenty of extra timber to the frame on top of what is seen in the plans using off cuts ect.

The Neoprene Seal i ordered turned out to be perfect for the job, very happy with it. I opted for the 5mm thick one i think, and as a result the doors are slightly harder to close, and therefore require stronger magnets, but the seal will be tight, which is the most important thing. Even if there was an air gap, the cabinet would have negative pressure. It's more for light leaks.

Camera charging now, pictures to come.
 

lilindian

Well-Known Member
Screen Shot 2015-12-10 at 16.29.25.png
(The Ladder - before the doors were put on)

Screen Shot 2015-12-10 at 16.30.24.png
(Doors on but clamped shut - the magnets purchased were not strong enough to hold the doors tight against the seal. This is partially because i hung the doors without putting the seal on first to give it an extra tight fit with the seal, and secondly because the plywood sheets came warped!)

(4mm Mirrors will be stuck to each door in the future)

(IT FLOATS!)

Screen Shot 2015-12-10 at 16.29.35.png
(Little entertainment station to box in the space up top a bit - also prevents the TV falling back)

Screen Shot 2015-12-10 at 16.29.12.png
(This is the alcove where the 2 acoustic fans have been boxed up and stuffed with insulation. The rest of the space will house the contactor/ballasts, and any extra will be storage for growing tools)

(The whole cabinet pulls out about 60cm away from the wall, which creates this gap for me to walk behind the cabinet and access this space)

DSC06857.JPG
(Orca taped all the edges to make it completely sealed - the only 2 edges are the near side top and bottom, but i have run out of tape, used 75 feet!)

DSC06859.JPG
(This is how the lights will hang - they are touching the sides of the cabinet, left and right, with approximately 1cm in between. This 1cm is for the sheet of ply that will slide in between and made it 2 separate grow spaces)

(The black strips left and right are the seals. I have put them on to try and straighten the doors a bit. The top and bottom seal will go on once i have installed the magnets)

(The doors will be covered in Orca, same as the rest, once i'm happy with how straight they are)


SO, can't do anything more until i have the magnets. Once i've sorted out the doors, the only thing left will be the ventilation.

All timber will be painted once i decide on a colour scheme to go with. Detailing on the timber is also missing, but i'll purchase beading and architraves when i have some cash.

The 10kg pull neodynium magnets are no-where near strong enough, so i'm now looking at the 50kg pull ones. But.. they're a lot more expensive, £34 a magnet, and i want approximately 10...

I know what you're thinking but... i'm only going to build this once!

Stay tuned for the rest​
 

lilindian

Well-Known Member
Well done sir. I also really like the K'nex scrog screens.
Thanks man. Knex screen worked well, loved how i could take pieces off the screen to tuck branches under/tie them down. I'll need more pieces for a screen of this size though!

Interesting. Macro cab, not the tiny stuff... me likey! Subbed for da show!
Aahhh yeaa, my next one will be a 4 light set up.... After that i'm done with cabinets, and on to rooms! At which point... I wana create a vertical system, heath robinson style. I made a little vert set up in my old cabinet using 2 cool tubes, and a 4 tier gully system with a 90L res at the bottom, bubbler tubing running down each gully..... and i never ran the system.... never got round to getting enough cuts to fill it!

Funny i was over in your thread earlier... i like your style...
 

ttystikk

Well-Known Member
Thanks man. Knex screen worked well, loved how i could take pieces off the screen to tuck branches under/tie them down. I'll need more pieces for a screen of this size though!


Aahhh yeaa, my next one will be a 4 light set up.... After that i'm done with cabinets, and on to rooms! At which point... I wana create a vertical system, heath robinson style. I made a little vert set up in my old cabinet using 2 cool tubes, and a 4 tier gully system with a 90L res at the bottom, bubbler tubing running down each gully..... and i never ran the system.... never got round to getting enough cuts to fill it!

Funny i was over in your thread earlier... i like your style...
Hee hee, we'd be dangerous if we teamed up on a shipping container build!
 

m4s73r

Well-Known Member
Are we talking about one above or below ground? ;) Because you know, below ground is where it's at.... bit more effort but hey, we'd only do it once!
Sadly shipping containers suck underground, they buckle. But a above ground stack. 16 ft of overhead. Could be sweet. That would be a LONG ass veg lol.
 

lilindian

Well-Known Member
Double stack! You said you wanted to go vertical, didn't you? LMAO!
LOL, throwing me in the deep end eh?

Sadly shipping containers suck underground, they buckle. But a above ground stack. 16 ft of overhead. Could be sweet. That would be a LONG ass veg lol.
My friend, where there's a will, there's a way. Doesn't that depend how deep you bury it? I know a thing or two about a long veg, but to get a 16ft-er? I vote for a multi tier-design :D
 

lilindian

Well-Known Member
Was lying in bed, and an idea came into my head....

Now i'm a big fan of 2 things, foliar feeding, and high humidity in veg. In the past, i have attempted to combine these 2 things into one effective daily treatment. I did this using an ultrasonic humidifier with Bloom Groigen mixed in (my favourite foliar feed for Veg). However, i found that A.) the smaller cheaper humidifiers on the market weren't up to the job, and B.) the products added to the water often ruined the humidifiers!

From these experiences i learnt that it probably wouldn't be possible to have an automatic foliar feed schedule going on.

I gave up on the idea of automation and resorted to pump up sprayers, until i came up with a new idea. To have a set of misters at roughly the canopy level, to mist the plants regularly (not to foliar feed as it would be RO water to avoid the mister nozzles getting clogged) to raise the humidity when the lights are on. Cooler leaf surface temperatures and a higher humidity will allow me to run a slightly higher wattage 1320W (660W each light with the super lumen switch) and therefore slightly higher temperatures. From my understanding plants metabolise at a faster rate at higher temperatures given a high humidity.

To achieve this, i am looking at using reptile misters, usually used in terrariums to keep reptiles cool and what not. The model in particular is the Monsoon RS400. You can attach up to 6 nozzles onto one unit, they aren't too expensive, and the nozzles and hosing parts are all available to buy separately. I plan to use 6, spread out evenly across the back of the cabinet. They spray a fine mist and the unit has a cycle timer on it, for misting of a certain duration every so many hours.

Again another purchase for the future, but keen to incorporate it in this cabinet.
 

m4s73r

Well-Known Member
LOL, throwing me in the deep end eh?


My friend, where there's a will, there's a way. Doesn't that depend how deep you bury it? I know a thing or two about a long veg, but to get a 16ft-er? I vote for a multi tier-design :D
Ive seen the results of them buried, they sag on the top real bad. But if you went in and supported the centers maybe.
 
Top