sure no prob man,

How do I convert a home
security light into a remote ballast grow light?
Contributed by: Spliffco, Inc.
For some reason growlight manufacturers are completely ignoring the small, personal grower. A quick look around Overgrow and you can see some very respectable bud being grown under 150's, and even 70 watt HPS
lights. But the smallest ready made remote ballast growlight you can buy is a 250 watter, and they usually cost well over $150 (US).
So, as usual in the medicinal herb growing world, you need to take matters into your own hands.
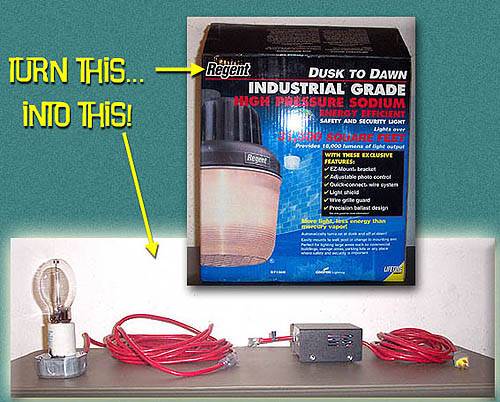
Here’s how to turn a 150 watt HPS
security light available at most Home improvment stores, into a nice remote-ballast grow light.

Materials & Tools:
MATERIALS
Regent GT150H, (About $79)
Heavy Duty extension cord of suitable length
One heavy duty grounded electrical plug end (male)
Electrical box
Electrical box plate
Romex cable connectors (3)
Wire nuts
Bolts, nuts washers
Strip of metal to secure ballast
Project case from Radio Shack ($6.99) #270-253A
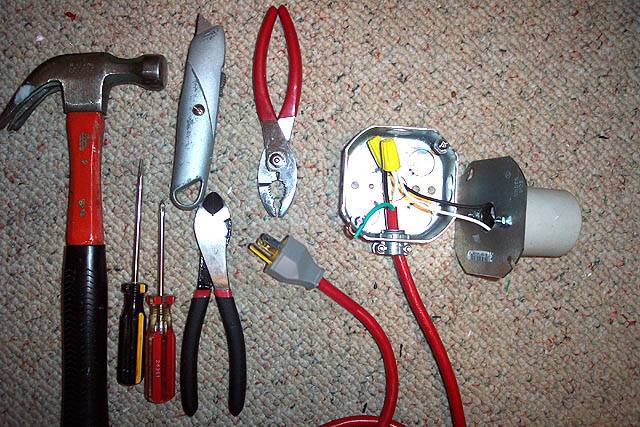
TOOLS
5/16 nut driver (for removing parts from the casing -- regular pliers will work)
Philips head screwdriver
Regular screwdriver
Hammer
Power drill and assorted bits
Metal file
Wire cutters
Utility knife or wire stripper
Diagonal Pliers
Pliers
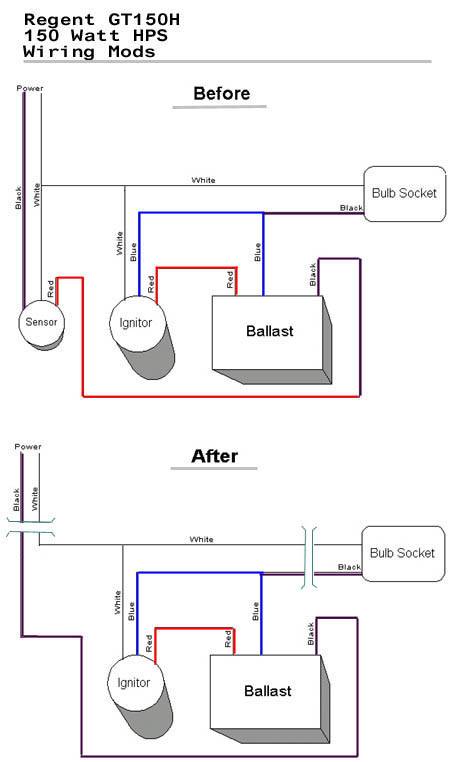
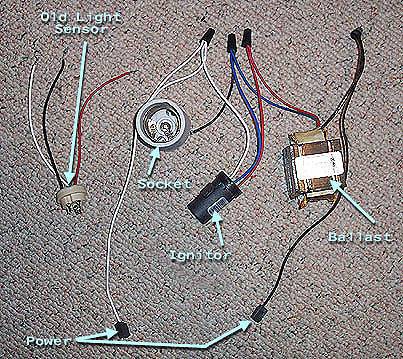
Wiring Diagram
Be careful...

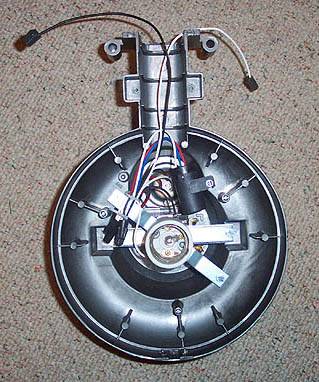
Remove guts
Remove the guts from the casing - bulb socket, ignitor, light sensor socket, ballast. The ballast was glued to the casing. I heated the casing for a couple of minutes on an oven burner (high), and when it was getting too hot to hold, I put it on the floor and wedged a hammer between the ballast and casing and popped it out gently.

REMOVE LIGHT SENSOR
These
security lights are designed to automatically turn on when it gets dark, so there is a built in light sensor that needs to be removed.
Remove all wire nuts.
Disconnect the white wire that comes out of the sensor (currently connected to all 3 other white wires).
Disconnect the black wire that comes out of the sensor (currently connected to the black “power in” wire).
The red wire coming out of the sensor is currently connected to the black wire coming out of the ballast. Remove the red wire, and then connect the black wire coming out of the ballast to the black “power in” wire.
Reattach wire nuts (there were 5 originally, now you only need 4).
Refer to the
wiring diagram!

WIRE THE SOCKET
The socket on this particular light had some metal
wiring connectors that stuck up and made it impossible to attach to the electrical plate without some modification (sorry no photo). Just pull the black and white wires off of the connectors, and cut the connectors down flush with socket base with diagonal pliers. Now loosen the connectors (screws inside the socket), slip the wires under them and tighten them back down. Please use some plastic electrical tape on the end of the socket to prevent any chance of the metal from the connectors making contact with the electrical box cover plate.
Secure the cord in the electrical box with a romex cable connector and wire it to the socket: black to black, white to white, secure with wire nuts. Some electrical boxes have a green screw inside to fasten ground wires, use that if yours has one, otherwise fasten the green ground wire to the box using one of the cover plate screws when you tighten the cover plate.

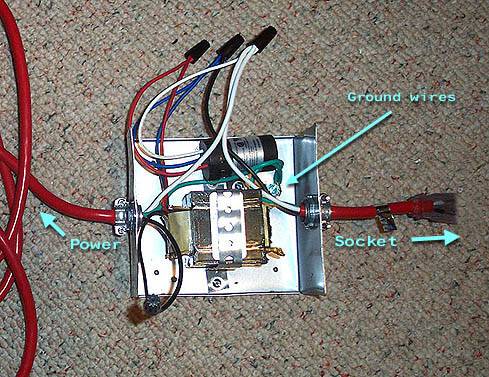
WIRE THE REMOTE BALLAST
Hopefully you can see the
wiring clearly in the photo, but if not, refer to the
wiring diagram for details.
You’re going to have to cut some holes in the Radio Shack project box for the power cords and some bolts to hold the ballast, ignitor and ground wires down.
I used a short length of metal (plumbing department) to secure the ballast. The ignitor had a notch that made it easy to bolt down. The ground wires from both electrical cords are screwed to the base of the box.
Cut a short length off the socket (female) end of the extension cord and wire it appropriately (again - see diagram). Wire the remaining electrical cord, including the grounded male plug to the other end of the box.
Use a tie wrap to bundle up the wires in the box and try to keep them away from the ballast, which will heat up during use.

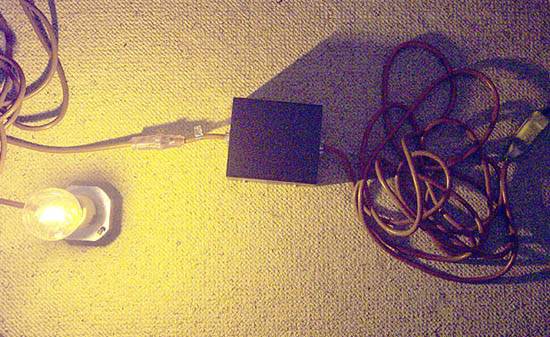
TEST IT!
If you've done everything right, it should light.

Now, build a reflector and you’ve got a nice little custom grow light.
Safety Warnings:
Always wire the male plug to the bulb socket and the female receptacle to the ballast to avoid possible electrocution! Always use an all metal project box which already has ventilation cooling slots, or if your project box has none, please cut adequate cooling slots, or drill several vent holes in the ballast enclosure (project box) to allow the heat to escape the box. Not adding the cooling slots or holes, could result in failure of the insulation and/or the transformer. Also, please be sure the enclosure is located in a well ventilated area to aid cooling.