Hey guys,
I been floating aound the forums for a little while now doin my research and have just completed my first grow box.
This design is small and easy to build and i've taken photos to illustrate the box...
What you need:
Dimensions are; 600mm x 450mm x 1400 mm
Imperial; 2ft x 1.5 x 4.5 ft
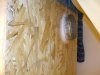
First walls were cut out of the particle board then the box was constructed by putting small 2x4s on both of the side peices,
The base was then cut to size and attached onto the small 2x4s attached to the sides.
Then the back was screwed on.
Followed by the door which can be any size you want really, and whatever else that needs to be covered!

Make sure you seal all the corners and edges so nothing can get out


Then screw in hooks so the light can be mounted

For security reasons put some liquid nails in all the screws you've used on the outside, so nobody can open it up!

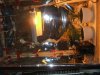
Then i used a 100mm hole drill to put my exhaust fan air through, then attached the small peices of wood used to mount the exhaust fan
Then painted!
Do a few nice layers so its a nice n thick coat.

To reduce vibrations caused by fan, stick some neoprene foam to the mounting position and tighten the fan through the foam onto the wood


This is the 8kg door catches we used, however we painted first. makes the door close perfect!

Then the most important part!!
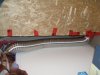
put all the weather seal in every spot at which the light can escape!!!!!!

After this we put the door handle and look on, followed with covering the outside with a stealth charcoal color for stealth placement inside my wardrobe and thats it!!


I been floating aound the forums for a little while now doin my research and have just completed my first grow box.
This design is small and easy to build and i've taken photos to illustrate the box...
What you need:
- A few 18mm sheets of particle board
- All your tools (drill, plane, tape, pencil)
- liquid nails
- 24mm screws
- Flat white paint (1 liter was all needed)
- Charcoal paint for outside
- Hinges
- latch
- 2 x 8kg magnetic door catch
- neoprene rubber
- 4" fan
- Lots of weather seal foam/rubber
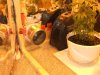
- 250w hps light
- door handle
- LOCK
Dimensions are; 600mm x 450mm x 1400 mm
Imperial; 2ft x 1.5 x 4.5 ft
First walls were cut out of the particle board then the box was constructed by putting small 2x4s on both of the side peices,
The base was then cut to size and attached onto the small 2x4s attached to the sides.
Then the back was screwed on.
Followed by the door which can be any size you want really, and whatever else that needs to be covered!
Make sure you seal all the corners and edges so nothing can get out
Then screw in hooks so the light can be mounted
For security reasons put some liquid nails in all the screws you've used on the outside, so nobody can open it up!
Then i used a 100mm hole drill to put my exhaust fan air through, then attached the small peices of wood used to mount the exhaust fan
Then painted!
Do a few nice layers so its a nice n thick coat.
To reduce vibrations caused by fan, stick some neoprene foam to the mounting position and tighten the fan through the foam onto the wood
This is the 8kg door catches we used, however we painted first. makes the door close perfect!
Then the most important part!!
put all the weather seal in every spot at which the light can escape!!!!!!
After this we put the door handle and look on, followed with covering the outside with a stealth charcoal color for stealth placement inside my wardrobe and thats it!!