My Stealth Grow Cabinet Build - Phase I - Environment

Hello fellow enthusiasts.

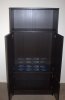
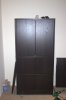
This will be a journal of my first grow cabinet build and since this forum has provided me with a wealth of knowledge, I figured I would try and chip in as best I can.

I will be breaking my build into three phases.

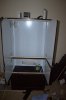
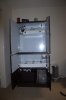
Phase I: Environment
Building the environment for the grow chamber of the cabinet.

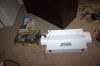
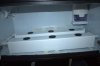
Phase II: Hydroponics
Once the environment is completed, I will be focusing on converting from soil to an Ebb and Flow hydroponics system.

Phase III: Clone Chamber
Lastly, I will be converting the final chamber of the cabinet into a small area for clones.

Please feel free to chip in with any tips, advice or fun ideas.

I will try to post updates daily.
 
I went out and purchased the EFFEKTIV storage system from IKEA. IKEA is great for DIY projects since you have the ability to mix and match different configurations to meet your needs.

I chose the following modules:

(2) 15" H x 30 1/2"W x 16"D
(1) 31" H x 30 1/2"W x 16"D

IMG_1696.jpg

I will be using the smaller sections for the reservoir (Phase II) and the clone chamber (Phase III).

I will be focusing on the largest section which will be used for veg and flowering.

The next steps will be light proofing the cabinet and cutting holes for ducting.

Unfortunately, the low profile reflector I purchased from http://www.greenlitegrolite.com/ventray.php will not arrive until tomorrow so the ducting and light proofing will have to wait till then.
 
Update:

The Greenlite reflector arrived yesterday instead of Tuesday. The company mistakenly put the wrong zip code so it ended up getting shipped back to them.

I do like the design, its pretty slick and it included the hanging kit. For $120 shipped, I can't complain.

IMG_1700.jpgIMG_1704.jpg

I have been waiting for the reflector to arrive because I wasn't exactly sure how I was going to fit a 6" duct next to the reflector. It looks like the duct is going to have to be a little squeezed, but I sure that wont affecting anything but aesthetics.

Since the reflector is going to take ~7-8" of height allowing only ~20" of height available to the plants for growth using three chambers, I have decided to combine the large section with one of the small ones. That will allow me 31"W 16"D 46"H to work with. The bottom section will be used for both clones and reservoir.

IMG_1706.jpgIMG_1705.jpgIMG_1699.jpg

I have cut out a 14"x4" rectangular section in the middle section for the passive intake, the vent will be going over the whole to make it look pretty and I will be building a light trap to mount behind the vent. I have also lined the upper section's door frame some 1x1's to ease in the light proofing. I'll add weatherstripping after the panda plastic is mount.

The next steps will be:

  1. Mount the reflector hanging kit and reflector
  2. Cut out a 6" oval exhaust duct.
  3. Mount a 1"x1" bordering the middle section for light proofing (same as upper area).
  4. Figure out how I am going to mount the oscillating fan (if I can find one that fits) or a couple 120mm PC fans.
  5. Apply panda plastic to veg area using adhesive spray.
I am waiting for the following items to arrive:

  • Soler & Palau TD-150 Inline Mixed Flow Fan - 6"
  • Speedster Variable Speed Fan Controller
  • Honeywell TM005X Wireless Thermometer w/ Humidity
  • C.A.P. AIR-2 Temperature and Humidity Controller
  • Watts Up? Electricity Meter PRO w/ PC software
Comments or suggestions are appreciated. This is my first cab ever and I would like to do it right the first time.
 

zen9

Member
Point it out if im wrong here, but your ultimate goal is to build a grow-room inside the cabinet whitout being able to see from the outside that you're actually growing in there? Thats awesome, I'd like to try the same thing some day. Also this is my first post, been lurking around in Toke n talk for quite some time, but i just recently figured i'd register and join you all. Well that, and i really wanted to see all the pictures people were posting :D
 
I had some time this weekend to really make some progress on the cab.

I cut holes for the duct and for the passive intake. They were by no means perfect but they will work.

IMG_1708.jpg
(The dried glue is from my first attempt using the adhesive spray.)

I applied panda plastic to the cab using some non-flammable contact cement. The contact cement is nice because it allowed me to use a towel to help smooth out the plastic and remove any bubbles.
IMG_1710.jpgIMG_1717.jpg
If anyone else is going to attempt this, here are some things I learned:

  1. Apply the glue to the plastic then to the cabinet.
  2. Do not try and use one large piece, cut a piece for each panel, then use some white acrylic tape on the corners.
  3. Take off any doors and do them separately. (You'll be glad you did)
  4. Use adhesive spray on any lingering unglued edges.
I applied weather stripping to the borders of the doors, mounted the reflector and ran the ducting.

In order for me to feel comfortable hanging the reflector I had to go through the top of the cabinet. I will need to put some pictures of me and the lady in front of those to hide them.
IMG_1720.jpgIMG_1721.jpgIMG_1718.jpgIMG_1719.jpg

In the next couple of days I would like to:
Mount the C.A.P. AIR-2 Environmental Control
Mount the Honeywell Wireless Sensor
Build a light trap for the passive intake.

I am still waiting for my exhaust fan to arrive, once that happens I will begin constructing my soundproof exhaust box and carbon filter.

If anyone has any advice, I would love any suggestions.

I am a little stuck on how to provide air movement inside the cabinet, I am thinking using a couple 120mm fans. Does anyone have any ideas for a very small oscillating fan or other means to move the air?
 

wildponey

Member
I will be following you closely! looks great!
Im also in the making of my grow Cab as we speak!
Last thing I need for mine is a portable AC unit, after that, my Cab is complete.
Keep up the great work!
 
Hey everyone. Just a small update to let everyone know I am still alive. I have been out of town for the past couple days, so I haven't had much time to work on the cab.

The S&P TD-150 arrived along with the speedster fan controller. I am not sure why more people are not purchasing this fan, for $120 shipped its one of the cheaper solutions and it is so quiet that I am not going to need to build a soundproofing box around it. I will just be mounting it to the back of the cab with some Dynamat Xtreme to help reduce the vibration. In the event that later in life I feel as if the fan is beginning to be too loud, I will then work on building a soundproof box to surround it.

The speedster controller is either defective or just a piece of crap (I got the knockoff brand from eBay). In plugging it in, the fan reverses direction and gets so hot it starts to melt the plastic housing, the variable control seems to only make it louder. Has anyone else experienced this issue?

I will be constructing the light trap from some foam board. A little ghetto, but it will serve its purpose.

I am waiting on the following to arrive prior to finishing the environmental control and exhaust system:

2 - Black Power Strips
1 - 4 SQ FT of Dynamat Xtreme
1 - Caframo 5" Wall Mount Fan
1 -[SIZE=-1] Eva-dry Electric Petite Dehumidifier

Once everything arrives, I will be able to complete the environment and begin working on Phase II - Hydroponics. I hope to have the environment completed by the end of this week.
[/SIZE]
 

bohicular

Active Member
hey - hows the cabinet going? I'm about to start construction on a cab this weekend. Are you up and running? I ran across this thread looking for door light proofing options - did yours work out?
 
hey - hows the cabinet going? I'm about to start construction on a cab this weekend. Are you up and running? I ran across this thread looking for door light proofing options - did yours work out?
It's worked out great so far. I have been horrible at updating the site with my progress.... Sorry!

I am getting the finishing touches setup with the Hydroponics NFT system and getting everything plugged in and ready to go. I should be done by next week.

For lightproofing:
I built a light trap for the passive intake using black foam board from Target. It looks kind of like this..
itsatrap.png

For the doors I used 3/4" x 3/4" pieces of wood lining the tops and bottoms of the door. I then lined the sides of the doors and the front of the 3/4's with some 1/8" thick rubber marine stripping. The doors wont fully close due to the stripping so I purchased some Grabber Latches (http://www.southco.com/class/c3-grabber-catch-latches-7399.html) and mounted them to the top of the cabinet door.

Its completely air tight and light proof.
 

bohicular

Active Member
I gotta get some of those grabber latches, because my plywood door is a bit warped and one corner isn't closing. For my passive intakes, I'm using 10mm pvc pipe with a couple of turns. I built some intakes like yours, using cardboard, and they worked fine, but I didn't think the airflow was so good (and light still leaks - - it really needs at least 2 turns).
I used 2cmx2cm wood strips to make a frame like yours, only with the sides as well. I was going to use the same hinges you have, but i got an extra 5cm of depth by using regular cheap hinges (easier to install too!). But on the other hand, ikea always gives you completely flat pieces, which is great.

Today, i bought a tube of black silicone + metal gun, which I am loving! Its real cheap, and I lined all the interior edges with it, as well as a bead on the outside of the 2x2 strips, where the door makes contact. It works great! (weather stripping is pretty expensive, at least where i live)

I'll get some pics up on my thread soon - -and it would be great to see your cab up and running! (I'm up and running now, although with a temporary exhaust system)
 
Here are some pictures I took last week. I ended up ripping the hydro system out of there to replace all the piping with 1/2" tubing. The pump has been resonating against the cabinet making a lot of noise. Since I sleep in the same room as the cab, it needs to be quit. I will also be putting a sponge under the pump to help absorb vibrations.

The light has been leaking out of the trap. I am thinking about retrofitting some piping instead of the cardboard.

Here is the setup before I ripped out the 4x4 fence posts.

IMG_2025.CR2.jpgIMG_2022.CR2.jpgIMG_2024.jpgIMG_2023.jpg
 

tendran

Active Member
It looks terrific man, you've really got your shit together. Not like a lot of the half ass assemblies we see. Keep up the great work!

Btw, I'm a big fan of these 120mm fans for cool air intakes. They're affordable, well designed and very quiet.
http://www.newegg.com/Product/Product.aspx?Item=N82E16835185006&cm_re=scythe_s-flex-_-35-185-006-_-Product

If you're going to have them all running on the same cycle or preferably 24/7, you can likely power them all off of one of those 6 amp LCD screen power supplies.
http://www.amazon.com/Kinamax-AD-LCD12-Monitors-Adapter-Supply/dp/B000VE7GQQ/ref=sr_1_1?ie=UTF8&qid=1288199552&sr=8-1

Sub'd and +rep for ingenuity. I love seeing new stealth furniture grows of this caliber.
 
hey - hows the cabinet going? I'm about to start construction on a cab this weekend. Are you up and running? I ran across this thread looking for door light proofing options - did yours work out?
Awesome, I'm soon to begin construction on a similar sized cab.. I plan on using thin rubber lining so it makes a seal when the door is closed.. Also Where do you get that cement? And can it be applied to sheet wood? One other question.. Are there adapters made for different ducting sizes? thanks
 

stelthy

Well-Known Member
Awesome man!! I like this cupboard, it reminds me somewhat of mine, I am well going to watch how you progress and your using almost the same reflector as me..I've just upgraded from a cooltube, cos this style reflecter has way better light coverage :) Here's a link to my Project :)

https://www.rollitup.org/general-marijuana-growing/320402-stelthys-600w-hps-project-new.html
.
Feel free to check it out.. its very simerlar :) be cool to compare our hard work..Best of luck and here's some REP :) - STELTHY :leaf:
 
Top