Stomper420
Active Member
This is cool. Good people helping good people..Gotta love it...Keep up the good work usernametaken, ab=nd do keep us updated as she progreses.
agreed.. Super righteousThis is cool. Good people helping good people..Gotta love it...Keep up the good work usernametaken, ab=nd do keep us updated as she progreses.
I personally...... Would put 1 fan directly in between the lights linking them together and reducing ducting (better air flow). Also go a bit overkill on your fans (720cfm or more) and fit controllers, this would give more heat and noise control overall. They are a bit more pricey but worth the investment.Based on all your help here is what I've come up with so far. Look good so far?
thanks mr green, I will look into adding the fan between the lights.I personally...... Would put 1 fan directly in between the lights linking them together and reducing ducting (better air flow). Also go a bit overkill on your fans (720cfm or more) and fit controllers, this would give more heat and noise control overall. They are a bit more pricey but worth the investment.

thanks man, I already bought the material. I'm hoping that all the little extra things that aren't needed but are nice help pay off in the long run.Totally overkill. Panda film everything, use polyglue and staples to hold it in place. Forget plywood, expensive and not needed although it would help with sound. Simply nailing 2x4 to the rafters (after panda) would work just fine
View attachment 2462879
here's what I would have done...
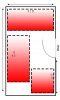
2 4x8 tables 4 lights, plus 1 grow tent for veg with a t5 setup in it... simple... effective...
add 1 10" max fan with carbon scrubber for exhaust and a 12" empty duct to the basement for air (negative pressure will pull the air without a fan...)
If possible I would tear the door out and mount it so it opens out... that way you can fit a 50g drum in there for a rez... add a pump with a water hose and you'd be set...
I feel dumb for not thinking of that... Cheers!you'll keep the drum inside the room, just run a water hose from upstairs when you want to fill it... 1 full drum should just barely water both trays at the same time...
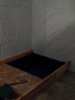
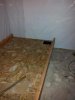
i have been thinking of building a small platform to hold the containers. It would have a lip to contain run off and the part the containers sit on will have a very slight pitch so that any run off will go to one side. At the end I was going to install a drain for the water to escape into another container.you can set the 4x8 tables on bricks... put 1x12's across the bricks, and use a large oil pan to catch the runoff... then just use a pump and hose to pump the runoff back outside...
like this?i have been thinking of building a small platform to hold the containers. It would have a lip to contain run off and the part the containers sit on will have a very slight pitch so that any run off will go to one side. At the end I was going to install a drain for the water to escape into another container.
thoughts?