robincnn
Well-Known Member
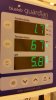
Good luck. You can see here the wiring style for normally open thermal protector on dimming side.I'll probably switch to B series meanwell and do it on the dimmer wires. sounds safer and easier overall.
https://www.rollitup.org/t/failsafe-for-fan-cooling.873706/page-2#post-11662980