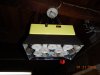
I think I'm better at building the enclosures... So finished up, turned on nothing blew up but its not very bright. Dimmer is working, unplugged that to see if it changed the wattage, no, only getting 57 watts. The leads from the driver show 140 volts dc, those were attached to the terminal strips, the 4 cobs are in parallel from those strips. When I check the voltage of the strips with the cobs on it shows about 25 volts. I disconnected the leads from the strips still 140 volts. Hopefully someone smarter than me could advise.
You are using an out of date browser. It may not display this or other websites correctly.
You should upgrade or use an alternative browser.
You should upgrade or use an alternative browser.
Pictures of your DIY lights - Post your pics!!!
- Thread starter TimeToBurn
- Start date


crankz1
Well-Known Member
Get rid of the terminal blocks and wire the cobs in series.I think I'm better at building the enclosures... So finished up, turned on nothing blew up but its not very bright. Dimmer is working, unplugged that to see if it changed the wattage, no, only getting 57 watts. The leads from the driver show 140 volts dc, those were attached to the terminal strips, the 4 cobs are in parallel from those strips. When I check the voltage of the strips with the cobs on it shows about 25 volts. I disconnected the leads from the strips still 140 volts. Hopefully someone smarter than me could advise.
Sour Wreck
Well-Known Member
Get rid of the terminal blocks and wire the cobs in series.
That would be alot easier, not sure why I thought they needed to be in parallel with that driver, is the 18 ga wire that I have soldered to the cobs big enough?
crankz1
Well-Known Member
Yeah, you'd want a constant voltage driver for parallel wiring. Your wire should be fine.That would be alot easier, not sure why I thought they needed to be in parallel with that driver, is the 18 ga wire that I have soldered to the cobs big enough?
Yeah, you'd want a constant voltage driver for parallel wiring. Your wire should be fine.
Works good now, thank you, dims from 193 watts to 31 watts.
Kaneh_bosm
Well-Known Member
(24) 280mm eb strips, wired in parallel powered by two hlg185-24a drivers. 

Here are some pics of all my homemade lights so far. First two are the new one at 194w and 30w. next two are of my "light bulb light", the first one I made, next two are qb288 fixture. Pic 7 is the first cob light with the cheapo full spectrum chips, last two are a qb120 fixture, I have 6 of those.
Attachments
-
 homemade lights 001.JPG3.4 MB · Views: 91
 -
 homemade lights 002.JPG3.1 MB · Views: 87
 -
 homemade lights 003.JPG3.2 MB · Views: 87
 -
 homemade lights 004.JPG3 MB · Views: 88
 -
 homemade lights 005.JPG3.6 MB · Views: 86
 -
 homemade lights 006.JPG3.1 MB · Views: 93
 -
 homemade lights 007.JPG3.2 MB · Views: 87
 -
 homemade lights 008.JPG3.3 MB · Views: 87
 -
 homemade lights 009.JPG3.1 MB · Views: 86
VegasWinner
Well-Known Member
 my current 3 GrowGreen 200w boards channels wired in parallel driving the pcb at 100w each for a total of 340w with two C1050B drivers one 240H and one 120H. The reds and blues are Royal Blue and Deep Red with lpc 1050 drivers for a 2x4 area.


wietefras
Well-Known Member
Small fixture to light a 40x60cm area for starting seedlings. Used 2 x 24W F-Series Gen3 5000K led strips powered by a Mean Well ELG-75-C1050A driver.


Strips are mounted on 25mm aluminium U-channels and attached to the driver. Later I added some alu angles at the ends to be able to hide the wiring better. Stays pretty cool too. The frame is lukewarm.
Still need to fix the hanger system with a metal wire system, but until I receive the parts for that, the chain and string seem to hold it up just fine too.
Always amazing how quickly you can build a light from these strips.
This fixture replaces a 2x55W PLL (T-neon) fixture. So it saves me over half in electricity and I get more light too.
Sour Wreck
Well-Known Member
Small fixture to light a 40x60cm area for starting seedlings. Used 2 x 24W F-Series Gen3 5000K led strips powered by a Mean Well ELG-75-C1050A driver.
View attachment 4079613
View attachment 4079614
Strips are mounted on 25mm aluminium U-channels and attached to the driver. Later I added some alu angles at the ends to be able to hide the wiring better. Stays pretty cool too. The frame is lukewarm.
Still need to fix the hanger system with a metal wire system, but until I receive the parts for that, the chain and string seem to hold it up just fine too.
Always amazing how quickly you can build a light from these strips.
This fixture replaces a 2x55W PLL (T-neon) fixture. So it saves me over half in electricity and I get more light too.
need to make me some like this with 4 strips for my veg area.
got 16 of them vertical in my 4x4 tent.
astonehead
Well-Known Member
 So my fixture is now 1m x 1m in a 1.2 x 1.2

wietefras
Well-Known Member
Took a FLIR picture of the 2x5000K ledstrip fixture I posted yesterday:

Aluminium frame is about 25C and the SMD's get up to 46C. I get the idea that the heat is not transferring well from the strips to the frame. With the TCI stips I had much less of a difference between PCB and aluminium (the alu gets much hotter there). But then those strips are twice as wide for the same number of watts.
I didn't add any thermal paste between strips and aluminium, because with the TCI strips this didn't seem to make a real difference (2C cooler at best). Perhaps these narrower Samsung strips would benefit from thermal paste?
Although the SMD's on the TCI strips go up to 50C. So the Samsung strip SMD's are actually running cooler.
noodle-led
Well-Known Member
I have two years ago's new hotness in my tent, a pair of Gen 7 Vero 29 COBs at 4000K some nice pin heatsinks from the ole Northern Grow Lights and the pricy AF Ledil reflectors. It lacks very much red but gets the job done. I took it down tonight to add a new feature to it so I grabbed some images.


What's that kajigger on the bottom? Well to solve my red problem I just added 10x CREE XP-E HE Photo Red diodes stuck onto a 25mmx10mm heatsink. DRAGON MODE ACTIVATE


I added a switch so I can turn the red LEDs off when I don't need them. I've been considering doing a new light with Bridgelux EB Gen 2 strips and having 5 strips on at all times and 4 strips on a switch like this. That way I can do like 4x 5000K + 1x 3000K, then switch on 4x more 3000K to get more red for blooms and fruits. All done with one driver, although the dimming is ganged to a single 3-in-1 dim circuit. I haven't seen any builds that have a switch to disable strips to change color temperature, any reason why that's not more popular?
OLD MOTHER SATIVA
Well-Known Member
3000 k..and 5000k 
Randomblame
Well-Known Member
OLD MOTHER SATIVA
Well-Known Member
6" x 22" 560 diode..
Similar threads
- Replies
- 4
- Views
- 458
- Replies
- 3
- Views
- 419
- Replies
- 3
- Views
- 1K
- Replies
- 17
- Views
- 2K