Well, it was a very long day today and not super productive as it was one of those start up days where I had to go to lowes and every time I turned around I didn't have this hole saw, or that bit, or that battery charger. Nonetheless a pretty productive day. Still shooting for moving the plants.
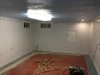
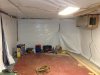
So this is the lovely room in my rental... quite sweet no? with the painted wood paneling and stencils? Lets just say I bought this house before the gentrification really kicked in
")
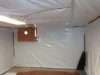
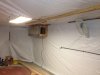
So first things first.. seal that bitch. Panda film all the walls and ceiling and seal the seams with foil tape and glue the bottom edge to the floor with liquid nails. A air stapler makes this go REAL quick. Done and done. Hint, the little strips of cardboard help keep you from pulling the panda out of the staples and also helps keep it snug to the ceiling when your nailing into the wall.
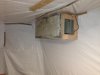
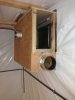
Ok, so what the hell is that big box on the wall? That is a "manifold" of sorts. Basically I need to keep the sound of this grow to a minimum. What makes air noisy is not volume, its velocity. So by having a large volume at the manifold (and a large basement window for the air to leave, I can slow down the velocity and really quiet things down. Some egg crate foam will help quite a bit as well.
Here is a better picture. So the two 6" flanges will be coming in from the left and right rows of lights. The big as opening is where the duct from my carbon filter fan wil be coming in. That is pushing 1600 CFM so it needs a pretty big duct or it will sound like a freight train. I think that is 12" x 18". You can see the 3' by 18" basement window if you look inside the box.
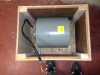
I also managed to mount the inlet fan. Also a 1600 CFM. Shitty picture but you can see the blower in there. Hey, its fugly cause its scrap wood.
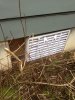
So that is blowing air into the room, on the opposite side from where the CF will be. Again, I just removed the window for airflow and bought a 32" x 18" by 3" deep filter to keep bugs, pollen, and what not from getting sucked into the room. Nothing fancy, the filter just slides into a tight groove. Easy to replace when it gets dirty. It will also help keep the sound down (this is why the fan manifold is soo long, I wanted to get it a little bit from the window. This is what it looks like from outside the basement window...

If your wondering why I used a blower its basically because they are cheap, have little flow loss from back pressure, and they are quiet. That, and they will run for fucking EVER. These units (dayton) are made for industrial uses and what not. I have seen fans run every day for 10 years and they are still running. I needed allot of flow and the 1700 CFM inline fans are $400. These were $150 a pop. You just need to mount them in a box. Here is a picture of the blower that will suck air from the CF. obviously I haven't mounted the back and flange to the box yet.
Last thing I managed to do was run the 120 power to the room. Had to run two separate 20 amp circuits.
Circuit one is my controller and inline fans (4 amps), and my dehumidifier (11 amps), plus a couple spare outlets for my hydro control bucket and water pump for the CO2 generator.
Circuit two is the two blowers (12 amps), and the oscilating fans.
pretty normal stuff, but for those that don't know, I'll explain it real quick. that way you can kill yourself or burn your house down and I can read about you in the paper and my friends and I will laugh and mock you.
So here is the panel with the cover taken off. Its a little creepy, even if you have done it before, but take your time, be careful and use your brain.
Ok, now see the three big lugs (screws) at the top.. Those are connected directly to the power lines. They are always hot. Even if you flip the main breaker, they are still silently waiting to kill you. If you touch the hot one with say a screwdriver, or your knife, or maybe you just hit it with a ground wire, depending on the thickness pf your shoe soles, your going to be dead. Not poked, not ouchie... dead. So yeah, DO NOT FUCK WITH THOSE LUGS!
So basically how this works is that the HOT wire (black) connects to a metal strip that all the circuit breakers clip on to. (again.. this is one of those no touchie things, but if you flip the main breaker the load bars, as they are called, are now not energized. So go ahead and lick them. (might want to hit it with a volt meter first though
The ground (bare copper... fucking duh) and the neutral (white) both connect to the same place, and those places are the grounding bars on both sides of the panel. Those tiny metal strips with all the screws in them.
SO.. to run a new circuit to your grow room. Take the case off, grab a headlight, then shut off the main breaker. Feed the wire CAREFULLY into the box, grab a bunch of slack and then cut the sheath off of it, all the way to where it comes into the box. Tighten the clamp that you installed in the hole that you put the wire through. Now, push the new breaker on to the load bars. It should pop right into place. Now run your black wire to the breaker and tighten it. Tighten all your connections very very well!!! Loose connections cause resistance and resistance cause heat. And heat...well, heat burns your animals and childhood pictures while the cops and insurance people show up. Now, take the white wire and the copper wire and secure them to the ground bars. Turn the breaker off!
Take your time and cut things to the right length. The wires should run down the sides of the box and then have a nice bend and into the breakers. see how fucking gangster my load center looks! That's because I wired that shit. My other house looks like someone crammed a blender in there.
Now, turn the main breaker on. You might want to close your eyes if this is the first time.. LOL
Now put the cover back on and make sure to break out a new metal space if it is a new breaker. You will figure it out if you don't know what I mean.
Now you can run the line through conduit (if it is below the rafters) or bare wire if you want to drill small holes and feed it through the joists.
My last comment.. if your going to wire stuff, take some time to google things and make sure you are doing things to code. In the event of a fire, if the inspectors find that the cause of the fire was wiring not to code, then you can bet your ass that they are not going to cover you. I would hazard that they would try and do it even if it wasn't the wiring that caused the fire. Plus, when done properly, your not going to pound a nail though a wire in the wall, have shorts in junction boxes, and all the other stupid shit that causes fire.
Jesus this was a long post.
Tomorrow comes the cool stuff.. like using a relay to power high amperage things from my low amperage controller, and a neat way to avoid having extension cords everywhere.
Cheers,
LF