I think I have read every thread on this forum on cloning. I had a very low success rate when I started. The other problem I faced was not being able to put my plants into flower until I was absolutely sure I had viable clones to carry on the genetics. I read and read and after trying a little from this post and something from that one I finally got it it wher I get almost 100% success rate. Cloning methods are vast and differ from one person to the next. After much death and a year of trial error and perfecting what works for me - here it is.
1. Set up everything ahead of time to be sure the cuttings are not sitting around waiting for you to set up the medium - cloning compounds and eq.
I use a greenhouse heating pad under my propogation tray where the clones will live for the next week. The model I use keeps the tray temp 10F higher than the ambient room temp. That works out to be about 85F. I plug it in and thoroughly wash the propogation tray and dome. My dome has baffles at the top to allow me to control the amount of humidity in the unit.
2. Sterilize scissors, razor blades and working surfaces with alcohol. Allow them to dry thoroughly before starting.
3. Now that everything is setup you need to choose areas of the mother plant and select only the best cuttings to make your clones. I usually make a straight cut just above an existing node and take cuttings with at least 3" of healthy growth with very sharp scissors. I got mine from a beauty salon supply house and they are perfect for the job. You want to cut the stem and not crush it. After cutting them I put them directly into a large bowl of good water. I submerge the whole cutting. I continue this process until I have taken all the cuttings I need.
4. Now to the magic of creating clones. I use small peat pots for the clones. My medium is a mix of 2 parts soil without any nutrients added to it, 1 part vermiculite and 1 part perlite. During the setup process these were filled with the medium and waterd until water is coming out the hole in the bottom of the pots. I repeat this 2 more times to ensure the medium is thoroughly soaked.
5. Take the first cutting and remove any fan leaves on the stem that are not within 1/2" from the top of the cutting. I use a shallow ceramic bowl filled with water to do the next steps. I take the razor and carefully scar the stem all the way around the area that will below the medium when planted. I cut a 45 degree angle about 1/8" up from the straight cut I made at the mother plant. I then make a cut that splits the stem about 1/4" from the bottom that splits the bottom of the stem into an inverted Y.
6. Dip the cutting in your favorite rooting hormone. I have tried powders, liquids and gels. The gel works best for me and I use Olivia's cloning gel.
I use a thin wooden dowel to make a hole in the medium a little larger than the diameter of the stem. Place the cutting into the medium and fill in around the edges to seal the stem in the medium. I spray the clone with good water and place the cutting in the propagation tray and go to the next. Repeat the process until all cuttings are in the tray. Spray all the cuttings and the inside of the dome one more time and place the dome on the tray.
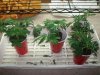
7. 2x a day I remove the dome for about 15 mins, spritz all the clones with good water and replace the dome. After one week a I start opening the baffles on the dome until the clones are healthy enough to start their journey and be transplanted into their new pots. The beauty of using peat pots is that you cam plant the whole pot right into the new pot without unpotting. Less stress and no chance of disturbing the roots.
Hope this helps. It was frustrating in the beginning, but no worries now. Endless supply of clones.