You are using an out of date browser. It may not display this or other websites correctly.
You should upgrade or use an alternative browser.
You should upgrade or use an alternative browser.
150w HPS Club: Inspirational Resource
- Thread starter MisterMicro
- Start date
jelven
Well-Known Member
i have a question, does the $20 light come with everything you need to hook it up? i seriously just can't understand all that electrical stuff, i am not handy at all and trust me, DIY is not my style.. i would love to have a 150w hps but can't afford the expensive prices.. any one know where to get a cheap set up? i'm confused about this $20 thing haha sorry everyone, i'm new at this...
frostythesnowthug
Well-Known Member
Yes.i have a question, does the $20 light come with everything you need to hook it up? i seriously just can't understand all that electrical stuff, i am not handy at all and trust me, DIY is not my style.. i would love to have a 150w hps but can't afford the expensive prices.. any one know where to get a cheap set up? i'm confused about this $20 thing haha sorry everyone, i'm new at this...
Go to home depot or wally world amongst others,they sell HPS lights that will be ideal for growing...You'll often find them in the clearance section at very good prices.
70w is pretty much as low as you wanna go, altho they do make lower wattage HPS floodlights, theyre not really worth bothering with.
150w is readily available in most home stores. plug n play kinda affair, although if you do decide to use it straight from the box, you may find the housng etc they come in will invade some of your available growing space headroom.
If space gets tight or if temps get too high, use the tutorial posted earlier in this thread to make it remote ballast...Its really that easy....you just have to decide whether you wish to completely dispose of the original housing and create your own, or if you wanna go for the easy option and keep the housing containing the ballast etc,and just extend the wiring to the bulb holder.(using correct rated wire of course)
This way you get minimal wiring to contend with and use the original housing to encase the ballast gear.
Also as previously posted,i am gonna do a more in depth breakdown on a 70w hps, that i am gonna be using to supplement my 150w cab, i am not sure which route i will be using yet to rig it up, as i dont know exactly whats gonna be required in the remote conversion until the light gets here and i get it dismantled.
time for a lil smokerella
frostythesnowthug
Well-Known Member
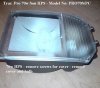
Ok gang, i got off work V early, and decided to check out the 70w that arrived this a.m.
I chose this Trac pro model as i've converted one before and theyre VERY easy to make remote....If you're looking for a 70w to supplement your cab, if possible try to get one that looks similar to this model, as theyre all pretty much the same to rig up.
This light is available in 120v/240v
This is a reasonably simple procedure,
Ok here goes..
Firstly remove the screws holding down the Lens.

Next remove the Bulb, and put it somewhere safe..

Now remove the screws that hold the Aluminum Reflector to the housing (usually 4 screws)....Next remove the screws that hold the Ballast/starter etc into the housing.
Now CAREFULLY lift the Reflector from inside the housing, this should give you access to the screws that hold down the bulb holder to the housing.
Remove the bulb holder fixing screws, and carefully remove the ballast and bulb holder etc from the housing.
Discard the housing (unless you wish to use it later to re-house the ballast control gear.

Now follow the two wires that exit the bulb holder to where they meet the ballast control gear....in this case, theyre blue and brown... use a sharpie to mark where the wires exit the ballast/starter...ie BR for the BROWN wire - BL for blue wire.
Now find a piece of cable suitable for High wattage electrical items.
For this i will be using a piece of cable from an old welder power supply, as its ample for the task in hand.
Using this wire,strip the ends to a suitable length,and now connect it to the terminals you just marked with the sharpie..
(the BR + BL)
Now strip the other end of the cable and connect it to the Bulb holder...ENSURE YOU CONNECT THE CORRECT COLORS
(Please note: i have used small 'chocolate block' type electrical connectors for Mocking up the light only - see pic - These will later be replaced with a single piece of the welder power supply wire , without any block connectors.)

You should now have a ballast/starter assembly with a long extended Cable (cut to the length you need) complete with bulb holder attached to the end.
Now double check your connections, ensuring that all colors correspond with each other ie blue to blue - Brown to Brown
or
for example, if you have used block type connectors to extend the cable ensure the colors match to which ever color you wire you joined the block to... ie blue wire from ballast --> block connector---> to red wire in extension cable---> to Block connector ----> to blue wire on bulb holder
Now check all connections are tight, and free of exposed wire, so as to be sure not to create potential electrical shorts or a FIRE HAZARD. If you wish you can also use electrical tape to cover the joins, after you have tightened the connections for peace of mind.
US residents - If You are using a U.S. 3 pin plug do the following:-
Now you will need a length of wire with a suitable plug attached to it to create the power supply lead...
Strip the lead to reveal the wires, and attach the Ground wire,Live wire and neutral wire from the lead to the terminals on the BALLAST.
The ballast terminals are marked as L/Ground/N....

If you are using an old 2 pin U.S. plug, you will need to run a wire from the GROUND terminal on the Ballast to a suitable ground... I wired my ground from the ballast of the 70w hps to the metal enclosure on my other 150w hps, which is fused for obvious safety reasons.

UK residents will need a 5 amp rated 3-pin plug and a length of 3 core wire cut to size(enough to reach the nearest power outlet)
Now Attach the plug to the wire, Brown wire to LIVE, yellow + green striped wire to earth and Blue wire to Neutral, check all connections are tight and replace plug cover.
Now strip the ends of the wires and attach the wires to the corresponding connections on the ballast terminals.
See pic....
Now, you should have a ballast/starter with and extended cable to the bulb holder, and a power lead.
PLEASE, check your connections once again, and MAKE SURE you have a GOOD ground/earth connection.
Fingers X'd and its time to plug the sucker in and test it.
its worth noting that these ballasts still get pretty hot even tho theyre only running a 70w.. adding a pc fan to the ballast will remove most of the heat just swell.

I chose this Trac pro model as i've converted one before and theyre VERY easy to make remote....If you're looking for a 70w to supplement your cab, if possible try to get one that looks similar to this model, as theyre all pretty much the same to rig up.
This light is available in 120v/240v
This is a reasonably simple procedure,
Ok here goes..
Firstly remove the screws holding down the Lens.
Next remove the Bulb, and put it somewhere safe..
Now remove the screws that hold the Aluminum Reflector to the housing (usually 4 screws)....Next remove the screws that hold the Ballast/starter etc into the housing.
Now CAREFULLY lift the Reflector from inside the housing, this should give you access to the screws that hold down the bulb holder to the housing.
Remove the bulb holder fixing screws, and carefully remove the ballast and bulb holder etc from the housing.
Discard the housing (unless you wish to use it later to re-house the ballast control gear.
Now follow the two wires that exit the bulb holder to where they meet the ballast control gear....in this case, theyre blue and brown... use a sharpie to mark where the wires exit the ballast/starter...ie BR for the BROWN wire - BL for blue wire.
Now find a piece of cable suitable for High wattage electrical items.
For this i will be using a piece of cable from an old welder power supply, as its ample for the task in hand.
Using this wire,strip the ends to a suitable length,and now connect it to the terminals you just marked with the sharpie..
(the BR + BL)
Now strip the other end of the cable and connect it to the Bulb holder...ENSURE YOU CONNECT THE CORRECT COLORS
(Please note: i have used small 'chocolate block' type electrical connectors for Mocking up the light only - see pic - These will later be replaced with a single piece of the welder power supply wire , without any block connectors.)
You should now have a ballast/starter assembly with a long extended Cable (cut to the length you need) complete with bulb holder attached to the end.
Now double check your connections, ensuring that all colors correspond with each other ie blue to blue - Brown to Brown
or
for example, if you have used block type connectors to extend the cable ensure the colors match to which ever color you wire you joined the block to... ie blue wire from ballast --> block connector---> to red wire in extension cable---> to Block connector ----> to blue wire on bulb holder
Now check all connections are tight, and free of exposed wire, so as to be sure not to create potential electrical shorts or a FIRE HAZARD. If you wish you can also use electrical tape to cover the joins, after you have tightened the connections for peace of mind.
US residents - If You are using a U.S. 3 pin plug do the following:-
Now you will need a length of wire with a suitable plug attached to it to create the power supply lead...
Strip the lead to reveal the wires, and attach the Ground wire,Live wire and neutral wire from the lead to the terminals on the BALLAST.
The ballast terminals are marked as L/Ground/N....
If you are using an old 2 pin U.S. plug, you will need to run a wire from the GROUND terminal on the Ballast to a suitable ground... I wired my ground from the ballast of the 70w hps to the metal enclosure on my other 150w hps, which is fused for obvious safety reasons.
UK residents will need a 5 amp rated 3-pin plug and a length of 3 core wire cut to size(enough to reach the nearest power outlet)
Now Attach the plug to the wire, Brown wire to LIVE, yellow + green striped wire to earth and Blue wire to Neutral, check all connections are tight and replace plug cover.
Now strip the ends of the wires and attach the wires to the corresponding connections on the ballast terminals.
See pic....
Now, you should have a ballast/starter with and extended cable to the bulb holder, and a power lead.
PLEASE, check your connections once again, and MAKE SURE you have a GOOD ground/earth connection.
Fingers X'd and its time to plug the sucker in and test it.
its worth noting that these ballasts still get pretty hot even tho theyre only running a 70w.. adding a pc fan to the ballast will remove most of the heat just swell.
Attachments


jesus420
Well-Known Member
Grow Area:
Converted Clothes Dresser (removed fronts from drawers attached w/ wood glue to make false fronts) 32"x14"x54" (about 3 sq.ft.)
Back side of dresser was made of wood fiber and i removed it then reattached with hinges and magnets and sealed it up with foam weatherstripping
Lighting:
150w HPS from E-conolight
2x 42w 2700k CFL's
Emergency Blankets (mylar) for reflectivity
Total Luminous Output ~20k Lumens
Ventilation:
(this part is kinda ghetto)
I want to cooltube, but i hate dealing with ducting especially in the confined space, and intake/exhaust ports are on the back which is essentially a door... so it's a pita.
basically I've got two inlet ports which are just two 4" square holes cut in the back of the dresser with a 6" desk fan exhausting out the rear... my ventilation is backwards though as intakes are above exhaust... kinda had to do it this way though b/c of space. It moves a lot of air, and it does it enough to provide direct airflow over the plants to stir them up a good bit.
I plan to reverse the flow of air and duct out of the 4" ports through carbon scrubbers and have a duct running off the 6" fan to make a light trap... however i'm worried that this will greatly reduce airflow as it's already 86 deg F on a good day.
actually all my issues come down to ventilation/heat... I plan on getting a homebox just because it's all nice and neat and spacious inside, i hate dealing with this dresser b/c it's so cramped, i dont know how ppl grow in rubbermaid tubs... i started in one of those (actually 2) for veg and it was a nightmare even with just cfl's
i have 3 plants right now flowering (17 days)... killed 3 males at this point, one confirmed female waiting on the other two.
frostythesnowthug
Well-Known Member
Sounds good Jesus420, yeah there can be issues with heat etc due to the lack of space in some of the cabs we use..
Even after planning these cabs as carefully as poss, you'll still nearly always hit a snag of some description.
As for rubbermaids, never used one as they look a lil too fiddly for my liking, altho i appreciate some people do some stunning grows within them.
My buddy is doing another 150w stealth scrog grow in his chimney, and its such a frickin small space..But he's pulling 1.5 oz dry,which is enough for him...The chimney acts as a real good vent for the heat, and naturally pulls air into the chimney breast as it convects the heat upwards..so no need for fans n such.
All covered up by some crappy gas fire that he got at a yard sale...
Uber stealthy..
Good luck with your plants, lets see some pix.
frostythesnowthug
Well-Known Member
Update: Just been to check temps in the cab now both the 150w and 70w lights are on, and the temp has increased from its usual 75 degrees from the 150w to approx 87 degrees while both are running.
I have turned the fan speed up a notch, and its dropped the temp to approx 80* which i can live with.
")
I have turned the fan speed up a notch, and its dropped the temp to approx 80* which i can live with.
frostythesnowthug
Well-Known Member
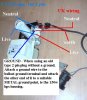
OOPs sorry gang this is how the tutorial shoulda looked,
i forgot to post one of the wiring diagrams...DOH!!
I chose this model TRAC pro 70w SON as its very easy to make remote, and i only need it for supplemental lighting in my cab..
....If you're looking for a remote ballasted HPS for your cab,
if possible try to get one that looks similar to this model, as theyre all pretty much the same to rig up regardless of wattage.
Ok here goes..
Firstly remove the screws holding down the Lens.
Next remove the Bulb, and put it somewhere safe..
Now remove the screws that hold the Aluminum Reflector to the housing (usually 4 screws)....Next remove the screws that hold the Ballast/starter etc into the housing.
Now CAREFULLY lift the Reflector from inside the housing, this should give you access to the screws that hold down the bulb holder to the housing.
Remove the bulb holder fixing screws, and carefully remove the ballast and bulb holder etc from the housing.
Discard the housing (unless you wish to use it later to re-house the ballast control gear.
Now follow the two wires that exit the bulb holder to where they meet the ballast control gear....in this case, theyre blue and brown... use a sharpie to mark where the wires exit the ballast/starter...ie BR for the BROWN wire - BL for blue wire.
Now find a piece of cable suitable for High wattage electrical items.
For this i will be using a piece of cable from an old welder power supply, as its ample for the task in hand.
Using this wire,strip the ends to a suitable length,and now connect it to the terminals you just marked with the sharpie..
(the BR + BL)
Now strip the other end of the cable and connect it to the Bulb holder...ENSURE YOU CONNECT THE CORRECT COLORS
(Please note: i have used small 'chocolate block' type electrical connectors for Mocking up the light only - see pic - These will later be replaced with a single piece of the welder power supply wire , without any block connectors.)
You should now have a ballast/starter assembly with a long extended Cable (cut to the length you need) complete with bulb holder attached to the end.
Now double check your connections, ensuring that all colors correspond with each other ie blue to blue - Brown to Brown
or
for example, if you have used block type connectors to extend the cable ensure the colors match to which ever color you wire you joined the block to... ie blue wire from ballast --> block connector---> to red wire in extension cable---> to Block connector ----> to blue wire on bulb holder
Now check all connections are tight, and free of exposed wire, so as to be sure not to create potential electrical shorts or a FIRE HAZARD. If you wish you can also use electrical tape to cover the joins, after you have tightened the connections for peace of mind.
US residents - If You are using a U.S. 3 pin plug do the following:-
Now you will need a length of wire with a suitable plug attached to it to create the power supply lead...
Strip the lead to reveal the wires, and attach the Ground wire,Live wire and neutral wire from the lead to the terminals on the BALLAST.
The ballast terminals are marked as L/Ground/N....

If you are using an old 2 pin U.S. plug, you will need to run a wire from the GROUND terminal on the Ballast to a suitable ground... I wired my ground from the ballast of the 70w hps to the metal enclosure on my other 150w hps, which is fused for obvious safety reasons.

UK residents will need a 5 amp rated 3-pin plug and a length of 3 core wire cut to size(enough to reach the nearest power outlet)
Now Attach the plug to the wire, Brown wire to LIVE, yellow + green striped wire to earth and Blue wire to Neutral, check all connections are tight and replace plug cover.
Now strip the ends of the wires and attach the wires to the corresponding connections on the ballast terminals.
See pic....
Now, you should have a ballast/starter with and extended cable to the bulb holder, and a power lead.
PLEASE, check your connections once again, and MAKE SURE you have a GOOD ground/earth connection.
Fingers X'd and its time to plug the sucker in..
Ok, So if it lit up, good work, and now all you have to do is create something for the ballast to sit on/in..I bolted mine to the other 150w HPS ballast on my cab.
The 'new' remote ballast will still get quite warm,so its probably not ideal to mount it on wood or leave it on carpeted floors..
Adding a pc fan to the ballast will remove most of the heat just swell, and help your control gear last a lil longer.
i forgot to post one of the wiring diagrams...DOH!!
I chose this model TRAC pro 70w SON as its very easy to make remote, and i only need it for supplemental lighting in my cab..
....If you're looking for a remote ballasted HPS for your cab,
if possible try to get one that looks similar to this model, as theyre all pretty much the same to rig up regardless of wattage.
Ok here goes..
Firstly remove the screws holding down the Lens.
Next remove the Bulb, and put it somewhere safe..
Now remove the screws that hold the Aluminum Reflector to the housing (usually 4 screws)....Next remove the screws that hold the Ballast/starter etc into the housing.
Now CAREFULLY lift the Reflector from inside the housing, this should give you access to the screws that hold down the bulb holder to the housing.
Remove the bulb holder fixing screws, and carefully remove the ballast and bulb holder etc from the housing.
Discard the housing (unless you wish to use it later to re-house the ballast control gear.
Now follow the two wires that exit the bulb holder to where they meet the ballast control gear....in this case, theyre blue and brown... use a sharpie to mark where the wires exit the ballast/starter...ie BR for the BROWN wire - BL for blue wire.
Now find a piece of cable suitable for High wattage electrical items.
For this i will be using a piece of cable from an old welder power supply, as its ample for the task in hand.
Using this wire,strip the ends to a suitable length,and now connect it to the terminals you just marked with the sharpie..
(the BR + BL)
Now strip the other end of the cable and connect it to the Bulb holder...ENSURE YOU CONNECT THE CORRECT COLORS
(Please note: i have used small 'chocolate block' type electrical connectors for Mocking up the light only - see pic - These will later be replaced with a single piece of the welder power supply wire , without any block connectors.)
You should now have a ballast/starter assembly with a long extended Cable (cut to the length you need) complete with bulb holder attached to the end.
Now double check your connections, ensuring that all colors correspond with each other ie blue to blue - Brown to Brown
or
for example, if you have used block type connectors to extend the cable ensure the colors match to which ever color you wire you joined the block to... ie blue wire from ballast --> block connector---> to red wire in extension cable---> to Block connector ----> to blue wire on bulb holder
Now check all connections are tight, and free of exposed wire, so as to be sure not to create potential electrical shorts or a FIRE HAZARD. If you wish you can also use electrical tape to cover the joins, after you have tightened the connections for peace of mind.
US residents - If You are using a U.S. 3 pin plug do the following:-
Now you will need a length of wire with a suitable plug attached to it to create the power supply lead...
Strip the lead to reveal the wires, and attach the Ground wire,Live wire and neutral wire from the lead to the terminals on the BALLAST.
The ballast terminals are marked as L/Ground/N....
If you are using an old 2 pin U.S. plug, you will need to run a wire from the GROUND terminal on the Ballast to a suitable ground... I wired my ground from the ballast of the 70w hps to the metal enclosure on my other 150w hps, which is fused for obvious safety reasons.
UK residents will need a 5 amp rated 3-pin plug and a length of 3 core wire cut to size(enough to reach the nearest power outlet)
Now Attach the plug to the wire, Brown wire to LIVE, yellow + green striped wire to earth and Blue wire to Neutral, check all connections are tight and replace plug cover.
Now strip the ends of the wires and attach the wires to the corresponding connections on the ballast terminals.
See pic....
Now, you should have a ballast/starter with and extended cable to the bulb holder, and a power lead.
PLEASE, check your connections once again, and MAKE SURE you have a GOOD ground/earth connection.
Fingers X'd and its time to plug the sucker in..
Ok, So if it lit up, good work, and now all you have to do is create something for the ballast to sit on/in..I bolted mine to the other 150w HPS ballast on my cab.
The 'new' remote ballast will still get quite warm,so its probably not ideal to mount it on wood or leave it on carpeted floors..
Adding a pc fan to the ballast will remove most of the heat just swell, and help your control gear last a lil longer.
downthedrains
Well-Known Member
Frosty, great job again man. I tried to rep you on it but I just rep'ed you and it wouldnt let me :/
Well keep it up and hopefully we can get those into the GroqFAQ
Well keep it up and hopefully we can get those into the GroqFAQ
frostythesnowthug
Well-Known Member
So if I get one of those lamps I can run my 150W HPS out of it?... just plug it in? and a standard mogul base lamp fixture will do the same?
No,The bulb wattage you can run in the Ballast depends on whatever wattage lamp you get.
A 70w HPS ballast wont run a 150w bulb, it will just keep trying to re-strike the bulb due to a lack of sufficient power and will eventually toast the ballast gear and the bulb.
If you want to go 150w with remote ballast, you will need to get a cheap 150w lamp and dismantle it.
If you can find a lamp that is similar in appearance to the one i posted in the tutorial, its a basic conversion.
If you cant find one of those style lights in 150w, just get a regular 150w hps light from one of the home stores and the conversion is pretty much exactly the same, just a lil more fussing around to get inside the housing.
If you get a light with a photo sensor built in to it, the wiring diagram to remove the sensor was posted earlier...easy procedure.
Rest of the wiring is the same.
The 70w HPS lamps come with a reasonably high temp-proof plastic e26(USA)/e27(UK) fitting that is sufficient for safe use with a 70w bulb and ballast.
150w and higher HPS come with a CERAMIC e39(USA), e40(Europe) Mogul base,as they get considerably hotter than a 70w....The ceramic base acts as a good thermoconductor,and reduces fire risks..
So in answer to your Q, no you cant use a mogul base 150w bulb in the 70w fitting...
This is the 150w i used for my cab, it was SOOOOO uber easy to convert to remote ballast,disassemble case, and extend bulb holder cable, and that was pretty much it!!! As the ballast is already enclosed in a metal shield you dont have to mess with it, just cable extension.

Thorn 150 watt Radpak DRS150 High Bay Fitting for 150w HPS-T Lamp
time for some caffeine
frostythesnowthug
Well-Known Member
Thanks DTD, shame i F*cked up on the pics on the first post, wasnt paying attention (Our pup bouncing around the house), and didnt realise i had posted the same pic twice..DOH..lol
and it was too late to re-edit it when i noticed the following a.m
Anyhoo, i PM'd FDD and he said to stick it in the DIY section, so i have, and here's the link if anyone wants to bookmark it or whatever.
https://www.rollitup.org/do-yourself/130848-diy-how-remote-ballast-hps.html
Hey MisterMicro, where you at bro? Whats the scoop on the new cab etc? Is it in action yet?
MisterMicro
Well-Known Member
Thanks DTD, shame i F*cked up on the pics on the first post, wasnt paying attention (Our pup bouncing around the house), and didnt realise i had posted the same pic twice..DOH..lol
and it was too late to re-edit it when i noticed the following a.m
Anyhoo, i PM'd FDD and he said to stick it in the DIY section, so i have, and here's the link if anyone wants to bookmark it or whatever.
https://www.rollitup.org/do-yourself/130848-diy-how-remote-ballast-hps.html
Hey MisterMicro, where you at bro? Whats the scoop on the new cab etc? Is it in action yet?
time man time.... ille have a dual 150w verticle cab setup soon.
waterCooled
Well-Known Member
sup guys,
I'm on day 38 of flowering scrog at the moment.
Here is a pic taken on day 35 of one of the many buds:

I'm on day 38 of flowering scrog at the moment.
Here is a pic taken on day 35 of one of the many buds:
mr.stankydanky
Active Member
if i use 2 150 watt lights for veg is there any need for me to use a few 6000k cfls as side lighting to make sure it doesnt stretch?
frostythesnowthug
Well-Known Member
The CFLs arent really that necessary, but will help keep them compact and bushy but if you get the 150s close enough to the plants your stretch should be minimal..
2 x 150w hps will give you something close to 30,000 lumens.
I'll post a pic later of my cabs current inhabitants, theyre bushy, produce some real nice buds and i use no supplemental CFLs for side lighting.
My cab is currently running
1x 150w hps
1x 70w hps
on 12/12 from seed
plants tend to finish out around 3ft
frostythesnowthug
Well-Known Member
Watercooled - lookin good bro, 150w are great for micro scrog
lets see some more pics..
lets see some more pics..


frostythesnowthug
Well-Known Member
Sweeet!
Similar threads
- Replies
- 39
- Views
- 6K