You are using an out of date browser. It may not display this or other websites correctly.
You should upgrade or use an alternative browser.
You should upgrade or use an alternative browser.
Alt0's Grow (1st timer)
- Thread starter Alto
- Start date
Alto
Well-Known Member
Heya Thow many more sprays of the eps solutiion do you spray them with, and for how long?
I mixed one tablespoon with a full gallon of PH balanced water.
I wet them until they were saturated (only No2 and No5)
then let them fan dry (placed fan right over them till dry)
I have no idea how much I will do this or for how long,
hell I don't even know if they need it as it could just be nute burn from
when I did that first foliar feeding?
I just thought I would keep the bases covered and being it looks
exactly like the Grow FAQ images of Mg deficiency I went ahead and game em some.
I will just watch and do it again if it looks to be working.
Too much Mg can lock out other nutrients tho so I have to be careful to not overdo it.
Actually it seems funny that 2 plants did not get enough Mg yet the rest are fine?
I bet I am still right about the beaded up nutes left on the young leaves
and that its just something they will have to grow out of in time.
The new growth (or growth protected from the light when first sprayed) all seems fine.
I have some other really nice looking plants to watch and make it not as bad.
God! If they all looked like No2 I would probably yank em all and try again with different nutes or something.
I am not one to waste time on a losing situation when a better one is within reach.
Thanks for stopping in again T, your such a great support!

thegigglepimp
Well-Known Member
Looking good mate! Hope the experiment works out for ya. Could help others! One of my leaves is showing browning as well at the moment, But its odd because its only one spike out of 10 on the leaf that is brown.... Not sure what this could be.
Other than the slight burns your plants are looking great! When my plants were at that stage i could just about get a smell of what was to come if i leant in far enough lol
Other than the slight burns your plants are looking great! When my plants were at that stage i could just about get a smell of what was to come if i leant in far enough lol
asf2j
Well-Known Member
yo alto, im having some trouble germinating, the first two tries were a no go. hopefully the third will be better.
could you walk me through a step by step. what did you germinate in and for how long, what did you soak your rock wool in, and how did you make a hole for the germinated seeds, are how far in did you plant the germinated seeds. do you have to be careful with the tap root when you put it in the rockwool. im so bummed i cant get this to work.
could you walk me through a step by step. what did you germinate in and for how long, what did you soak your rock wool in, and how did you make a hole for the germinated seeds, are how far in did you plant the germinated seeds. do you have to be careful with the tap root when you put it in the rockwool. im so bummed i cant get this to work.
yo alto, im having some trouble germinating, the first two tries were a no go. hopefully the third will be better.
could you walk me through a step by step. what did you germinate in and for how long, what did you soak your rock wool in, and how did you make a hole for the germinated seeds, are how far in did you plant the germinated seeds. do you have to be careful with the tap root when you put it in the rockwool. im so bummed i cant get this to work.
Dont mean to jump in, but i consider myself good at germinating seeds lmfao. So since alto is gone imma throw some advice at you. Teh best way i've found to do this. Which i've had success doing more then 15 times recently n lots in the past. K well. What I do is. I get a paper towel fold it up nicely depending on how many seeds ur germin decide how big to make it. All i do is fold it in half then in half again so on each side of the side there is papertowel doubled. Once folded i soak the papertowel really wet squeeze a good ammount out leaving it wet but not dripping n not dry ya kno? So u could still squeeze a good ammount out but Dont.. Anyway then i unfold place my seed/seeds in there keepin them bout an inch apart then refold. After that i throw it in a sandwhich fold the sandwhich baggy over to close it try to get all the air out then i throw that bitch on the top of my computer for heat which helps.. Its like alil humidity doom for ur seeds. I've had a seed crack within 18 hours.. Usually takes 1-2 days at most . Now after noticing them cracked. i've been careful but never too careful. I just throw them in my rapidt rooters root down seed up. Water them n try to close up the rooter.
Alto
Well-Known Member
very good advice clean, I see a LOT of folks do it that way here at riu.
What I did was this:
in a small Tupperware container (I mean small) I mixed 5ml of H2O2 (Hydrogen Peroxide)
with a quart of water that I had adjusted to PH 5.5 with General Hydro PH DOWN.
(It was 7.1 out of the tap)
Then I dropped the seeds in there (they will float) and put it in a dark place for 24 hrs.
warm is good as well, (if I remember it was 70F in the room I had them in)
What this does is rinses off the stuff that keeps them from germin'
as well as kill any possibility of mold or other critters messin' up the works.
It also oxygenates the water somewhat.
While the seeds were soaking I also soaked the Rockwool in the same mixture.
(different container)
5ml H2O2 with PH 5.5 water.
Once the 24hrs is up (you may even seed a cracked seed) I squeezed most of the water out of the rockwool cubes (leaving some but not wet)
Placed them in a shallow tray that had a dome (Jiffy Starter Tray from previous gardening adventures) and a small amount of water on the bottom
I then just dropped the 6 seeds into holes I made in the Rockwool starter cubes.
I used a small pencil but anything would do as long as the hole can be pinched back closed.
and pinched them closed, and kept them in the dark.
I don't know what way they were facing? They turned themselves right-side up at some point on their own.
Once they were all cracked and some were even sticking up out of the cubes I put them under 4 -2' T5 veg fluros.
In about 4 days they had quite a few roots sticking out from the rockwool
at which time I put into the final growing pots.
NOTE:
Having the Hydrogen Peroxide in the seedling water is fine,
but if your nutes contain organic material you should flush them by just running some water through the cubes
(you can then let the cubes drain on their own)
before putting into their final homes.
They look tiny in those great big pots, but its a LOT better than having to disturb the roots later by transplanting.
I have dried out some seedlings using paper towels on a plate in the past due to lack of attention.
PTs will dry out fast if left in the air so you need to cover it somehow.
Using the zip lock bag to keep them moist is a great idea!
but yeah, soaking them for 24hrs will help.
Did you buy these or are they bag seed?
Alto
Well-Known Member
Thanks TGPLooking good mate! Hope the experiment works out for ya. Could help others! One of my leaves is showing browning as well at the moment, But its odd because its only one spike out of 10 on the leaf that is brown.... Not sure what this could be.
Other than the slight burns your plants are looking great! When my plants were at that stage i could just about get a smell of what was to come if i leant in far enough lol
I smell em as soon as I walk into the OP now
asf2j
Well-Known Member
bag seed, from some killer dank. i was so happy with the bud i bought froma buddy(no pun intended) that i decided i would grow this summer from the seeds i got with that bag.
the bud i got was a giant 1/4oz nug. the whole thing looked healthy, dont see it affecting the seeds. like a said, i know i planted that first one wayyyy to deep. about 3 inches down = no bueno.
the bud i got was a giant 1/4oz nug. the whole thing looked healthy, dont see it affecting the seeds. like a said, i know i planted that first one wayyyy to deep. about 3 inches down = no bueno.
Alto
Well-Known Member
NP was just wonderingbag seed, from some killer dank. i was so happy with the bud i bought froma buddy(no pun intended) that i decided i would grow this summer from the seeds i got with that bag.
the bud i got was a giant 1/4oz nug. the whole thing looked healthy, dont see it affecting the seeds. like a said, i know i planted that first one wayyyy to deep. about 3 inches down = no bueno.
yeah I just dropped em in and they went as far as they went on their own.
I would say 1/4 to 1/2 inch deep was all.
thegigglepimp
Well-Known Member
I used a thin paintbrush to poke a whole 1-2cm's down into the rock wool. Put the seed in root down, tried to break the rock wool up over to cover the hole. Then just water, no nutes etc. In fact i kept them in the dark still when they were in rock wool untill they emerged if i remember correctly.
Alto
Well-Known Member
Same here but I used a small pencil to make my hole.I used a thin paintbrush to poke a whole 1-2cm's down into the rock wool. Put the seed in root down, tried to break the rock wool up over to cover the hole. Then just water, no nutes etc. In fact i kept them in the dark still when they were in rock wool untill they emerged if i remember correctly.
and everyone was up and out except 6/7 when I put on the fluros
no nutes for about a week or two just PH balanced H20.
Alto
Well-Known Member
 Date: 5/02 5:30am
 Room Conditions:
LIGHTS (400W MH) ON 18/6 (off time 8am to 2pm)
Distance from top of Growing Medium 24"
Temperature - 79F
Humidity - 59%
Room/Light vent running-YES ((off 7am on 4pm)
Small room fan (on high, facing plants, timed off / on every 30 mins)
Water Conditions:
Reservoir Aeration running-YES
Temperature 67.5F
PH 5.8
PPM 1095
Nutrient Solution:2 GAL.
25.0ML Flora Nova GROW
2.0ML Floralicious Plus
20.0ML FLORABLEND Vegan Compost Tea
Notes:
Not much new to report today
New growth on No2 and No5 looks healthy and good
Sprayed everyone down this morning just as light went off
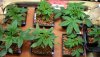
Images:
1/7- day 22 5:23(AM)
8- overall shot
Attachments


Alto
Well-Known Member
Yeah its fun to watch them develop.
Here are some odd things I noticed lately:
(Remember all these plants are in the same nute solution time schedule ect.)
No 3 has developed dark purple stems. This is the sign of several things according to the grow FAQ but I think in this case its purely strain related.
Notice No 4 it's stems are light green under the exact same conditions.
No 5 is passing everyone in the "growth" department
(its on its 2nd set of leaves on the side branches already!)
The leaf structure is quite different on each plant as well.
While a few have the tucking under type leaves as in No 4
some have the center leaf on top others have the side ones on top.
You can see this comparing No 4 (under) and No 3 (over)
While this is all interesting to me, (maybe not so much to some of you),
next grow I think I will stick to a single strain (OK maybe 2)
That way I can provide ideal conditions for it rather than trying to make several different strains (with different needs) happy at the same time.
I guess it will all boil down to how well I do cloning, and what plants develop as girls. Should I get "skunked" (no pun intended)
and need to start next one on seed I will choose seeds that look very much alike for 3 and the other 3 will be Grenadine (being I know they are all the same strain)
Thanks for your constant support Toolage, (more rep when able)
and to everyone that has taken an interest in my journal.
toolage
Well-Known Member
yeah different strains are definently harder to maintain especially for a first grow i'd assume. I'm grew 2 indica and 1 sativa, and the sativa was very hard to maintain. Once I got the conditions right though, it flourished the best it could for bagseed. Everything is working out well though bro and I'm sure you are going to see great things out of these!! And thanks for the future rep and I'm here for ya bro!
Alto
Well-Known Member
Date: 5/03 –5:30am Room Conditions:
LIGHTS (400W MH) ON 18/6 (off time 7am to 1pm)
Distance from top of Growing Medium 20"
Temperature - 74F (78.9/71.0)
Humidity – 49.5% (50/46)
Room/Light vent running-YES ((off 7am on 4pm)
Small room fan (on high, facing plants, timed off / on every 2 hours)
Water Conditions:
Reservoir Aeration running-ALWAYS
Temperature – 69F
PH – 5.8
PPM – 1200
Nutrient Solution:2 GAL.
25.0ML Flora Nova GROW™
2.0ML Floralicious Plus™
20.0ML FLORABLEND ™Vegan Compost Tea
Notes:
OK well the lights of for 6 is definitely helping growth.
No 2 and No 5 have responded to either the Epsom salt spray or time.
Either way they are both looking a LOT better this morning.
New Leaf sets are larger and greener than I had expected in this short a time.
Yay!
No 1 and No 3 are getting huge! I measured No 3 to record this and surprised myself.
She comes in at 16” wide across the largest leaf set and a staggering 6” tall.
That brings her ½ the way to where I intend to flower (12”
I may be able to flower in about another two weeks, maybe less
depending on how they do with the new Nutes mix that will start later toady.
Speaking of which, I premixed and PH balanced Week 4 nutrients last night,
And will be changing the reservoir later this after noon when lights come back on.
I of course will document this when I do it.
Enjoy the images!
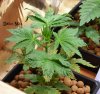
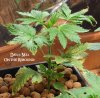
Images:
1/7- day 23 5:23(AM)
8- No 2 on the REBOUND!
9- No 3 width measurement
10- No 3 height measurement
Well another day closer to flower. Man these kids are finally starting to take off!
Changing the Res later today (lights on at 1pm so about mid day)
Hope everyone is well, and thanks for the support
Additional Note:
My temp/RH gauge finally showed up from Hong Cong (was opened by customs) and so
now the Room Temp/RH record will also include high/low for the reporting period.
Thanks again
Attachments


Alto
Well-Known Member
Howdy!
Pickin' up to full strength with this weeks mix...
WEEK 4
Nutrient Solution: 2 GAL. mix
25.0ML Flora Nova GROW™
4.0ML Floralicious Plus™
30.0ML FLORABLEND ™Vegan Compost Tea
2 Tsp. Epsom Salt (for needed Mg due to clalcium in tap water)*
2 Tbs. PyroSol™ Silicate Clay (Will add silicate)
*
OK back to the mix.
to 2 gallons of PuRed water PPM 140 (lmao) I added
4.0 ml Floralicious Plus™
(this is a constant supplement during entire grow)PPM 320
STIR...I then added,
30.0ML FLORABLEND ™Vegan Compost Tea
(another supplement with a slight increase to bring to full dose) PPM 600
STIR...Next I added,
2 tsp Epsom salt
(being the plants responded to the foliar spray with Mg I thought it wise to add some to the mix) PPM 650 STIR...And finally new to me is,
10ml PyroSol™ Silicate Clay
(made from silica mud or something will add silicon to plants providing a defense from heat
and other stresses I am sure to provide them during their journey to adulthood, promotes strengthening of plant cell walls )
STIR...At this point the PPM reading was at 850.
I then added the base nutrient to bring mix to target of 1200 PPM
25.0ML Flora Nova GROW™
Between adding each part I mixed solution with a wooden drumstick
(my version of a wooden spoon)
PH read at 6.8
added General Hydroponics PH DOWN to get mixture to 5.3
stirring and adding a few drops at a time, testing in between.
(my system has a tendency to rise during its time in the reservoir
so I started out just below my target of 5.5)
It is IMPORTANT to not mix chemicals outside the water
add the supplements first topping off with base nutrient bringing to target PPM
And for Gods sake adjust PH AFTER all nutrients are added and well mixed.
Thats it. All mixed up and ready to go.
I loosely covered the pail and allowed the mixture to sit in the grow room to acclimate to temperature for todays switch.
When switching I will remove plants/temp probe, empty res, wash thoroughly in sink, change bubble stones,
refill with new nutes, and return pots.
I would like to thank the authors of the Grow FAQ here at riu.org for the wonderful directions in doing this.
Without the knowledge from other growers I would have no idea about the importance of following these steps
or how to even start to go about doing this. This site rules!
**steps down off soap box**
Should take about an hour total to switch out and if there is anything worth mentioning I will take a picture of it.
Pickin' up to full strength with this weeks mix...
WEEK 4
Nutrient Solution: 2 GAL. mix
25.0ML Flora Nova GROW™
4.0ML Floralicious Plus™
30.0ML FLORABLEND ™Vegan Compost Tea
2 Tsp. Epsom Salt (for needed Mg due to clalcium in tap water)*
2 Tbs. PyroSol™ Silicate Clay (Will add silicate)
*
GROWFAQ
If the starting water is above 200 ppm, that is pretty hard water, that will lock out mg with all of the calcium in the water
Side Note:
I used my new PuR water filter to remove chlorine and other nasty stuff from tap water.
I have allowed my tap water to sit for up to a week in an open container but I suspect
my water company uses chloramine.
This will not be removed by evaporation and can only be removed with an RO filter. I dont have an RO filter
(I have been pricing them however for next grow) Anyway to make a long story shorter, I got this faucet attached PuR water filter.
What a waste of my hard earned cash! When measuring the tap water straight it reads 140 PPM thru the filter it reads 140 PPM.
Anyway save your money.
OK back to the mix.
to 2 gallons of PuRed water PPM 140 (lmao) I added
4.0 ml Floralicious Plus™
(this is a constant supplement during entire grow)PPM 320
STIR...I then added,
30.0ML FLORABLEND ™Vegan Compost Tea
(another supplement with a slight increase to bring to full dose) PPM 600
STIR...Next I added,
2 tsp Epsom salt
(being the plants responded to the foliar spray with Mg I thought it wise to add some to the mix) PPM 650 STIR...And finally new to me is,
10ml PyroSol™ Silicate Clay
(made from silica mud or something will add silicon to plants providing a defense from heat
and other stresses I am sure to provide them during their journey to adulthood, promotes strengthening of plant cell walls )
STIR...At this point the PPM reading was at 850.
I then added the base nutrient to bring mix to target of 1200 PPM
25.0ML Flora Nova GROW™
Between adding each part I mixed solution with a wooden drumstick
(my version of a wooden spoon)
PH read at 6.8
added General Hydroponics PH DOWN to get mixture to 5.3
stirring and adding a few drops at a time, testing in between.
(my system has a tendency to rise during its time in the reservoir
so I started out just below my target of 5.5)
It is IMPORTANT to not mix chemicals outside the water
add the supplements first topping off with base nutrient bringing to target PPM
And for Gods sake adjust PH AFTER all nutrients are added and well mixed.
Thats it. All mixed up and ready to go.
I loosely covered the pail and allowed the mixture to sit in the grow room to acclimate to temperature for todays switch.
When switching I will remove plants/temp probe, empty res, wash thoroughly in sink, change bubble stones,
refill with new nutes, and return pots.
I would like to thank the authors of the Grow FAQ here at riu.org for the wonderful directions in doing this.
Without the knowledge from other growers I would have no idea about the importance of following these steps
or how to even start to go about doing this. This site rules!
**steps down off soap box**
Should take about an hour total to switch out and if there is anything worth mentioning I will take a picture of it.
Similar threads
- Replies
- 6
- Views
- 837
- Replies
- 10
- Views
- 801
- Replies
- 13
- Views
- 1K