For those of you who have followed my previous grows i welcome you to the new grow journal featuring many ideas concepts and designs that have been derived from your grow journals and i thank the rollitup community for sharing. I always like to attempt and return the favor to newbies and anyone else who is curious about the methods im employing. I welcome all positive posts and criticism meant to improve my grow and education along with others. I will not tolerate negative posts and shit talking. More then happy to have you booted.

So moving on, for those of you that havent followed my grows (links in my signatures) I like to ramble but it is because i also like to be thorough. Details can be very important to others and myself as minor notes that need to be noted. I am starting this new journal to help me document the actual grow i am beginning since my last thread can be considered more of a design and discussion thread. Also will allow people to see my setup from the beginning with all the details and specs.
I just had my right knee meniscus removed yesterday so its giving me sum downtime to get all this shit set up and rolling. It was my 3rd surgery on the right knee, and one on my left knee regarding ACL and meniscus repairs due to car accidents, sports, snowboarding, work injuries and other bullshit. So saying that you can understand why i have chosen to use cannabis indica and sativa mixes to help my chronic pain.
I am a medical marijuana patient sanctioned by california laws like prop 215 and senate bill 420. I have a medicinal growers card as well to grow up to the federal limit of 99 plants. My beautiful gf has the same so we are legally covered and to help the medical MJ community I vend my extra medicine back to local collectives i am involved with.
So that all being said lets get this shit rolling with the facts;
STRAIN SELECTION THIS ROUND;
SOUR GRAPE= Purple ElephantxChemdogxSour Diesel
-the aroma and flavor resembles a grape juice and flowering colors are intense
ROOM SPECS;
I will be using two spare bedrooms; Room A; Flower Phase/ Room B; Veg stage for mothers, clones, and vegging plants until 12" then transfer to flower room.
Room A= 11.5'x10.5'
Room B= 9.5'x10.5'
-both rooms have vaulted cielings and deep closets.
The closet in Veg Room B will be for drying the harvested ladies.
Closet in Room A contains supplies, propane tank, and 100can carbon filter for odor control.
SECURITY;
I have installed a 4 channel DVR with 4 night vision/sensor cameras around the house, 3 double flood censor lights, censor chime alarm in front of the grow rooms hallway, two pitbulls, firearms, security gate that requires to be chimed in for entry, and locked growroom doors for obvious security. This location is secured and a need to know basis only for the grow op. I have had this plan in motion for just about a year now and we all know Growop Rule #1; TELL NO ONE ABOUT YOUR GROW!
I have gone to great lengths to control odor, sound, and lighting from outside the house. Suburban life aint wat it seems...
")
ROOM BASIC DESIGN;
each room has been lined with true reflective Mylar (up to 95% reflective) and the flooring lined with pondliner for spill safety. In room A (flower room) i lined the flooring with plywood for support and the ability to allow the hydro tables to roll away from the wall for maintenance.
Now i am goin to attempt to list in great detail what each room contains...
ROOM B; VEG PHASE=
1x1000w MH hortilux bulb, lumetek digital convertable ballast
1x400w MH hortilux bulb, lumetek digital convertable ballast
2x T5 flouro lamps for cuttings
2x Digital thermometer
10,000 btu portable AC unit
755 cfm 8" fan
8" aluminum flex ducting to air cool the two lamps. Sealed system in and out the same window.
4'x4' hydroton table for vegging clones to 12"
-system will be hand fed for max control as needed until i get it dialed. It will drain to waste on one side.
-ill be using 6" rockwool cubes for veg transplant
Small fan for the closet which will be a dedicated hang drying area and for curing in mason jars.
This room as of right now remains lights on for 24hrs/day. I might drop the photoperiod down but im lookin to get max results asap so id like to veg faster so the lights stay on all the time. One downside is the room temp stays high for a portion of the day even with great venting. temps 71-85 depending on time of day.
The feeding schedule for veg i am still deciding on but the nutes include;
MagiCal
Big Bud & Overdrive
Vermi-T blend
Cannazym
Roots excelerator
Great White
Sensi Grow A & B
That should be it for now with the veg room. i hope i didnt leave anything out. Now is time for Room A; Flower phase. this has a lot of shit so ill attempt and list what all is involved.
Room A; Flower Phase=
PHOTOPERIOD=
12hours on/ 12 hours off
-12am (on)-12pm (off)
-this time frame will benefit me in multiple ways;
1) not running mass electricity all day long with other appliances will keep my electrical bill in a lower "tier" and save sum funds.
2) night time temps are much lower so its important that the outside air that is used to air cool my lamps is as low as possible so my lamps get cooled more efficiently. i figure lights come on at midnight and gives me a few hours in the morning to work with the lights on until they shut off at noon. not a big deal since ill have a green light in the room to work during the "dark period"
3) simple security; i do not plan to have many of my friends know that im growing let alone know where i live. the secret is between me, the lady, our parents, and one trusted homeboy. thats it. but we do have the occasionaly couple of friends come over to enjoy the pool, pool table, fight nights for UFC, bbq, etc. so i figure the smart thing is to have the growrooms virtually "off" during the prime hours of peeps coming and going thru the house. Since im gettin boring in my older age i dont throw raging keggers anymore let alone stay up past 12 haha. but anyways those sum tips for others to consider with their grows.
NUTRIENTS:
Using the greencoast homeblend connoisseur recipe for drain to waste nute lineup;
SAME AS IN VEG+
Bud Candy
Purple MAxx
Final Phase
might tweak it sum with similar brands or additives but we will see how things go. i will need more discussion on this recipe but i already know its gonna be a never ending convo since there is no right or wrong way to grow weed. but the input is appreciated.
Recipe calls for starting at 200ppm and working ur way up to 1300ppm during flower then lower the ppm during last weeks of flower.
LIGHTING=
6x600w HPS hortilux bulbs, lumetek digital ballasts
EXHAUST/VENTILATION/FANS=
2x 1075cfm Max Fan for intake/exhaust for air cooling the light hoods
3x 16" oscillating fans
1x 755cfm max fan for the 100 carbon can
-10" aluminum flex ducting for mass air intake and exhaust.
-8" aluminum flex ducting for air distribution to each individual hood. this allows max and even PSI of air volume to be evenly distributed to each lamp and the air is the same temp. Consider the fact that if u run 6 light lamps in a single row and each is connect solely by the same single line of ducting, the first lamp gets cooled by the outside air which around here could be 70-110 degrees, but by the time that same air has been pushed through all 6 hoods, the end temp on the 6th light could have multiplied 6 times that amount of heat due to the additional heat from the previous lamp in line, thus not truely air cooling the majority of ur light hoods. my design should really be used for 600-1000w lamps. the additional cost and labor of running additional ducting and connectors is well worth it when i can air cool each of my hoods with the same outside air at the same time thus allowing me to lower the lights closer to the canopy (hopefully 12" away)
and not burning the foliage. This is a plus for the obvious reasons; more lumens for the buds to suck up
I hope i explained that well enough if not please feel free to ask.
ODOR CONTROL=
1x 100 can carbon filter to scrub the air clean of the delicious bud candy aroma

C02=
1x GEN-1 c02 propane generator; 15ppm/hour rated for greenhouse w/ 3200sqft. has four burners inside that burns propane and byproduct is c02, heat, and humidity.
Sentinal PPM digital reader set for 1500ppm
-this system runs the c02 generator as a supplement timer. fills hte room to the desired 1500ppm level and anytime the room decreases and drops below 1450ppm the sentinal will kick on the generator and pump out c02 until 1550ppm is reached and will shut off automatically. the unit is suspended from the beams mounted above and will drool out c02 all over the lovely ladies as a special "ppm microphone" is hung above the canopy and reads the appropiate c02 levels in parts per million.
The advantage of c02 is like steroids for plants, the earths atmosphere contains roughly 300ppm of c02 naturally. theoritically thousands of years ago it was much higher and the plants still are able to manage much higher ppm levels. so we can feed it up to 5 times the natural amount and see a huge difference in growth and nug developement.
so word is c02 injection can increase ur yield by 25% with all the other proper conditions.
I chose the generator over the c02 bottle system for these reasons;
1) cost, the amount of c02 i will need to fill a vaulted cieling room is huge amounts and the plants will take up more and more and i dont want to be stockpiling c02 bottles or goin to the fukn store every other day.
the cost of a c02 bottle is like $125 at most hydro stores, $100 for the bottle and $25 for the refill or sum shit. but if i was even refilling once a week (unlikely, itd prob be more like twice a week with the biggest bottle) then thats $100-200/month easy. the regulator for the bottle was $120 or sumthing. the generator was a large investment; $550 for everything i need (except sentinal ppm reader) and i only need to swap out the propane tank once a month or so. and the cost is like $10 with a commercial license (that my pops has
) so u do the math ;p
but the generator isnt for everyone granted. thats wat great about growin, diff strokes for diff folks...
2) i must be faded and wrote my reasons all above in #1 lol so fuck it im moving on...
-oh sidenote they do have generator same price that hook directly to ur natural gas line... if anyoe cares lol
TEMPERATURE=
since my pops owns an AC company and all of course i gotta use his connections for this shit.
24,000 BTU Split Airconditioning unit- this is a 2ton AC unit that allows u to put the condenser outside ur house and run copper piping to the split AC unit that is mounted in the room above head blowing down onto the canopy and i got it for $800 (yes im proud lol) i had been shopping around forever and the hydro stores wanted $2,200-3000 for the same fucknin unit! and thats with my 25% discount! one of my dads distrubtors went out of biz and had to unload. i was gonna buy a couple of them and flip em but figured it wasnt worth it. but anyways the 2ton is for sure enough to cool my flower room and keeps temps watever i want them at.
I do have to say the one thing i see a lot of people skimping out on is temp issues; like not aircooling or doing it with weak cfm fans, no AC or minimum like an 8,000btu unit (and guess wat, i was one of those peeps, we used the 8000btu wondow unit and it was ran so hard and never really worked to cool the room) so thats how i learned go big or go home. id like to explain sumthing to those (who were like me) and dont quite understand the britush thermal unit ratings air conditioning companies use. a unit is rated in BTU and they tell u a 8,000btu unit is strong enough to cool a 10'x10' bedroom down to 70 or so. it WOULD... if it was a normal room... not a room full of prespiring plants and HID lamps or poor ventilation etc. so always go for double or triple ur sqft rating. (ex; ur grow room is 10'x10' which is 1000sqft... the AC unit should be rated for 2000-3000sqft IMHO. My dad would bak this up since he told me it lol) i just hope this helps any
newbies trying to decide wat AC to run. spend the money now and save ur crop or just make things easier on urself! also consider the mistake i had made, bought the 8000 btu unit tryin to save a buck and guess wat, its no fuckn good now. i mean it works fine but its too small to do the job i want. so watd id have to do? go out and buy a new one. yes granted this setup is a lot larger but u get the concept.
so rambling again.. time to smoke a bowl hold up.

Now for the hydro setup;
two 4'x'8 hydroton tables that will hold rockwool single slabs underneath the vegged 6" rockwool cubes. all rockwool has been soaked over nite in PHd water of 5.5
on a slight slant so it feeds from one end and drains out the other end.
Im using a 70gallon nute resovoir under each 4'x8' table. it will house the reverse osmosis water with around 5ppm and all my additives will increase the ppm as needed during during phases of flower.
The rez will have 4 airstones to keep the water airated and no stangnant water. i will have a submerisble pump that will go up to the hydro table with proper fittings and water will be delivered via spghetti tubing and out double emittiers on the rockwool cubes. i chose to do double in case one tube gets clogged. i will b running a prefilter on the tubing from the pump as well. PVC piping will be constructed to deliver the feeding water at an even PSI. the runnoff water will then be tested regularly for ph and ppm to see what the plants are uptaking. so u can adjust nutes as needed via plant signs.
the runoff water will be drained to a tote container and then pump down to the waste area outside the garage.
this is mirrored for the other table as well.
WATER=
reverse osmosis machine. 200gallon/day purifies regular tap water that is usually around 200ppm+ this allows u too have total control of wat is added to the water ur plants are receiving and allows an additional 200ppm of feeding to be given without burning the plants with nutes or creating "lockout" (too salty for plants to uptake nutes)
In the garage which is conviently located right below the two grow rooms, sits my tall big black 200gallon drum rez
scored a deal on it at greencoast so i said sure why not.
SO i have the R.O. machine setup to have tap water fed from our washing machine plumbing (just use a Y splitter to use the spicket and branch off a hose to the RO machine) then a small hose at the end of the double membrane RO machine is fed into the 200gall rez and slowly fills the tank 200gallons per day.
The runoff hose for the RO was extended to reach the machine machine plumbing as well and evacuated outside. easy install and simple plumbing is all thats needed.
The 200gallon rez will have a float valve to shut off the RO machine once its reached my desired heighth. a submersible pump will be in the bottom of the rez and pumped water up to both my grow rooms. i will have a Y-splitter as well so each room can be pumped together or seperate. also keeps the hole in the roof/flooring smaller. lol
the pump will fed my three rez upstairs in the two rooms. the drain waste from a feeding will come down the same way but outside to drain.
ELECTRICITY=
So for anyone who ever considers running more then a couple lights and big fans, u need to bump up ur power supply IMO. so i gotta practice wat i preach rite?
we calculated how many amps every electronic device involved was gonna require and then had to come up with a plan.
we started with which devices can be converted to a 240v which is best performance, it runs less power to the device and saves u plenty of electricty for the rest of the house as well as lower ur bill. the lights still power up the same and produce the same power. I had bought switchable power ballasts on all 6 600w ballasts and the 400w ballast. the 1000w ballast is set on 120v only.
so we added up how many amps needed and came to be around 70amps total between fans cfm fans, pumps, lights, etc. well my breaker box is only pulling 100amps total. lol problem right?
so since this is sumwat a temporary location and grow for a couple years we deicided instead of goin way hardcore (bumping up to a city permit to get a 200amp breaker box and run new cables underground to the street electrical vault costing about $2000...) we just did a 125amp breaker outside and ran #6 wiring thru conduit into the garage where we installed a temporary 100amp breaker box but only filled it with 70amps of breakers. giving us more then enough all around to cover the heavy pulls of double AC units on the house now, fridges, tvs, lights, HID lamps, fans, etc. were using #12/4 romex cable up to each grow room. the small stuff (IE; oscillating fans, T5 flouros, max fans) can run off the existing rooms 15amp breaker which is the regular wall sockets. we installed custom power boxes in each room with the necessary power conversion. the flower room needed 6 sockets for the 6 600w ballast rated at 240v which i already had the ballasts converted
with the correct 240v power cord. that power box then how a simple power on/off supply cord that is attached to a timer which will turn my lights on and off 12/12 cycle. this box my dad made is designed to hold the power surge of the HID ballasts and not short out. we covered every thing we could to be compleltely firesafe. the veg room has a similar power box with both 240v conversion and 120v standard. same timer applies.
I think i covered most of that info. any questions just ask. i am not an electrcian but my dad is... so ill help the best of my knowledge but this is SERIOUS shit. dont skimp out on electrical shit or ull be on the news with the ancor stating huge drug den burns down cuz stoners cant wire shit...

heres a formula to use if ure trying to figure out the total amps for ur room. its simple just look on watever electronic devide and see what it says, sumtimes amps is provided but if not usually watts will be. take the watts and divide it by whatever power supply ure gonna run (not all can be converted to 240v btw)
so say its 100 watts and ure gonna plug straight into the wall socket which is 120v. so its
100w/120v= 0.8amps
pretty simple and helps be exact when doin a good sized growop. hope this helps even just one person. rep me if it did!
watts divided by voltage (IE; 120v or 240v/ watever u want to run)= amps
SUPPORT/STRUCTURE DESIGN;
some of you may be wondering wtf is all goin on inside this space shuttle looking room. the beams are 2"x8" oak stretch across the room and mounted to a support 2"x8" board. the board on each side of the room for support has been Lag Bolted into the studs of the house for max hold. the beams are then hung with a special bracket called a joint holster and screwed tight. the beams are stood "on side" or vertical for the added strentgh the 8" side of the 2x8 provides. this allows me to evenly distribute weight across the room without failure or bend, flew, bow, dip snap, etc. the lights only weigh 30lbs each but i can hang from it at 185lbs. good enough for me ;p -go big or go home right?
the lamps are hung with bigger eye hooks screwed in the right position for an even hanging lamp. the spacing between the beams was obviously forethought with the style of ventilation and lamp spacing in mind. things like this take lots of forethought and design. i went thru countless sketches before all this to make this shit up and my dad is the one who tweaked it all to work and i learned and hope to share wat ive learned to sumone who may need it.
we mounted the two 1075cfm max 10" fans on a sheet of plywood and then used nylon bands (big zipties) to fasten the 10" ducting to them and threw the board up on top of the beams and they just sit perfeect. this allows everything to get up and away from my walkway and the lights. even tho the room does look crowded as fuck with all that ducting.
i used cable ties to run wires from one to the other end of the room and used a sheetmetal straping to hang the duct work. ive worked for my pops so doin this shit was easy cuz we have the right tools. sumthing this scale is gonna be rough for sumone with no knowledge in this field and lacking te proper tools.
but put ur mind to it and anything can be done. shit look at me... my ass went from last spring gettin ready to try and grow outdoor monster with miracle grow! haha. fat chance. u learne alot from peeps on RIU and books. never wouldve thought id be where i am today with this shit. thats wat makes it so fun for me. and the fact that it helps other patients get by everyday. makes it the sickest job
so im getting tired cuz ive been writing forevvvver and i think i should just write a book. lol get paid for it at least rite?

so heres the beginning to what should be an eventful, yet positive, grow journal.
enjoy the design and construction photos. Along with the videos of the room tour.
about over a week ago;
[youtube]<object width="480" height="385"><param name="movie" value="http://www.youtube.com/v/qlYZLnB2db0&hl=en_US&fs=1&"></param><param name="allowFullScreen" value="true"></param><param name="allowscriptaccess" value="always"></param><embed src="http://www.youtube.com/v/qlYZLnB2db0&hl=en_US&fs=1&" type="application/x-shockwave-flash" allowscriptaccess="always" allowfullscreen="true" width="480" height="385"></embed></object>[/youtube]
heres the veg Room B;
[youtube]<object width="640" height="385"><param name="movie" value="http://www.youtube.com/v/GuLSa27lj-E&hl=en_US&fs=1&"></param><param name="allowFullScreen" value="true"></param><param name="allowscriptaccess" value="always"></param><embed src="http://www.youtube.com/v/GuLSa27lj-E&hl=en_US&fs=1&" type="application/x-shockwave-flash" allowscriptaccess="always" allowfullscreen="true" width="640" height="385"></embed></object>[/youtube]
and the space shuttle lol
Room A; flower phase-
[youtube]<object width="640" height="385"><param name="movie" value="http://www.youtube.com/v/FdCiPyI9TGQ&hl=en_US&fs=1&"></param><param name="allowFullScreen" value="true"></param><param name="allowscriptaccess" value="always"></param><embed src="http://www.youtube.com/v/FdCiPyI9TGQ&hl=en_US&fs=1&" type="application/x-shockwave-flash" allowscriptaccess="always" allowfullscreen="true" width="640" height="385"></embed></object>[/youtube]
and here is some of the still shots for design and construction.
heres the sourgrape cuttings i took from the SG mothers
the sour grape mothers stayin healthy
enter Room A;
u can see where the 10" ducting splits off to two "T-Ys" and is distributed to each lamp via 8" ducting to a 90degree duct.
this shows the exit of hot air goin up to the other side which will be exhausted out the window
fire extinguisher for safety and one of three 16" oscillating fans
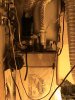
a shot of the closet in the flower room where the propane tank is kept and the 100can carbon filter with 755 cfm fax to suck air into the can and scurb it clean of sweet bud smell and blos out the top
a shot of the power box with 6 240v outlets that are connected to the 6 600w convertable ballasts.
heres the 4'x8' hydroton flood tables with channels for drainage. on custom made table stand with caster wheels for rollers to roll on the pond lined plywood floor.
this is a closer shot of the "T-Y" duct piece. its two that were connected to compact the area of duct work exhausting. this special piece allows me to branch off to diff sizes and maximize PSI. the fans are 10" fans so need 10" ducting and the hoods are 8" so needs to be reduced. this adds static and velocity if u do it right. static is resistance so u dont want that.
and had to throw in sum teaser shots from my previous outdoor and indoor grow and the wifey doin a lil photoshoot. enjoy.
And yes that is the gf in the avater default pic, i appreciate the compliments but no creepy comments please nuthin but respect and she will gladly do more and better shoots soon. look for her possibly in the new Pin Ups for Pitbulls Calendar. pick up a calendar too its for a great cause.
FUCK BSL! vote no on ban state legislation. the bill wants to outlaw over ten diff types of breeds. breeds like pitbulls, boxers, german shepards, dalmations, mastiff, huskies, rotties, and other breeds. dumb to outlaw the fire dog the cop dog and supposed "fight dogs". any dog will fight for survival and to make its master happy.
"Punish the deed not the breed"
ok enough preaching haha lets get on with the grow show!