Mars 2 Cob Conversion - Citizen / Cree build

Budzbuddha

Well-Known Member
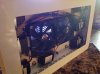
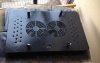
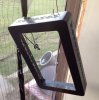
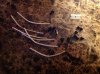
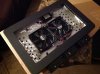
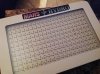
Lurking the forums i found a lot of intersting builds centered around resurrecting that old Mars Hydro LED. I have used them over the years with mixed results. Recently , i had a Mars Classic Series II start to have led failures . Whole sections would go to shit and figured it was time to GUT this thing and plan a project around it.
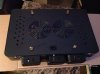
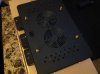
Model : Mars 600
( actual draw 272/300 W )
6 drivers ( 50w ) 0.5A - 0.55A each
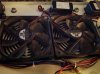
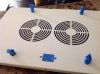
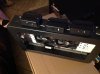
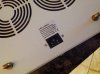
Dual Fans and 12v ( 1.0A ) driver
110 Volt

For this build i wanted to use as much as i could from the original unit EXCEPT the main led board.
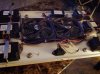
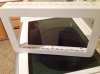
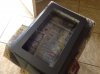
I will re-use the drivers / Connectors - Case / and Fan System. The main difference will be a more passive heatsink than what those sad little ones that were inside.

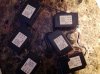
I have a couple of options for the COB engines .....

Next are the different builds i am looking into now that the unit has been disassembled.

COBS :
Option 1 :
Cree 72V ( 3500k ) CXB3590-0000- 000R0HCD35H
4 Cob build - using mars drivers

Option 2 : ( Better )
Cree 72V ( 3500k )
4 Cob build - Meanwell 185-c700ma driver
50w per cob

Option 3 :

Citizen CLU048-1212 ( 3500k / 5000k )
80/90 CRI
4 or 6 cob build - ( 4 3500k / 2 5000k )

For me , i will probably pick the CITIZEN build mostly for price , seeing how much performance i can get out of the little cobs. I plan to have 2 center cobs ( 5000k ) on a switch to power on and off . As far as Heat sinks i may go with the typical plate style or individual round pin heatsinks ( lattice brace ).


image.jpg image.jpg image.jpg


I gotten inspiration for this build from @Growmau5 and wanted to do a project instead of putting the shotgun to it. I wanted to do a good cost effective build and see how it plays out.

Feel free to tag along and drop some suggestions.
 

davillains

Well-Known Member
when you get a whole row to go out its because each led diode is coupled with a zener diode, if one of them dies no problem, if both die the row goes. Easily checked with a multi-meter though and easily repairable.
 

Budzbuddha

Well-Known Member
I started the disassembly today just to inventory what i am working with. I began by removing and saving all of the case screws. Once i opened the case , i noticed it had 6 drivers - Each marked 50w ( 0.5A - 0.55A ) 110-120V .

Each of the drivers were connected with plug connectors. The main AC power is individually connected to each driver separately ... Which will allow me to PLUG IN more lights or remove.

image.jpg image.jpg image.jpg

Cleaning was definitely needed ......
 

Budzbuddha

Well-Known Member
when you get a whole row to go out its because each led diode is coupled with a zener diode, if one of them dies no problem, if both die the row goes. Easily checked with a multi-meter though and easily repairable.
It was large blocks and lines of leds going to shit so called IR UV leds were burned ( broken ).
 

Budzbuddha

Well-Known Member
Now was time to see the shitty heat sinks used .... Those particular connectors will also be re-used for the new build.

image.jpg
image.jpg
image.jpg

I pulled those little heatsinks off of the LED BOARD ... and cleaned off the thermal paste with alcohol and an old rag.
 

Budzbuddha

Well-Known Member
Just see how little space there is ... Time to change it up.

image.jpg

Next was time to CAREFULLY remove the glass from the case. There is a considerable amount of adhesive caulking holding in the glass . I used an xacto knife to run along glass panel edge to help free it. There is some tabs that also needs to be bent out of the way.

image.jpg image.jpg

I saved the glass panel because of its size and could use it to get a template of aluminum heatsink. It takes a little work to get it out without breaking it or cutting the shit out of yourself.
 

Budzbuddha

Well-Known Member
Next was give her a new look .... New paint and ventilation.
I drilled a vent pattern to help exhaust heat from the heatsinks. The case color was boring , so i chose a hammered look. Easy peasy ....


image.jpg image.jpg image.jpg image.jpg image.jpg
 

davillains

Well-Known Member
I'd buy the led panel off ya if I was on the same side of the pond ...
anyhow, if you're doing a 4 cob build whats the benefit of using this mars carcass ? why not mount the cobs on an angled aluminum frame for better spacing/canopy distribution ?
 

Budzbuddha

Well-Known Member
Worked on the chassis , and mounted the drivers to be used. The hammered finish looks great and gives a much nicer look. I originally was going for a 4 COB light ( 1212 citi ) but installed a third driver that may or may not be used for a 6 Cob version.

I am going to extend the original connector wire lengths ( driver power to AC harness ) this weekend.

I am running into a little roadbump with my choice of COB supplier as they seem to be " out of stock " of my particular choice , and am hoping to get a response when NEW STOCK will be available. However .... The rest of the build will be completed ready for the heatsink .

image.jpg image.jpg image.jpg image.jpg
 

GreenSanta

Well-Known Member
without discouraging you I had a similar fixture that I thought hey Im gonna get in the DIY with it. ... well it turns out it was nothing but a dream. Heatsink was non existent (I know cheap light from china) the glass was useless, so was the frame, bottom line, is that at the time, I ordered a couple of heatsinks ( new frames for the new lights ... no need for cases! ) In the end I built the new light without using a single component from the cheap china light, which is still sitting disassembled...
 

Budzbuddha

Well-Known Member
I get it ... But instead of shooting it with my mossberg ... I figured i could make a cheap little cob light as did @Growmau5 with an old mars. It will be more of a supplemental build . As i am going with a TimberLights Framework setup.

For a few bucks , it will outperform the original mars. Heatsink is not the issue.
It's the COB SUPPLIER at the moment @CobKits being out of stock of the lights i need.
 

Budzbuddha

Well-Known Member
UPDATE :

I went with a better option for this conversion ... Quantum Board.
Far easier to refit .... No chunky heatsinks and it will be a mix of passive - active ( dual fan ) cooling . Plus is a perfect fit . I am also adding some CREE XM L2 diodes ( 3750 - 5000k ) on sides of QB.

image.jpg image.jpg image.jpg
 

Tejashidrow

Well-Known Member
Can anyone explain the difference of
Citizen 1212 -v3
Vrs
Citizen 1212-v6??

I can get
5 v3 for $25
1 v6 for $28

Is the
V3 (loosely ) like the Cree 3070
While the
V6 like the Cree 3590 ?

I'm wanting to upgrade one of my mars 300
My flower area has 28 inches head room from soil to top of cab
So I don't think I'll need as much power (?) as say one growing in a tent or room.
And Im planing on leaving the glass in the mars (at least at first) to minimize the chance of sunburn
Yeas I scrog or manifold
Thanks
 
Last edited:
Top