Thermoelectric wine cooler drying and curing - DIY

Hey guys, i just discovered this project this morning and by tonight I've already ordered my kooltron and a probreeze!

I'm thinking about designing and 3d printing a few things that may help and wanted to ask for some feedback on what would be useful.

After reading through the first 5-10 pages and the most recent 10-15, I have a few questions, some print related and other general questions. Apologies in advance for any misunderstandings on my part lol.

Print-related questions:

1. The pro breeze seems to blow upwards, but it seems like people want it to blow at the door. Could a directional diffuser/vent solve this? Seems like it would be an easy design/print if so.

2. If I didn't want to take apart my ink bird, could i just cut a bigger hole, slip the moisture sensor through and make a bigger plug? Also would be an easy print.

3. Curious how people are mounting the silicone mesh mats (these appear to be meta for airflow/flavor). Theoretically, might there be a way to get more layers through 3d printed adapters that fit into the tray slots?

4. Are there any other printable parts that people would find helpful?

currently considering

--nice lil case to seat the dehu in the fridge
--hooks for the inkbird sensor inside and the controller outside
--and an enclosure for any remaining "guts" from the dehumidifier

---

5. General question--Wet/Dry Trim

I have always done the classic dry trim after a 14 day hang the whole plant, followed by a light debuck before a 2-4 day binning stage in the same hanging environment. (As described by exotic genetix big shimmy method on discord).

I originally thought I saw op say he hung for 24-36 hours before cutting to stalks, doing a light debuck to remove any large fan leaves and then proceeding with the .5% incremental adjustment until finish. *could be wrong about where I saw this, I've been reading a lot today lol

However, in later posts I've seen people say they do a full wet trim right on chop day and start the .5% adjustments that day.

I've only ever had bad experiences with day of harvest wet trims, and have even had a bad time with trims that I thought were dry but actually had some moisture left, so I am scared to do a full wet trim.

Instead, I was thinking of doing something more like what I describe above, 24-36hr whole plant hang, then debuck and then start in the fridge. Finally, once I'm dry I'd finish up by trimming the rest of the sugarleaf, and store back in the fridge.

Would that be the safest way to avoid grassy flavor and loss of terps? I have all the time in the world to wait for perfection here haha.

Ok thanks rant over

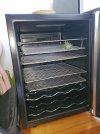
Pic for attention vanilla shaved ice bx1

I’ll try and answer your questions:
1. I’m not sure if it was ever proven to be a bad thing with the dehumidifier fan blowing up, but mine does blow toward the door. A diffuser to change the direction would work, but may not be necessary and take up extra room. I’ve only used the dehumidifier that blows forward, hopefully someone else will answer this one.

2. Yes, I was comfortable taking the Inkbird apart but you can just cut a bigger hole.

3. I used plastic tie wraps to hold the silicon mats to the trays. Easy enough but I’m sure a printed tray or adapters would work and look more professional. I found a dehydrator that has almost the same size stainless trays, an adapter would be perfect for something like that and very easy.

4. I’m not sure printing a case for the dehumidifier is really needed but would look nicer. The reason I removed the case was to make more room for buds, but a smaller case would work. A holder for the Inkbird outside the cooler would be a nice addition.

5. Originally I hung the branches to dry a couple days, then trimmed and into the cooler. Now I do a quick trim and go straight in, mainly getting the fan leaves and large stems out. I clean it up a bit before bagging it up if needed. Either way works fine, I don’t have a good place to hang dry many times of the year, it’s either too hot and humid or too dry, so it goes straight in. I think taking the buds out after drying and while curing to trim will work.
 
TY! - Got it, that all makes a lot of sense, and I appreciate the quick response! Def feeling better about the wet trim now that I've read through the whole thread and that you explained it to me so clearly, ty!

I'll prob go direct into the cooler bc I now understand how it will be just as safe if not safer, and wayyyy more energy efficient to control the dry process of the wet trimmed buds in the cooler vs hanging the whole plant in my tv room and running the big window ac/dehumidifier from my basement all day like I used to. My gf will appreciate having that space be useable and less stinky lol.

I'm almost considering the light pre-cooler trim as a "prepping" stage rather than a full wet trim, just because it's gonna be a lot less trimmed than it would be if I was to actually try to wet trim a plant to get it dried and bagged super quickly... which I've only ever done once, and it was for a buddy who had a bunch of plants, hit a pest scare and had to cut and trim quick.

PRINTING - I decided that I might as well not reinvent the wheel and ended up printing some parametric cable zip tie mounts and wire grommets. figure ill screw the cable tie into the back of the cooler about where you guys mount yours and use that to hold the sensor inside on the back plate. (assuming its ok to screw into that area?)

I'll use the same mount with 3m on the front or side of the fridge and attach the the inkbird with a small print in place carabiner for easy removal. since i'll be stripping the circuit board, there won't be any other guts to worry about for the humidifier, but I am also printing this rasp pi case to hold all the extra bits just in the event I get lazy or decide to keep the circuit board intact to make a warranty return easier.

also made a remix of a "fume extractor" fan holder to use as a low profile case for the dehumidifier. I tilted it backwards slightly to drain nicely into the drainage gutters. Will prob skip the vent on top for now unless I discover that upwards airflow does become an issue.


not sure why these links wont preview like the ones above but:


all parts here.

1 hr 12 mins from now i'll have the basics! (gonna print the fan holder after i make some tweaks)

Screenshot 2025-05-18 233612.png

Screenshot 2025-05-18 212908.png

also gonna figure out the mounting system for the metal dehydrator trays, I like @Spacebucketcr 's solution with the dowels and would love to take a look at the rack/slide mount points to see if I could implement something similar to get more rows of the steel dehydrator trays. who knows how far I'll get with it tn lol but if anyone can take calipers to the trays or the slots I'd love to get some data to design off while I wait for my cooler to get here.

ALI EXPRESS PELTIER UNITS? - I just found these replacement peltier assemblies on AliExpress, and idea if any of them would theoretically work as good or better and if so what else one would need to make them work? Just the appropriate power supply based on the specs of the Peltier? Since I'm starting out I could be interesting in trying one of these, I'm not looking to dry faster but maybe just have a little extra power avoid the chance of freezes and have optimal airflow at a lower price.

The cheapest one is $3.99 on sale for me rn lol. If that one is as good as the pro-breeze and you guys think it won't burn my house down I may have to say screw it and return the one I ordered on Amazon lol.

(Edit, these links only work in the app and might be regional but you can Google the product listing or reverse search the images and find them)

$48.77 | A18R -1PCS 200 X 115 X 8.5Mm 120W Thermoelectric Peltier Refrigeration Semiconductor Cooling System Kit Double Fan

Screenshot_20250518-220141_AliExpress.jpg

$14.59 | XD‑35 12V 60W Thermoelectric Peltier Plate Module Cooling System DIY Kit for Small Space Cooling
Screenshot_20250518-220201_AliExpress.jpg

$16.12 | SR-01 5V Thermoelectric Cooler Peltier Elemente Module 40*40MM 5V Semiconductor Refrigeration Chip Easy to DIY/Assemble
Screenshot_20250518-220215_AliExpress.jpg

DESSICANT - also saw some people asking about desiccant. I'd personally stay away from it as it seems unnecessary, but for anyone who wants to experiment, I wonder if something like this may make for a more efficient system, or if it would just introduce another weird element and potential chemical off-gas.

https://www.printables.com/model/661165-drybox-dessicant-holder-with-120mm-fan

pxl_20231126_231625825.webp

ok rant over again lol more to come soon!!

time to kick back and reward myself with a nice dab on the m22 escc while I babysit the first layers of the humidifier stand!!

20250519_000953.jpg

[not sure about rules for links around here so if i need to remove those pls lmk and i will!]
 
Last edited:
Back
Top