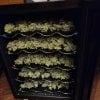
Thermoelectric wine cooler drying and curing - DIY

Hook Daddy

Well-Known Member
I like this for sure! Where did you place the ac infinity probe? I drilled a hole right below the dehumidifier. Sometimes I feel this dehuey is not strong enough.. has anyone ever had mold using these? Have not had any bud to dry yet lol View attachment 5411497
I have never heard of anyone getting mold in one of these, and unless there was already mold in the buds it would be quite difficult to start. The dehumidifier is more than capable of removing the moisture too fast if you want it to, I keep it slow so the dry takes 2-3 weeks.
 
Your setup sounds pretty slick, though. I can imagine the relief of finding a solution that works for you. Thanks for sharing the details – I'm sure it'll help others facing similar problems.
 

xYEETMANx

Member
I have never heard of anyone getting mold in one of these, and unless there was already mold in the buds it would be quite difficult to start. The dehumidifier is more than capable of removing the moisture too fast if you want it to, I keep it slow so the dry takes 2-3 weeks.
Where did you place your RH/temp probe in yours to get the most accurate reading in RH?
 

SouthFloridaGenetics

Well-Known Member
Humidity slowly but surely going down. Took a bit to figure out the right set point and calibration but I tried to match the inkbird to the wireless sensor and figured that if I set the SV on the inkbird too low, the dehumidifier was probably freezing since the rh would remain steady. Def would’ve hang dry for a day or two before if I had time but i had to do it like this
View attachment 5389871
AYo Mate! Can you give us an update on the Cannatrol? Give us some juicy details about it and about the weed please!
 

Hook Daddy

Well-Known Member
Where did you place your RH/temp probe in yours to get the most accurate reading in RH?
I didn’t really test any other position than my original one, which was about half way up level with the bottom of the fan I guess. There’s pictures in the thread of exact positions. I mounted it on the right side looking from the front. It was mounted so it was just below the shelf above but not touching. It made it easy to not let buds touch the probe.
 

Tony9d9ct

Active Member
AYo Mate! Can you give us an update on the Cannatrol? Give us some juicy details about it and about the weed please!
I'm running the Hookatrol also, Koolatron with Pohl Schmitt, a week in. I've always had varying temp and rh being in the Northeast and have been pretty hit or miss with my drying. After a week honestly I can still smell alot of them good scents that you smell on the plant but not after dried and cured, if that makes sense. Its a home run for me especially for under 300 for everything. I'm building a second one for long term storage so I have a dedicated dry and cure, and a storage unit for when I have another harvest to dry. I lurked on here for months, almost bought the 1800$ unit, but I'm glad I built this thing it's been great so far.20240728_084255.jpg
 

Tony9d9ct

Active Member
Where did you place your RH/temp probe in yours to get the most accurate reading in RH?
I have mine double sided taped to the side like in the pic, but it's parallel to the shelves and just under the bottom of the shelf, so there's space around it. I also make sure to keep buds away from it a little bit. You don't want it touching. I'm using a wifi hygrometer with a smart outlet for the dehu tho but I do like this location.Screenshot_20240728_141125_Gallery.jpg
 

Asey1

Member
So after reading for weeks and planning everything i finally bit the bullet and bought a wine fridge.

As im from Austria and the used market was pretty slim or for really high end fridges, i was lucky that the model i wanted (Klarstein Barolo 15) was on sale on ebay and i got it for around 160 Euros (well probably ill even get 20% back because the door was misaligned and thats what they offered me if i dont want to return it)

Anyways, as the unit was new and i wanted to keep my warranty i was looking for ways to get the job done without having to make a hole in it. Also it was kinda hard to tell where you could put a hole in it without damaging it or hitting the coolant. Luckily i was able to do it and maybe for some people in the german market or somebody looking at the same model it might be a useful guide.

1.jpg

This is how the unit looked new. I started to strip everything away and started to look for some ways inside. On the next picture (i didnt do a before picture) you can see the place where i was able to pull through 2 sturdier cables and the Inkbird sensor (i did it the other way around, i removed the sensor case, because the connector there is smaller then on the Inkbird unit itself)
The 2 others cables were already there (guess for the fan?) and thats why i decided to try it there.

2.jpg

First i had to remove the screws from the back plate inside the fridge as you can see here

3.jpg

I just unscrewed the 4 outer screws and the 4 in the middle are the ones that the heat sink is connected to. After that i was able to move the whole heat sink in the back a little bit inside to make space for my cables and the sensor.
This step is probably best done with another person! There is kind of a sweet spot, where the cable or sensor fit through but you can just push it in a little bit, because the angle you're holding the heat sink doesnt allow to move it further.
After you got the cables and sensor to a point where they don't move further in, you can move the heat sink a little bit again to make space for the cables and sensor.
When you get "stuck" again, move the heat sink a little bit and push/pull the cables again. Its a balance game but sooner or later you will have the cables inside.
As the sensor cable was too soft i connected it to my sturdier cable which was already pushed through and pulled them together inside of the fridge. And again, trust me, if you have somebody who can help you, let them it will be much easier and faster.
So with everything in place i connected the dehumidfier (still tryin to figure out what to do with the cables, that was just for testing purposes)

5.jpg

On the back side i just put my cables and the sensor cable next to the 2 cables that where already there, pulled them through the black plastic housing (funily, there was already a whole on the left bottom corner (maybe they use it for the bigger unit too) where i could pull my power cables and sensor through and then i connected everything in the back.
I also cut the power cord from the dehumidifier and made a direct connection to my cables so i dont have a long cable bouncing around and beeing in the way. Inside the black housing there was also enough space where i could "roll up" the sensor cable and hide it inside.

7.jpg4.jpg

The inkbird unit is the perfect size where you dont need any adhesive or anything else to hold it in place, no matter what side you "squeeze" it in.
I used the "right" side for it, because its opposite from opening the door.
In this case you always have this side facing outwards so if you dont have the wifi version, you can have a quick glance through the grills on the side and see your RH.
For the inkbird power connector i used double sided tape and thats about it. I screwed everything back together and even the grill had space which i didnt really think it would. Here is another before and after and honestly it turned out much better than expected.
Im definately gonna make it "prettier" inside before i use it, but im very happy how the back turned out with everything in place.

1.jpg6.jpg

I hope i was clear enough as english isnt my main language, but if anybody has question or is german speaking and needs advice with this model, just shoot me a pm or ill try to answer here.

And a big f**** shout out and thank you to you hook daddy for doing all this work and testing. Without you, nobody would be here today!
 

Hook Daddy

Well-Known Member
@Hook Daddy Just how dense do you pack your shelves? I've got this puppy loaded up more than it's been loaded up before. It's currently set at 54°F and 78.5%

View attachment 5412140View attachment 5412141View attachment 5412142View attachment 5412143View attachment 5412144
I’ve had it about that full before, your settings should be good, just step down slowly the first few days, and watch the drip tray it will fill up multiple times daily. Looks like a nice harvest!
 
  • Like
Reactions: TCH

TCH

Well-Known Member
I’ve had it about that full before, your settings should be good, just step down slowly the first few days, and watch the drip tray it will fill up multiple times daily. Looks like a nice harvest!
I got the first 3 trays in last night and I've soaked the water out of the tray a couple times already. Not gonna lie,I'm glad the 4th plant in my tent was a little bit of a runt. I don't think I could have fit another 10 nugs in there, let alone another half a plant worth. Haha
 

MRobi

Member
So I'm on day 10 of my first dry in one of these. Started at 80%RH/55F and have been stepping down by 1%RH daily. Drip tray filled a lot initially and even spilled over a few times but that seems to be under control. Currently at 70%RH/55F

I'm wondering what others experience has been around smell. I open the door to the fridge and I'm hit with that freshly cut grass smell and not the nice dank smell of weed. Meanwhile the rest of this crop that's in the tent in a hanging drying rack has a great smell. When do you find the smells start coming out?
That hay smell is chlorophyl breaking down. Give it time and keep stepping down the RH and that hay smell should start to go away.
 

Foilcard

Member
Is it normal for humidity to rise as the empty cooler is cooling? Here is a pic of my stats when I turned on my koolatron rig. Does that seem normal?1000008124.jpg
 
Is it normal for humidity to rise as the empty cooler is cooling? Here is a pic of my stats when I turned on my koolatron rig. Does that seem normal?View attachment 5412406
Check to make sure its actually draining. I had an issue where my RH was going up and it was because it wasn't on level ground and was tilting forward a bit causing the water from the dehumidifier to collect on the floor of the fridge and not drain causing the humidity to raise. Granted I had some flower in there but that is the only thing I can think of.
 

Nugnewbie

Well-Known Member
Relative humidity (RH) (expressed as a percent) also measures water vapor, but RELATIVE to the temperature of the air. In other words, it is a measure of the actual amount of water vapor in the air compared to the total amount of vapor that can exist in the air at its current temperature.

Cooler air can't hold as much moisture. So, decreasing the temperature will increase relative humidity, not the actual amount of moisture in the air.
 

billiam77

Member
Just a heads up for the cheapskates like me, the vivosun dehumidifier is the same as the pohl dehumidifier except for the on/off button and is a little cheaper when bought on amazon. I have made three of these koolatron bud coolers and love them, and will advise anyone going through the trouble to package the inkbird under the back cover AND cut the power cord on it and splice it into the power cord for the koolatron so you need only one outlet, did that on my second and third one, but cleaner install and will do that to my first one once its empty.
 

madcash

New Member
Ok so I just found this thread last week and pulled the trigger on all the parts and have now inadvertently run an experiment to see how much water the dehu pulls out vs the fridge itself.

I’m going out of town for a week on Saturday and was freaking out about drying my purple lemonade auto that was just ready for harvest and so searching found this thread - thanks to Hook Daddy and everyone for all the valuable info.

Unfortunately, when I received the Koolatron from Amazon. It was obviously used / open box with scratches everywhere and all of the shelves just thrown inside. I initiated a return to Amazon to get a new one but the clock was ticking so I decided to just use it without drilling the hole in the back so I could return it and just chuck the dehu in there with the cables for it and the sensor coming through the door. It still seals well around it and I think the loss of seal is negligible.

In any case, I decided to just try and fit everything in two shelves and worry about doing a proper build until my new unit arrives.

IMG_8911.jpeg

I did a bud wash and wet trim and threw it all in starting at 55f / 65%rh since I wanted to dry the excess water from the wash more quickly than Hook’s recommended 55f/76%rh to start.

Everything seems to be working as expected with the temp going btw 55-59f while the rh bounces btw 61-70%.

When I woke up this morning I checked the drain catch for the cooler and it was almost overflowing - awesome. Then I checked the dehu reservoir and there was barely enough water to cover the entire bottom of it. So not much at all. I couldn’t measure how much was in the runoff from the fridge itself but I’d estimate it’s 4-5x more than the dehu reservoir.

I know there’s been discussion of how much the dehu is necessary vs just a heater so I thought this was an interesting data point. There was also no ice buildup at all on the dehu fins.

I’m not sure the results would be the same for a full load of fresh flowers but it definitely appears that the fridge is doing the lions share of the moisture extraction.

I still have questions and would like to see what would happen if just a heater was used, something like a small reptile heating pad with minimal power draw. I also wonder if the dehumidifier casing acts as an insulator to prevent the peltier from freezing up. Also, when the dehu does freeze up, does it prevent it from working as a heater, which then affects the fridge and stops it from pulling moisture, as Hook Daddy has observed in an earlier post.
 
Top