CFL Stealth Cabinet 1st Grow

SmokeyMcPotJK

Active Member
First, 4/20 day highlights.
Big Soil Upgrade:
I went out to the hydro shop and got a bag of Fox Farms Ocean Forest
Temp Reduction:
Forgot we put the fans on half speed so I was able to increase them to full speed to lower the temp.
Because of this I was able to add 2 more bulbs. I can still fit 2 more but 14 is good for now.
so 23k+ lumens
Temp is staying at 81 tops

Grow notes
4/20:
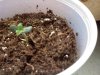
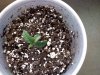
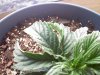
Second baby broke soil
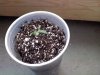
The first to break soil is in the darker soil (MG organic garden mix)
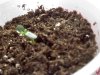
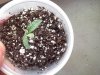
The second to break is in dollar store potting mix.
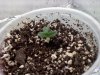
Third has not broke soil but its potting mix on top MG organic gardening mix on bottom
 

Attachments

SmokeyMcPotJK

Active Member
4/21
Pic's..tipped the first to sprout over on accident after the 4/20 pics but before these. It just lost a little dirt from the top and got a little shocked im sure but I straightened it up gently with a little dirt and it should live.

The mg plant, first to break, in darker soil has...1 wierd embryo leaf that is sickly looking and one big one. I think its a little retarded. It also has a purple stem. <--Not incurred from tipping the plant it just grew like that.

I think I sewed the one that hasn't broke soil to deep. I gently dug down a little bit until I saw the very top of a little curved root and then misted the soil. Lets see if this will help it pop. I

Here is a side view and top view of both..
 

Attachments

SmokeyMcPotJK

Active Member
By the way the 3rd seed didnt make it. I think I planted it to far down. It hadn't germed yet midday. When I was messing around with the DIY CO2 in the cabinet I knocked the dud over so its dead for sure now.
 

TalonToker

Well-Known Member
Hey Smokey, it looks like you've got a lot going on there for a first grow. Like I already mentioned, I am in no way an expert, but I'll be glad to try and help out where I can.

First off, we have already touched on the subject of lumins. Since you are adding co2, if I were you, I would shoot for 3500/square foot. This might allow you to reduce your number of cfls which will help out with your heat issue. If you can possibly afford, and fit, a small fan blowing up onto your lights, this will also greatly help to disperse the heat.

Regarding your humidity situation, a heat lamp creates heat by 'burning' the air. This will signifigantly lower the humidity. Hopefully, as the season changes and it warms up you won't need this anymore. Such a low humidity will be great for flowering, but as you seem to already know, it's not good for seedlings. Until you plants reach about 4 inches, I wouldn't be afraid to mist them with aged water about twice a day. A good way to raise the humidity level is to put a bucket of water in there. If there is not room, use glasses of water, or whatever you can fit.

Regarding your soil, I feel for you about having problems with MG as I have had issues with it as well (check out my journal). I know that a lot of people seem to love the Fox Farm, and I'll admit I've never used it, but I'd like to share two negative things I've heard about it. 1) As I'm sure you know it is very expensive as far as soil goes. 2) It is packed with nutrients just like MG: maybe not as strong as MG, but Pete (the CH9 breeder) advised me to avoid it for that reason. I'm currently having great luck with Scotts Premium potting soil (available at Home Depot). It's very cheap, low in nutrients (but still plenty enough for the first 3-4 weeks of growth), and has a desirable ph right out of the bag (MG's ph out of the bag can be anywhere from 5.0 to 7.0).

Sorry about the long post, I promise I'll never do it again in your thread. I also want to apologize if I mentioned anything you already know--my bad. I really like what you got going on.--Subscribed!
 

SmokeyMcPotJK

Active Member
Hey Smokey, it looks like you've got a lot going on there for a first grow. Like I already mentioned, I am in no way an expert, but I'll be glad to try and help out where I can.

First off, we have already touched on the subject of lumins. Since you are adding co2, if I were you, I would shoot for 3500/square foot. This might allow you to reduce your number of cfls which will help out with your heat issue. If you can possibly afford, and fit, a small fan blowing up onto your lights, this will also greatly help to disperse the heat.

Regarding your humidity situation, a heat lamp creates heat by 'burning' the air. This will signifigantly lower the humidity. Hopefully, as the season changes and it warms up you won't need this anymore. Such a low humidity will be great for flowering, but as you seem to already know, it's not good for seedlings. Until you plants reach about 4 inches, I wouldn't be afraid to mist them with aged water about twice a day. A good way to raise the humidity level is to put a bucket of water in there. If there is not room, use glasses of water, or whatever you can fit.

Regarding your soil, I feel for you about having problems with MG as I have had issues with it as well (check out my journal). I know that a lot of people seem to love the Fox Farm, and I'll admit I've never used it, but I'd like to share two negative things I've heard about it. 1) As I'm sure you know it is very expensive as far as soil goes. 2) It is packed with nutrients just like MG: maybe not as strong as MG, but Pete (the CH9 breeder) advised me to avoid it for that reason. I'm currently having great luck with Scotts Premium potting soil (available at Home Depot). It's very cheap, low in nutrients (but still plenty enough for the first 3-4 weeks of growth), and has a desirable ph right out of the bag (MG's ph out of the bag can be anywhere from 5.0 to 7.0).

Sorry about the long post, I promise I'll never do it again in your thread. I also want to apologize if I mentioned anything you already know--my bad. I really like what you got going on.--Subscribed!
Thanks for stopping by. Please post as often as as long of posts as you like.
Fan:
I need to look into getting a small fan. The only problem is I got everything hardwired meaning there are no plugs in the box. If I do take out 2 blubs I could put a socket to plug converter and throw a fan in there. I will keep my eyes open for like a personal desk fan or something.
Humidity:
My felt trick was working pretty well but I don't have a spot for it right now. If you place the bottom of a piece of felt in a container of water and place the top near a fan that will create pretty good humidity. The intake fan is all the way at the bottom and I can't place anything in front of it or the temp goes up. The fan on top of the black box is always on so what I will probably do is hang the felt up under that and just spray it once in a while.

Thanks again for your post. Post anything anytime I don't mind. Its lonely talking to yourself, lol.
 

SmokeyMcPotJK

Active Member
For Humidity, what if I placed a clear container of water in the box, sealed with just a small hole at the top. Wouldn't this create good humidity? Or would an open container work better? I figure if it was closed mostly and under the light the heat inside the container would get higher then normal and create more evaporation?

4/22
Added smoke alarm in my grow area.
Watered the 2 little plants. One for the second time (potting mix) it was super dry, must have good drainage. One for the first time (mg organic gardening)


UPDATE TO FIRST POST ON THREAD
seems I cant edit posts made before the website 'upgrade' so.....
I am not going to use rockwool in the future I am going to germ in paper towel and sew right into my finishing pot so I don't lose time transplanting.
 

TalonToker

Well-Known Member
I would try to put as large of a container of water as possible in there. I have low humidity issues as well, and I keep a big bucket full of water right next to my plants. It makes a huge difference. If you use a container that is mostly sealed, I would be concerned that if the water reached temps much above 80, then this would add to your heat issues. I would try an open container first, and even then I would monitor the temps of the grow area and the water closely at first.

On editing posts, I believe that there is either a time limit, or maybe you just can't do it after so many other posts are made in that same thread. I noticed this before the software upgrade. I guess my point is that if you need to edit, you will need to do it as soon as possible.

On starting your seeds off in large pots, beware. It is a lot more difficult to keep from over/under watering when you do that. If you start your babies off in small pots that are slightly smaller at the bottom then they are at the top, transplanting is a piece of cake. The trick is to do the transplant the day after watering. The wetness will keep the soil together. Just don't try it when the soil is too wet, as then the plant won't want to come out. I tried to demonstrate using an empty pot. If you grab the pot as shown, then just flip it over and give it one good smack on the bottom, the plant comes right out with all of the soil intact. There is virtually zero shock to the plant. I found out the hard way that this is much easier than starting in large pots.-Peace
 

Attachments

SmokeyMcPotJK

Active Member
I would try to put as large of a container of water as possible in there. I have low humidity issues as well, and I keep a big bucket full of water right next to my plants. It makes a huge difference. If you use a container that is mostly sealed, I would be concerned that if the water reached temps much above 80, then this would add to your heat issues. I would try an open container first, and even then I would monitor the temps of the grow area and the water closely at first.

On editing posts, I believe that there is either a time limit, or maybe you just can't do it after so many other posts are made in that same thread. I noticed this before the software upgrade. I guess my point is that if you need to edit, you will need to do it as soon as possible.

On starting your seeds off in large pots, beware. It is a lot more difficult to keep from over/under watering when you do that. If you start your babies off in small pots that are slightly smaller at the bottom then they are at the top, transplanting is a piece of cake. The trick is to do the transplant the day after watering. The wetness will keep the soil together. Just don't try it when the soil is too wet, as then the plant won't want to come out. I tried to demonstrate using an empty pot. If you grab the pot as shown, then just flip it over and give it one good smack on the bottom, the plant comes right out with all of the soil intact. There is virtually zero shock to the plant. I found out the hard way that this is much easier than starting in large pots.-Peace
Thanks again for the advice. I often think I can do things that are to hard for my skill level. If most all guides say to transplant it probably best to do that. At least at first. I've read a few..probably more advanced posts that say transplanting slows down growth a few days to a week each time because the plant needs some time to recover from the shock and take root in its new container before growth resumes. So they recommend to start in your finish pot.
I watched a great video today. It showed the transplant process in detail. Jorge Cervantes Ultimate Grow. That's the guy who wrote Marijuana Horticulture: The Indoor/ Outdoor Medical Grower's Bible. Which, silly fact, is used as the text book at Michigan's Marijuana University.

Thanks for the pics anyway. Nice of you to go out of your way to help.
 

TalonToker

Well-Known Member
Yeah, I've seen the Jorge video as well. I agree, it is very helpful. Another one that I really like is the high times video called "Ready, Set, Grow!" which can be seen on youtube.:-P

I used to be afraid of transplanting too, but after having so many problems form starting plants in their 'final home' I finally got up the nerve to attempt transplanting. The first attempt was a little shaky, but by the second time I had it down. Now I firmly believe that if you do screw it all up and loose a couple of days of growth from the shock of transplanting, it's a lot better than losing 3 or 4 days every other week until your plant grows into its larger pot. Anymore, if any of my plants do experience any shock from transplanting, it is so negligent that it is not even noticable.:weed:
 

SmokeyMcPotJK

Active Member
Yeah, I've seen the Jorge video as well. I agree, it is very helpful. Another one that I really like is the high times video called "Ready, Set, Grow!" which can be seen on youtube.:-P

I used to be afraid of transplanting too, but after having so many problems form starting plants in their 'final home' I finally got up the nerve to attempt transplanting. The first attempt was a little shaky, but by the second time I had it down. Now I firmly believe that if you do screw it all up and loose a couple of days of growth from the shock of transplanting, it's a lot better than losing 3 or 4 days every other week until your plant grows into its larger pot. Anymore, if any of my plants do experience any shock from transplanting, it is so negligent that it is not even noticable.:weed:
Good advice. I'm sold. I will get transplant practice in on my 2 new bag seedlings before I do the northern lights. The bag seedlings are in party cups now so they will be going to bigger pots in like a week Im guessing.
Also I will check out ready set grow and Im watching the jorge cervantes ultimate grow 2 tomorrow prob.
 

SmokeyMcPotJK

Active Member
Plant Update
Heat is still to high. Got some ideas to fix that. I will try them out tomorrow along with posting pics.
First born...bigger one...sad from heat. Leaves curled upwards at the edges.
Second born...seedling..mg organic gardening soil...looks 'special' (its looked wierd from the start.)
Third born...seedling...generic potting mix...looks good

Pics coming up tomorrow
 

SmokeyMcPotJK

Active Member
4/24
Watered all plants well. Gave big plant a good dampening with 20-20-20 then a good amount of seltzer water then water.
Disconnected heater and removed 2 bulbs
Almost time to transplant little guys? Roots are at the bottom, not a lot yet.

Pics the 2 little guys then root shots then the big guy

p.s. I know you should not use clear party cups cuz roots dont like light. However its good for me for learning so I can see how fast the roots grow down. Also I have seen a ton of really good growers use them. In the future I will prob switch to non clear ones.
 

Attachments

TalonToker

Well-Known Member
4/24
p.s. I know you should not use clear party cups cuz roots dont like light. However its good for me for learning so I can see how fast the roots grow down. Also I have seen a ton of really good growers use them. In the future I will prob switch to non clear ones.
I've got a great tip for you on this that I can't take credit for as I read it in someone else's journal (can't remember who's jounal specifically). When you hear this I bet you think exactly what I thought which was "OMFG!! So simple, yet supra-genius! I must be a complete idiot for this to not be common sense for me." I'm not even trying to say anything negative about you as I really did think that! Go buy some party cups that are the same brand, same size, same everything as your clear party cups, with the only difference being that they are not clear. Cut some holes in the bottom of them and put your clear cups into the non clear cups and violla!! You will have solved the problem of keeping the roots in the dark and you can then simply remove the clear cups whenever you want to check out the roots.

Depending on has fast they are growing you probably have a good week or two before they will need transplanting, but it's definately time to start thinking about it.--P
 

SmokeyMcPotJK

Active Member
I've got a great tip for you on this that I can't take credit for as I read it in someone else's journal (can't remember who's jounal specifically). When you hear this I bet you think exactly what I thought which was "OMFG!! So simple, yet supra-genius! I must be a complete idiot for this to not be common sense for me." I'm not even trying to say anything negative about you as I really did think that! Go buy some party cups that are the same brand, same size, same everything as your clear party cups, with the only difference being that they are not clear. Cut some holes in the bottom of them and put your clear cups into the non clear cups and violla!! You will have solved the problem of keeping the roots in the dark and you can then simply remove the clear cups whenever you want to check out the roots.

Depending on has fast they are growing you probably have a good week or two before they will need transplanting, but it's definately time to start thinking about it.--P
Damn man. You are right. That blew my mind. Seriously its like 'why did I not think of thank'. Lol. Nice! Great advice. I will do that.

Updates:
The temp is down to around 79-80. Got 1 more idea I think I will try tomorrow and that is trying to find like a rack shelf to put on the bottom of the box. Like a little table almost. Reason being, the intake fan is at ground level and the big planter is blocking the natural airflow.
Also I got the big plant placed really close to the lights now. Right in the open spot between a cluster so there is light within around 1 inch from all sides of the plant. I will see how thats going in the morning.
 

TalonToker

Well-Known Member
I like the rack idea. On your plant that is surrounded by lights, just make sure that is has room to grow without growing into any of the lights.-P
 

SmokeyMcPotJK

Active Member
I like the rack idea. On your plant that is surrounded by lights, just make sure that is has room to grow without growing into any of the lights.-P
The temp problem seems to be solved. It was the planter blocking the air flow. Man some things are just so easy and you think way to far into it. I put the planter up on a rectangle tupperware container that is the same length as the bottom of the pot but the width is smaller. So I put the small side facing the fan so there would be less air being blocked. Its 75 now! My new favorite guy, Jorge, says 72 -76 so I am happy to be in the range now. If I do go with the rack idea that will be better. Virtually none of the air flow will be blocked. Then Maybe I can add a couple more lights back in.

Also, I just checked on the plant and I will check it first thing in the morning to make sure its not getting to close to lights. Their 4 hours of night is coming in a couple hours and I will be up not to long after that so Im sure it will be fine. If it does grow real close to the lights overnight that would rock.

Lastly, the growth of the big plant is weird. It is super compact and their are little leaves in the middle under other leaves. There is just leaves on top of leaves. I read compact is good but this seems excessive.
 

TalonToker

Well-Known Member
Lastly, the growth of the big plant is weird. It is super compact and their are little leaves in the middle under other leaves. There is just leaves on top of leaves. I read compact is good but this seems excessive.
This takes us back around to the lumins issue. A lot of light encourages growth, but all those lumens keeps the plant from needing to stretch for the light. Just raise the lights a little bit, say 2-4 inches above the tops. This gives you control over how much they stretch. One inch between the nodes is ideal. When you start flowering your babies, that's when you move the lights in to 1 inch, or as close as possible without causing burning.-P
 

SmokeyMcPotJK

Active Member
This takes us back around to the lumins issue. A lot of light encourages growth, but all those lumens keeps the plant from needing to stretch for the light. Just raise the lights a little bit, say 2-4 inches above the tops. This gives you control over how much they stretch. One inch between the nodes is ideal. When you start flowering your babies, that's when you move the lights in to 1 inch, or as close as possible without causing burning.-P
Thanks again. I was trying that for a couple weeks. It is responding well with the lights around it like they are now. It looks alot healthier in general. I will have to post a pic tomorrow. I will probably move it further from the light tomorrow.
Man I f__d this round all up, lol. Good thing it was a practice run.
Also one of the babies is looking good. real good. I will get pics up tomorrow
That one other baby is still wierd looking. Dark leaves with purplish tint and stem is purple. Couldn't find that when looking for deficiency. Maybe its genetics maybe its soil idk. We shall see how it grows up
 

monkeybones

Well-Known Member
4/21

The mg plant, first to break, in darker soil has...1 wierd embryo leaf that is sickly looking and one big one. I think its a little retarded. It also has a purple stem.
Minor mutations are common in cannabis plants, but it rarely causes detriment to the plant in the long run. The plant's genetics ultimately determine its health in maturity. At worst mutations will slightly slow the period between seed and maturity. Of my AK-48 seedlings, the only one that had extreme difficulty leaving its husk and suffered a bent stem mutation actually turned out to be my greenest, healthiest, sexiest (pistils) plant. If not the biggest. :mrgreen: Could be strain specific. A couple of my mystery plants had some very bright purple fanleaf stems in their mature stage. Not sure 'bout seedlings.

I've got a great tip for you on this that I can't take credit for as I read it in someone else's journal (can't remember who's jounal specifically). When you hear this I bet you think exactly what I thought which was "OMFG!! So simple, yet supra-genius! I must be a complete idiot for this to not be common sense for me." I'm not even trying to say anything negative about you as I really did think that! Go buy some party cups that are the same brand, same size, same everything as your clear party cups, with the only difference being that they are not clear. Cut some holes in the bottom of them and put your clear cups into the non clear cups and violla!! You will have solved the problem of keeping the roots in the dark and you can then simply remove the clear cups whenever you want to check out the roots.
+rep for that man, fantastic idea. I will definitly do this for clones! So simple and brilliant. :eyesmoke:

4/24
Watered all plants well. Gave big plant a good dampening with 20-20-20 then a good amount of seltzer water then water.
Disconnected heater and removed 2 bulbs
Almost time to transplant little guys? Roots are at the bottom, not a lot yet.

Pics the 2 little guys then root shots then the big guy

p.s. I know you should not use clear party cups cuz roots dont like light. However its good for me for learning so I can see how fast the roots grow down. Also I have seen a ton of really good growers use them. In the future I will prob switch to non clear ones.
Everything is looking pretty good! Keep it up.
 
Top